Redux 应用: 在 React 中使用 redux 的 3 种 方式 + 异步更新 + 中间件(TS实现)
文章目录
前言
本篇来分享三个在 react 项目中使用 redux 的三种方式,以及异步状态更新、中间件开发等使用方法。全部实验基于 TS 的实现版本。
正文
0. 依赖管理
redux 的基础包就用原名
$ yarn add redux
对 react 的支持则提供了 react-redux 包
$ yarn add react-redux
要支持对异步更新的操作则会用到 redux-thunk、redux-action、redux-sega 等;本篇仅为 react-thunk 做介绍
$ yarn add redux-thunk
下面马上进入代码环节
1. Redux 全局状态对象定义
有关 Redux 的基础概念可以参考以下,本篇就不再过多说明,主要目标在于分享 redux 的用法而已:
1.1 Reducer 更新函数
本篇创建一个简单的计数器做示例
首先我们先定义一个更新状态的 Reducer 逻辑
/src/timer/reducer.ts
export const timerReducer = (
  state: TimerState = 0,
  action: TimerAction
) => {
  switch (action.type) {
    case 'INCREMENT':
      return state + 1
    case 'RESET':
      return 0
    default:
      return state
  }
}
计时器的状态只有一个就是计数的数字本身
export type TimerState = number
而可接受的动作有两种,分别是递增(INCREMENT)和充值(RESET)
export type TimerActionType = 'INCREMENT' | 'RESET'

export type TimerAction = {
  type: TimerActionType
  payload?: Object
}
1.2 actionCreator 更新函数工厂方法
接下来我们为两个 action 定义两个用于生成操作的工具函数
/src/timer/actions.ts
// action creators
export const incrementAction: ActionCreator<TimerAction> = () => ({
  type: 'INCREMENT',
})

export const resetAction: ActionCreator<TimerAction> = () => ({
  type: 'RESET',
})
1.3 store 创建全局状态中心
最后就是创建我们要使用的最终状态中心 store
/src/timer/index.ts
import { createStore } from 'redux'

export const createTimerStore = () => {
  return createStore(timerReducer)
}
2. 基础用法(同步状态更新)
有了 store 对象之后,相当于是创立了一个独立于 React 组件之外的全局状态管理器,接下来我们就要让组件依赖于这个 store 的状态来进行渲染
接下来我们会介绍三种运用 redux(也就是使用 store) 的方式
2.1 直接使用 store 对象本身
第一种方法是直接使用 store 本身,透过调用 store 本身的 API 来获取和更新状态
2.1.1 store 自带 API
首先我们要介绍的是,当我们使用 createStore 创建出来的 store 对象拥有三种可以调用的 API
store#getState()
store#dispatch(action)
store#subscribe(callback)
getState很简单就是获取当前状态的dispatch(action)则是提交状态更新操作(action)的方法subscribe(callback)则是用于订阅状态更新的方法
2.1.2 组件代码示例
接下来我们就可以利用这三个 API 来完成依赖于全局状态的组件
/src/basic/Basic.ts
首先我们先创建一个全局 store 对象
const store = createTimerStore(true)
接下来我们在组件构造函数保留全局状态,并对全局状态进行订阅
class Basic extends Component<{}, { count: TimerState }> {
  constructor(props: {}) {
    super(props)
    this.state = { count: store.getState() }

    store.subscribe(() => {
      this.setState({ count: store.getState() })
    })
  }
同时为两个 action 定义/封装两个状态更新函数
  increment() {
    store.dispatch(incrementAction())
  }

  reset() {
    store.dispatch(resetAction())
  }
最后就是根据保留到当前组件 state 的全局状态进行渲染并挂上相关更新函数
  render() {
    const {
      state: { count },
      increment,
      reset,
    } = this

    return (
      <div>
        <h2>Basic Usage by Observer</h2>
        <div>count: {count}</div>
        <div>
          <button onClick={increment}>increment</button>
          <button onClick={reset}>reset</button>
        </div>
      </div>
    )
  }
}

export default Basic
如此依赖就完成对于全局状态 store 的调用
2.2 使用 react-redux 关联到 Class 组件
然而直接使用 store 对象的 API 其实还是有些麻烦。
全局状态的概念让我们不禁想到了 Context 上下文的概念。实际上 Context 就是一个很好的全局状态的载体,透过 Context 来传递 store 全局状态恰恰好
2.2.1 Provider 挂载全局状态
首先我们需要将 store 对象放到所有需要共用状态的共同根组件上
/src/App.ts
import { Provider } from 'react-redux'

const store = createTimerStore()

export default function App() {
  return (
    <div>
      <h1>React Redux</h1>
      <Provider store={store}>
        <Class />
      </Provider>
    </div>
  )
}
2.2.2 connect 高阶组件状态映射
使用了 react-redux 的 Provider 来挂载 store 之后,react-redux 还提供了另一个方法:connect 高阶组件让我们能够使用 store 对象数据
connect 方法的标签如下
connect(mapStateToProps, mapDispatchToProps)(component)
mapStateToProps相当于是把 store 中的状态映射到 props 属性上mapDispatchToProps则是将封装好的 action (调用 dispatch 方法)映射到 props
也就是说用了 connect 高阶组件之后,我们就可以像是使用 props 传递状态一样直接从 props 拿到状态(state)和动作(action) 了
2.2.3 mapStateToProps 映射状态
首先我们先定义状态的映射逻辑
/src/class/Class.ts
const mapStateToProps = (state: TimerState) => {
  return { count: state }
}
函数必须返回一个对象,它会将这个对象与原本的 props 对象进行合并
2.2.4 mapDispatchToProps 映射更新函数
第二个则是将 redux 相关的更新函数封装到 props 属性下
/src/class/Class.ts
const mapDispatchToProps = (dispatch: Dispatch<TimerAction>) => {
  return {
    increment: () => {
      dispatch(incrementAction())
    },
    reset: () => {
      dispatch(resetAction())
    },
  }
}
2.2.5 Class 组件本身
最后是我们的类组件,它使用 store 里面的状态的方法就是直接从刚刚写好的映射到 props 的方式来获取,具体的更新逻辑也是从 props 来拿
/src/class/Class.ts
interface TimerProps {
  count: number
  increment: () => void
  reset: () => void
  incrementAsync: () => void
  resetAsync: () => void
}

class Class extends Component<TimerProps> {
  render() {
    const { count, increment, reset, incrementAsync, resetAsync } =
      this.props

    return (
      <div>
        <h2>Usage in class Component</h2>
        <div>count: {count}</div>
        <div>
          <button onClick={increment}>increment</button>
          <button onClick={reset}>reset</button>
        </div>
      </div>
    )
  }
}

export default connect(mapStateToProps, mapDispatchToProps)(Class)
2.3 使用 Hook 关联到函数组件
第三种算是最简单的,介绍使用 Hook API 的方式来声明的组件如何使用 Redux
2.3.1 Provider 提供 store
与类组件一样,我们总是要在外层使用 Provider 来提供 Context 作为 store 的载体
/src/App.ts
const store2 = createTimerStore()

export default function App() {
  return (
    <div>
      <h1>React Redux</h1>
      <Provider store={store2}>
        <Hook />
      </Provider>
    </div>
  )
}
2.3.2 useSelector 获取状态
与类组件不同的是,我们不需要再定义额外的 mapStateToProps 来获取状态,透过 useSelector 就是一个针对单个状态的获取
/src/hook/Hook.ts
const count = useSelector((state) => state)
参数 state 相当于是 store.getState() 返回的内容,本示例就是我们的 count 属性
2.3.3 useDispatch 获取更新函数
在 Redux 中我们要更新数据必须透过 dispatch 的方式来提交一个 aciton
在类组件的场景之下我们需要定义一个 mapDispatchToProps 函数来封装对于 dispatch(action) 的调用如下
const mapDispatchToProps = (dispatch: Dispatch<TimerAction>) => {
  return {
    increment: () => {
      dispatch(incrementAction())
    },
    reset: () => {
      dispatch(resetAction())
    },
  }
}
在 Hook 的方法下我们只需要调用 useDispatch 拿到 store.dispatch 方法,接下来我们就可以直接将状态更新逻辑封装到组件内了
/src/hook/Hook.ts
const dispatch = useDispatch()

const increment = () => dispatch(incrementAction())
const reset = () => dispatch(resetAction())
2.3.4 useTimer 自定义 Hook
实际上我们就可以将上述与 timer 的 Store 相关的逻辑封装到一个自定义 Hook 当中
/src/hook/Hook.ts
function useTimer() {
  const count = useSelector((state) => state)
  const dispatch = useDispatch()

  const increment = () => dispatch(incrementAction())
  const reset = () => dispatch(resetAction())

  return {
    count,
    increment,
    reset,
  }
}
最后我们就可以在组件内直接使用状态和更新函数了
export default function Hook() {
  const { count, increment, reset, incrementAsync, resetAsync } =
    useTimer()

  return (
    <div>
      <h2>Usage in React Hook</h2>
      <div>count: {count}</div>
      <div>
        <button onClick={increment}>increment</button>
        <button onClick={reset}>reset</button>
      </div>
    </div>
  )
}
3. 自定义 redux 中间件
接下来在异步调用之前我们先来看看什么是中间件
在 redux 中的数据流如下图
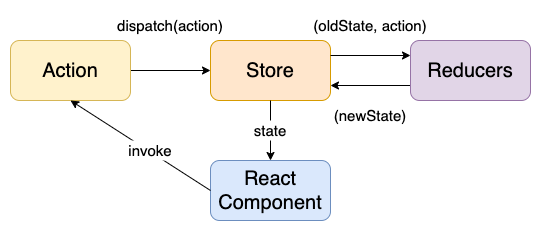
而我们在提交一个动作的时候在一般的同步场景如下
store.dispatch(action)
而有时候我们希望在提交动作和真实执行的前后做一些额外的工作,而这就是中间件
3.1 中间件定义
中间件的定义函数标签应该如下
const middleWare = store => next => action => {}
store表示中间件绑定的 store 对象next则表示下一个中间件的调用action则表示本次调用的 action 对象
3.2 自定义中间件
接下来我们就可以自定义一个消息中间件
/src/timer/middlewares.ts
export const middlewareSample: Middleware =
  (store) => (next) => (action) => {
    console.group('[middlewareSample] log')
    console.log(`before action: count=${store.getState()}`)
    next(action)
    console.log(`after action: count=${store.getState()}`)
    console.groupEnd()
  }
而我们要应用中间件的时候可以在创建 store 的同时使用 applyMiddleware 加入中间件
/src/timer/index.ts
export const createTimerStore = () => {
  return createStore(timerReducer, applyMiddleware([middlewareSample]))
}
如此一来我们之后提交的所有 action 都会经过中间件的调用
4. 异步状态调用
接下来最后一个小结我们要来介绍如何在 redux 中实现异步状态更新
4.0 什么是异步 action?
前面我们更新状态的时候都是直接调用
store.dispatch(action)
然后有的时候我们的状态可能是异步获取的,如远程 API 或是资源加载,那么我们可能需要定义这样一种方法
const asyncAction = (dispatch) => {
    dispatch(middleAction)
    asyncMethod().then(res => {
        dispatch({ ...successAction, payload: res })
    })
}
异步的诀窍就在于第二个 dispatch 的自动调用,也就是我们希望写成如下的这一种纯函数
const asyncAction = (dispatch) => {
    return asyncMethod().then(res => {
        return {
            ...successAction,
            payload: res
        }
    )
}
而这个特性我们就可以使用中间件来解决!如下(注意这时候我们拿到的 action 不再是一个单纯的动作对象,而是一个 Promise 对象)
const asyncMiddleWare = store => next => action => {
    action.then(res => {
        next(res)
    }).catch(err => {
        throw err
    })
}
而 redux 已经存在很多中间件供我们使用了,本篇用到的是 redux-thunk 这个中间件
4.1 redux-thunk 异步更新定义
redux-thunk 中间件的作用使 store.dispatch 还能够接受如下 action
store.dispatch((dispatch, store): Promise => { /* ... */ })
也就是我们可以传入一个任意的异步函数来调用
首先我们再重新定义两个新的 action
/src/timer/actions.ts
// async action creators
export const incrementActionAsync =
  () => async (dispatch: Dispatch<TimerAction>) => {
    console.log('increment after 1 sec')
    setTimeout(() => {
      dispatch({ type: 'INCREMENT' })
    }, 1000)
  }

export const resetActionAsync =
  () => async (dispatch: Dispatch<TimerAction>) => {
    console.log('reset after 1 sec')
    setTimeout(() => {
      dispatch({ type: 'RESET' })
    }, 1000)
  }
同时我们需要改造一下 store 的创建,加入 thunk 中间件
/src/timer/index.ts
export const createTimerStore = (withThunk: boolean = false) => {
  const middlewares: Middleware[] = withThunk ? [thunk] : []
  middlewares.push(middlewareSample)
  const enhancer = applyMiddleware(...middlewares)
  return createStore(timerReducer, enhancer)
}
下面我们演示在三种场景下的使用差异
4.2 使用 store API
回到第一种的直接使用 store 的模式,因为我们已经使用 thunk 改造了 store.dispatch 方法,所以我们是可以直接调用并传入新的 aciton 的
/src/basic/Basic.ts
class Basic extends Component<{}, { count: TimerState }> {
  // ...

  incrementAsync() {
    ;(store.dispatch as ThunkTimerDispatch)(incrementActionAsync())
  }

  resetAsync() {
    ;(store.dispatch as ThunkTimerDispatch)(resetActionAsync())
  }

  render() {
    const {
      // ...
      incrementAsync,
      resetAsync,
    } = this

    return (
      <div>
        <h2>Basic Usage by Observer</h2>
        {/* ... */}
        <div>
          <button onClick={incrementAsync}>incrementAsync</button>
          <button onClick={resetAsync}>resetAsync</button>
        </div>
      </div>
    )
  }
}

export default Basic
4.3 使用 Class 组件
而在类组件的场景下,我们可以在 mapDispatchToProps 这样写
const mapDispatchToProps = (dispatch: Dispatch<TimerAction>) => {
  return {
    incrementAsync: () => incrementActionAsync()(dispatch),
    resetAsync: () => resetActionAsync()(dispatch),
  }
}
或是这样写
const mapDispatchToProps = (dispatch: ThunkDispatch<TimerState, {}, TimerAction>) => {
  return {
    incrementAsync: () => dispatch(incrementActionAsync()),
    resetAsync: () => dispatch(resetActionAsync()),
  }
}
当然我们可以用更优雅的 bindActionCreators 方法
/src/class/Class.ts
const mapDispatchToProps = (dispatch: Dispatch<TimerAction>) => {
  return {
    increment: () => {
      dispatch(incrementAction())
    },
    reset: () => {
      dispatch(resetAction())
    },
    // incrementAsync: bindActionCreators(
    //   incrementActionAsync,
    //   dispatch
    // ),
    incrementAsync: () => incrementActionAsync()(dispatch),
    resetAsync: bindActionCreators(resetActionAsync, dispatch),
  }
}
4.4 使用函数组件
函数组件还是一样的香,由于 thunk 中间件允许我们向 dispatch 传入异步函数,而 Hook 形式下与直接使用 store 类似,都是直接拿到 dispatch 方法并调用,所以我们就可以像是封装一般 action 一样直接封装异步 action
/src/hook/Hook.ts
function useTimer() {
  const count = useSelector((state) => state)
  const dispatch = useDispatch()

  const increment = () => dispatch(incrementAction())
  const reset = () => dispatch(resetAction())
  const incrementAsync = () => dispatch(incrementActionAsync())
  const resetAsync = () => dispatch(resetActionAsync())

  return {
    count,
    increment,
    reset,
    incrementAsync,
    resetAsync,
  }
}
结语
其他资源
参考连接
| Title | Link |
|---|---|
| Redux 入门教程(一):基本用法 | https://www.ruanyifeng.com/blog/2016/09/redux_tutorial_part_one_basic_usages.html |
| Redux 入门教程(二):中间件与异步操作 | https://www.ruanyifeng.com/blog/2016/09/redux_tutorial_part_two_async_operations.html |
| Redux 入门教程(三):React-Redux 的用法 | https://www.ruanyifeng.com/blog/2016/09/redux_tutorial_part_three_react-redux.html |
| redux的hook使用 | https://www.cnblogs.com/cc123nice/p/13441935.html |
| reduxjs/redux-thunk – Github | https://github.com/reduxjs/redux-thunk |
| 淺析 React Redux 的概念以及使用 | https://blog.csdn.net/weixin_46803507/article/details/116499240 |
| Redux 中間件以及異步 action | https://blog.csdn.net/weixin_46803507/article/details/116574462 |
| React 系列 : Redux + TypeScript | https://blog.csdn.net/weixin_46803507/article/details/116873722 |
完整代码示例
https://github.com/superfreeeee/Blog-code/tree/main/front_end/react/react_redux