简单使用MyBatis-Plus
今天接触了MyBatis-Plus,记录一下使用过程把。
1、创建一个mybatis-plus工程
1、1创建数据库表
DROP TABLE IF EXISTS user;

CREATE TABLE user
(
	id BIGINT(20) NOT NULL COMMENT '主键ID',
	name VARCHAR(30) NULL DEFAULT NULL COMMENT '姓名',
	age INT(11) NULL DEFAULT NULL COMMENT '年龄',
	email VARCHAR(50) NULL DEFAULT NULL COMMENT '邮箱',
	PRIMARY KEY (id)
);
DELETE FROM user;

INSERT INTO user (id, name, age, email) VALUES
(1, 'Jone', 18, 'test1@baomidou.com'),
(2, 'Jack', 20, 'test2@baomidou.com'),
(3, 'Tom', 28, 'test3@baomidou.com'),
(4, 'Sandy', 21, 'test4@baomidou.com'),
(5, 'Billie', 24, 'test5@baomidou.com');
1、2引入依赖
 <!--引入mybatis-plus的依赖 不要再引入mybatis的依赖 因为这两者之间可能存在冲突。-->
        <dependency>
            <groupId>com.baomidou</groupId>
            <artifactId>mybatis-plus-boot-starter</artifactId>
            <version>3.4.0</version>
        </dependency>
1、3数据源配置
spring.datasource.druid.driver-class-name=com.mysql.jdbc.Driver
spring.datasource.druid.url=jdbc:mysql:///lianxi?useUnicode=true&characterEncoding=UTF8
spring.datasource.druid.username=root
spring.datasource.druid.password=root
1、4 dao层必须继承BaseMapper接口
public interface UserDao extends BaseMapper<User> {
}
1、5主启动类添加扫描dao层。
@SpringBootApplication
@MapperScan(basePackages = "com.yy.dao")
public class SpringbootMpApplication {

    public static void main(String[] args) {
        SpringApplication.run(SpringbootMpApplication.class, args);
    }

}
1、6新增
@Test
    void contextLoads() {
        //Wrapper:条件封装类。----null
        //查询所有
        List<User> list = userDao.selectList(null);
        System.out.println(list);
    }
1、7修改
@Test
    public void update(){
        //默认使用了动态sql。 增加列 gmt_update  gmt_create
        User user=new User();
        user.setId(1L);
        user.setName("张三"); //如果数据库没有设置默认值。
        userDao.updateById(user);

    }
1、8删除
//逻辑删除:  (增加一个字段 isdeleted) 修改工作。
  //1.未删 0已删
    @Test
    public void delete(){
        int i = userDao.deleteById(2L);
        //这个带就是真实删除  如果想实现逻辑删除则需要给数据库表增加一个新的列isDeleted
    }
1、9查询
@Test
    public void select(){
        User user=new User();
        user.setName("克");
        //根据id查询
//        User user = userDao.selectById(2L);
//        System.out.println(user);

        //根据条件查询多条记录Wrapper----子类有QueryWrapper
        QueryWrapper wrapper=new QueryWrapper();
        wrapper.select("name","email");
        //where =  like in between
        //wrapper.eq("name","张三"); //equals
        if(StringUtils.isNotEmpty(user.getName())){
            wrapper.like("name","三");
        }
        if(user.getAge()!=null){
            wrapper.between("age",10,25);
        }
        List list = userDao.selectList(wrapper);
        System.out.println(list);
    }
2、分页查询
2、1 创建一个配置类
@Configuration
public class MybatisPlusConfig {
    @Bean
    public MybatisPlusInterceptor mybatisPlusInterceptor() {
        MybatisPlusInterceptor interceptor = new MybatisPlusInterceptor();
        interceptor.addInnerInterceptor(new PaginationInnerInterceptor(DbType.MYSQL));
        return interceptor;
    }
}
2、2 测试
@Test
    public void selectByPage(){
        Page<User> page=new Page<>(1,5);
        page=userDao.selectPage(page,null);
        System.out.println("当前的页码:"+page.getCurrent());
        System.out.println("得到总页码:"+page.getPages());
        System.out.println("总条数:"+page.getTotal());
        System.out.println("当前页码的记录:"+page.getRecords());
    }
3、 自动生成代码
3、1 创建springboot项目
  <dependency>
            <groupId>com.baomidou</groupId>
            <artifactId>mybatis-plus-generator</artifactId>
            <version>3.4.0</version>
        </dependency>

        <dependency>
            <groupId>org.apache.velocity</groupId>
            <artifactId>velocity-engine-core</artifactId>
            <version>2.3</version>
        </dependency>
3、2编写配置
public class CodeGenerator {

    /**
     * <p>
     * 读取控制台内容
     * </p>
     */
    public static String scanner(String tip) {
        Scanner scanner = new Scanner(System.in);
        StringBuilder help = new StringBuilder();
        help.append("请输入" + tip + ":");
        System.out.println(help.toString());
        if (scanner.hasNext()) {
            String ipt = scanner.next();
            if (StringUtils.isNotBlank(ipt)) {
                return ipt;
            }
        }
        throw new MybatisPlusException("请输入正确的" + tip + "!");
    }

    public static void main(String[] args) {
        // 代码生成器
        AutoGenerator mpg = new AutoGenerator();

        // 全局配置
        GlobalConfig gc = new GlobalConfig();
        //获取工程的根目录
        String projectPath = System.getProperty("user.dir");
        gc.setOutputDir(projectPath + "/src/main/java");
        gc.setAuthor("闫克起");
        gc.setOpen(false); //是否生成代码后打开本地目录
        gc.setSwagger2(true); //实体属性 Swagger2 注解
        mpg.setGlobalConfig(gc);

        // 数据源配置
        DataSourceConfig dsc = new DataSourceConfig();
        dsc.setUrl("jdbc:mysql://localhost:3306/mybatis-plus?serverTimezone=Asia/Shanghai&useUnicode=true&useSSL=false&characterEncoding=utf8");
        // dsc.setSchemaName("public");
        dsc.setDriverName("com.mysql.cj.jdbc.Driver");
        dsc.setUsername("root");
        dsc.setPassword("root");
        mpg.setDataSource(dsc);

        // 包配置
        PackageConfig pc = new PackageConfig();
        pc.setModuleName("aaa");
        pc.setParent("com.ykq");//设置父包   com.ykq.aaa.controler dao service entity
        mpg.setPackageInfo(pc);


        // 策略配置
        StrategyConfig strategy = new StrategyConfig();
        strategy.setNaming(NamingStrategy.underline_to_camel);
        strategy.setColumnNaming(NamingStrategy.underline_to_camel);
        strategy.setEntityLombokModel(true);
        strategy.setRestControllerStyle(true);//controller是否使用restful风格

        mpg.setStrategy(strategy);
        mpg.execute();
    }

    //xml映射文件 生成时放入resources/mapper

}
3、3运行配置类
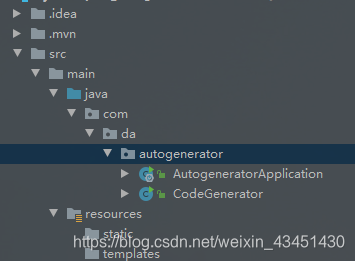
运行前
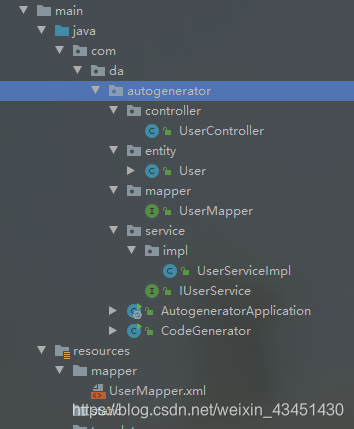
运行后
版权声明:本文为weixin_43451430原创文章,遵循 CC 4.0 BY-SA 版权协议,转载请附上原文出处链接和本声明。