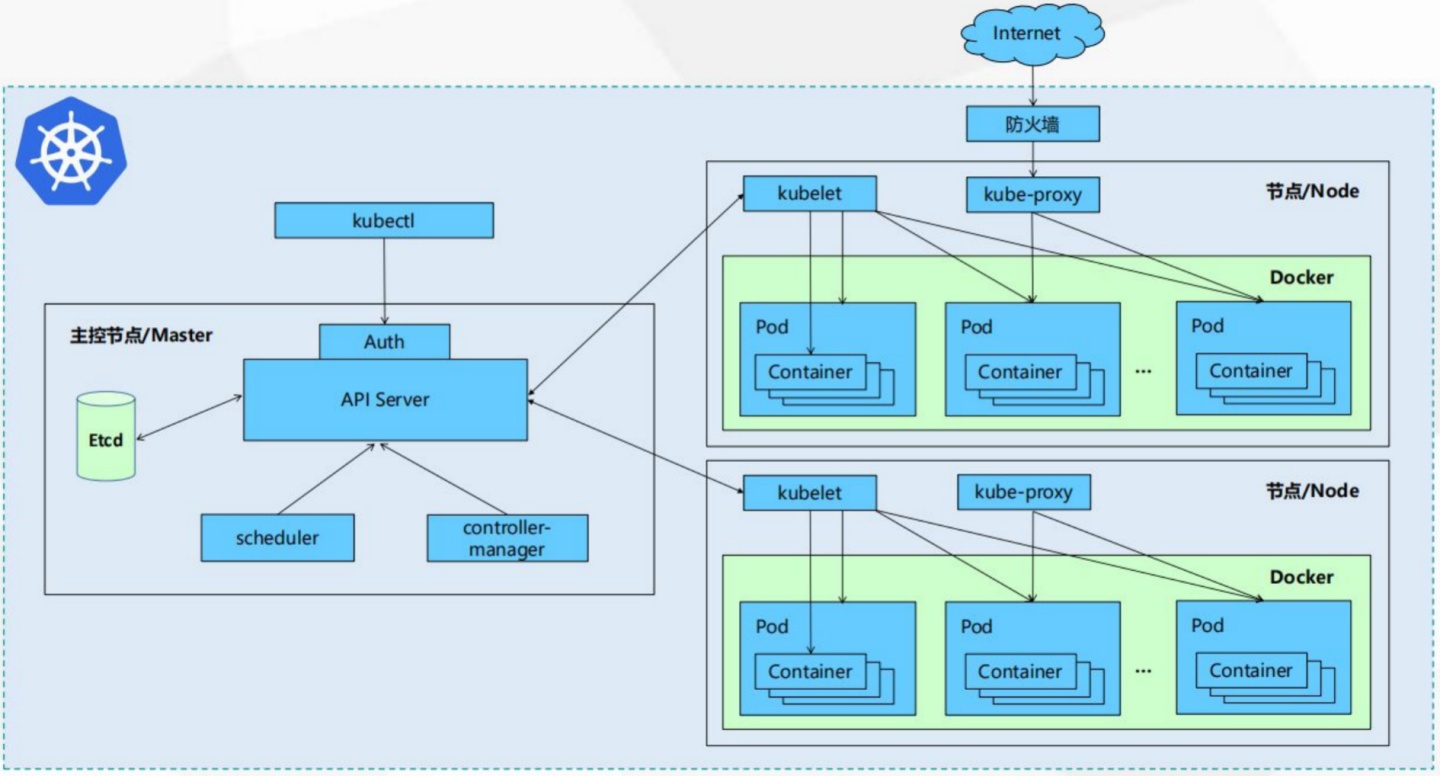
kubernetes集群部署
为节约资源此集群仅3台机器
方式1. minikube
Minikube是一个工具,可以在本地快速运行一个单点的Kubernetes,尝试Kubernetes或日常开发的用户使用。不能用于生产环境。
官方地址:
https://
kubernetes.io/docs/setu
p/minikube/
方式2. kubeadm
Kubeadm也是一个工具,提供kubeadm init和kubeadm join,用于快速部署Kubernetes集群。
官方地址:
https://
kubernetes.io/docs/refe
rence/setup-tools/kubeadm/kubeadm/
方式3. 直接使用epel-release yum源,缺点就是版本较低 1.5
方式4. 二进制包
从官方下载发行版的二进制包,手动部署每个组件,组成Kubernetes集群。
其他的开源工具:
https://
docs.kubeoperator.io/ku
beoperator-v2.2/introduction
二、kubeadm部署k8s集群
官方文档:
https://kubernetes.io/docs/setup/production-environment/tools/kubeadm/install-kubeadm/
kubeadm部署k8s高可用集群的官方文档:
https://kubernetes.io/docs/setup/production-environment/tools/kubeadm/high-availability/
注:本文采用最新版centos版本8.1
1、系统配置
1.1、集群环境
机器数量
3台
操作系统
Centos8.1
设置主机名称
分别设置主机名称为:
master node1 node2
每台机器必须设置域名解析
192.168.1.200 master
192.168.1.201 node1
192.168.1.202 node2
1.2、禁用开机启动防火墙
# systemctl disable firewalld1.3、永久禁用SELinux
编辑文件/etc/selinux/config,将SELINUX修改为disabled,如下:
# sed -i 's/SELINUX=permissive/SELINUX=disabled/' /etc/sysconfig/selinux
SELINUX=disabled
1.4、关闭系统Swap
1.8版本之后的新规定
Kubernetes 1.8开始要求关闭系统的Swap,如果不关闭,默认配置下kubelet将无法启动。
修改/etc/fstab文件,注释掉SWAP的自动挂载,使用free -m确认swap已经关闭。
[root@master /]# sed -i 's/.*swap.*/#&/' /etc/fstab
#/dev/mapper/centos-swap swap  swap   defaults     0 0
1.5、检查MAC地址和product_uuid
Verify the MAC address and product_uuid are unique for every node
- You can get the MAC address of the network interfaces using the command
# ip link - The product_uuid can be checked by using the command
# cat /sys/class/dmi/id/product_uuid
It is very likely that hardware devices will have unique addresses, although some virtual machines may have identical values. Kubernetes uses these values to uniquely identify the nodes in the cluster. If these values are not unique to each node, the installation process may fail.
1.6、重启系统
2、安装软件
2.1 所有机器安装docker
# yum install wget container-selinux -y
# wget https://download.docker.com/linux/centos/7/x86_64/stable/Packages/containerd.io-1.2.6-3.3.el7.x86_64.rpm
# yum erase runc -y
# rpm -ivh containerd.io-1.2.6-3.3.el7.x86_64.rpm
注意:上面的步骤在centos7中无须操作
# update-alternatives --set iptables /usr/sbin/iptables-legacy
# yum install -y yum-utils device-mapper-persistent-data lvm2 && yum-config-manager --add-repo https://download.docker.com/linux/centos/docker-ce.repo && yum makecache && yum -y install docker-ce -y && systemctl enable docker.service && systemctl start docker
2.2 所有机器安装kubeadm和kubelet
配置aliyun的yum源
# cat <<EOF > /etc/yum.repos.d/kubernetes.repo
[kubernetes]
name=Kubernetes
baseurl=https://mirrors.aliyun.com/kubernetes/yum/repos/kubernetes-el7-x86_64
enabled=1
gpgcheck=1
repo_gpgcheck=1
gpgkey=https://mirrors.aliyun.com/kubernetes/yum/doc/yum-key.gpg https://mirrors.aliyun.com/kubernetes/yum/doc/rpm-package-key.gpg
EOF
安装最新版kubeadm
# yum makecache
# yum install -y kubelet kubeadm kubectl ipvsadm
说明:如果想安装指定版本的kubeadmin
#yum install kubelet-1.16.0-0.x86_64 kubeadm-1.16.0-0.x86_64 kubectl-1.16.0-0.x86_64
配置内核参数
# cat <<EOF > /etc/sysctl.d/k8s.conf
net.bridge.bridge-nf-call-ip6tables = 1
net.bridge.bridge-nf-call-iptables = 1
vm.swappiness=0
EOF
# sysctl --system
# modprobe br_netfilter
# sysctl -p /etc/sysctl.d/k8s.conf
加载ipvs相关内核模块
如果重新开机,需要重新加载(可以写在 /etc/rc.local 中开机自动加载)
# modprobe ip_vs
# modprobe ip_vs_rr
# modprobe ip_vs_wrr
# modprobe ip_vs_sh
# modprobe nf_conntrack_ipv4
查看是否加载成功
# lsmod | grep ip_vs3、获取镜像
特别说明:
- 三个节点都要下载
- 注意下载时把版本号修改到官方最新版,即使下载了最新版也可能版本不对应,需要按报错提示下载
- 每次部署都会有版本更新,具体版本要求,运行初始化过程失败会有版本提示
- kubeadm的版本和镜像的版本必须是对应的用命令查看版本当前kubeadm对应的k8s镜像版本
[root@master ~]# kubeadm config images listhttp://k8s.gcr.io/kube-apiserver:v1.17.2http://k8s.gcr.io/kube-controller-manager:v1.17.2http://k8s.gcr.io/kube-scheduler:v1.17.2http://k8s.gcr.io/kube-proxy:v1.17.2http://k8s.gcr.io/pause:3.1http://k8s.gcr.io/etcd:3.4.3-0http://k8s.gcr.io/coredns:1.6.5使用下面的方法在aliyun拉取相应的镜像并重新打标
docker pull
http://
registry.cn-hangzhou.aliyuncs.com
/google_containers/kube-apiserver:v1.17.2docker tag
http://
registry.cn-hangzhou.aliyuncs.com
/google_containers/kube-apiserver:v1.17.2http://
k8s.gcr.io/kube-apiserv
er:v1.17.2docker pull
http://
registry.cn-hangzhou.aliyuncs.com
/google_containers/kube-controller-manager:v1.17.2docker tag
http://
registry.cn-hangzhou.aliyuncs.com
/google_containers/kube-controller-manager:v1.17.2http://
k8s.gcr.io/kube-control
ler-manager:v1.17.2docker pull
http://
registry.cn-hangzhou.aliyuncs.com
/google_containers/kube-scheduler:v1.17.2docker tag
http://
registry.cn-hangzhou.aliyuncs.com
/google_containers/kube-scheduler:v1.17.2http://
k8s.gcr.io/kube-schedul
er:v1.17.2docker pull
http://
registry.cn-hangzhou.aliyuncs.com
/google_containers/kube-proxy:v1.17.2docker tag
http://
registry.cn-hangzhou.aliyuncs.com
/google_containers/kube-proxy:v1.17.2http://
k8s.gcr.io/kube-proxy:v
1.17.2docker pull
http://
registry.cn-hangzhou.aliyuncs.com
/google_containers/pause:3.1docker tag
http://
registry.cn-hangzhou.aliyuncs.com
/google_containers/pause:3.1http://
k8s.gcr.io/pause:3.1docker pull
http://
registry.cn-hangzhou.aliyuncs.com
/google_containers/etcd:3.4.3-0docker tag
http://
registry.cn-hangzhou.aliyuncs.com
/google_containers/etcd:3.4.3-0http://
k8s.gcr.io/etcd:3.4.3-0docker pull coredns/coredns:1.6.5
docker tag coredns/coredns:1.6.5
http://
k8s.gcr.io/coredns:1.6.
5
下图是2019-12-11的版本1.17.0的下载列表
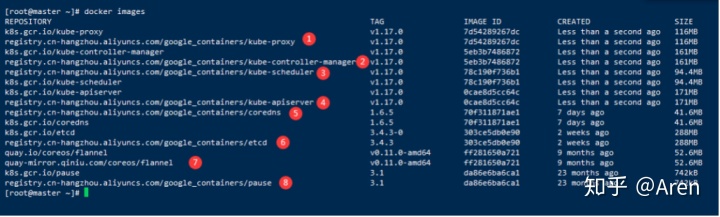
# docker images
REPOSITORY TAG IMAGE ID CREATED SIZE
k8s.gcr.io/kube-proxy v1.17.0 7d54289267dc Less than a second ago 116MB
registry.cn-hangzhou.aliyuncs.com/google_containers/kube-proxy v1.17.0 7d54289267dc Less than a second ago 116MB
k8s.gcr.io/kube-controller-manager v1.17.0 5eb3b7486872 Less than a second ago 161MB
registry.cn-hangzhou.aliyuncs.com/google_containers/kube-controller-manager v1.17.0 5eb3b7486872 Less than a second ago 161MB
registry.cn-hangzhou.aliyuncs.com/google_containers/kube-scheduler v1.17.0 78c190f736b1 Less than a second ago 94.4MB
k8s.gcr.io/kube-scheduler v1.17.0 78c190f736b1 Less than a second ago 94.4MB
k8s.gcr.io/kube-apiserver v1.17.0 0cae8d5cc64c Less than a second ago 171MB
registry.cn-hangzhou.aliyuncs.com/google_containers/kube-apiserver v1.17.0 0cae8d5cc64c Less than a second ago 171MB
registry.cn-hangzhou.aliyuncs.com/google_containers/coredns 1.6.5 70f311871ae1 7 days ago 41.6MB
k8s.gcr.io/coredns 1.6.5 70f311871ae1 7 days ago 41.6MB
k8s.gcr.io/etcd 3.4.3-0 303ce5db0e90 2 weeks ago 288MB
registry.cn-hangzhou.aliyuncs.com/google_containers/etcd 3.4.3 303ce5db0e90 2 weeks ago 288MB
quay.io/coreos/flannel v0.11.0-amd64、所有节点配置启动kubelet
4.1、配置kubelet使用国内pause镜像
获取docker的cgroups
DOCKER_CGROUPS=$(docker info | grep 'Cgroup' | cut -d' ' -f4)
# echo $DOCKER_CGROUPS
cgroupfs
配置kubelet的cgroups
cat >/etc/sysconfig/kubelet<<EOF
KUBELET_EXTRA_ARGS="--cgroup-driver=$DOCKER_CGROUPS --pod-infra-container-image=k8s.gcr.io/pause:3.1"
EOF
4.2、启动
# systemctl daemon-reload
# systemctl enable kubelet && systemctl start kubelet
特别说明:在这里使用systemctl status kubelet,你会发现报错误信息
10月 11 00:26:43 node1 systemd[1]: kubelet.service: main process exited, code=exited, status=255/n/a
10月 11 00:26:43 node1 systemd[1]: Unit kubelet.service entered failed state.
10月 11 00:26:43 node1 systemd[1]: kubelet.service failed.
运行journalctl -xefu kubelet 命令查看systemd日志才发现,真正的错误是:
unable to load client CA file /etc/kubernetes/pki/ca.crt: open /etc/kubernetes/pki/ca.crt: no such file or directory
这个错误在运行kubeadm init 生成CA证书后会被自动解决,此处可先忽略。
简单地说就是在kubeadm init 之前kubelet会不断重启。
5、初始化集群
5.1、在master节点进行初始化操作
特别说明:
初始化完成必须要记录下初始化过程最后的命令,如下图所示

[root@master ~# kubeadm init --kubernetes-version=v1.17.2 --pod-network-cidr=10.244.0.0/16 --apiserver-advertise-address=192.168.1.200 --ignore-preflight-errors=Swap
[init] Using Kubernetes version: v1.1.0
[preflight] Running pre-flight checks
[WARNING SystemVerification]: this Docker version is not on the list of validated versions: 18.09.1. Latest validated version: 18.06
[preflight] Pulling images required for setting up a Kubernetes cluster
[preflight] This might take a minute or two, depending on the speed of your internet connection
[preflight] You can also perform this action in beforehand using 'kubeadm config images pull'
[kubelet-start] Writing kubelet environment file with flags to file "/var/lib/kubelet/kubeadm-flags.env"
[kubelet-start] Writing kubelet configuration to file "/var/lib/kubelet/config.yaml"
[kubelet-start] Activating the kubelet service
[certs] Using certificateDir folder "/etc/kubernetes/pki"
[certs] Generating "front-proxy-ca" certificate and key
[certs] Generating "front-proxy-client" certificate and key
[certs] Generating "etcd/ca" certificate and key
[certs] Generating "etcd/server" certificate and key
[certs] etcd/server serving cert is signed for DNS names [master localhost] and IPs [192.168.1.200 127.0.0.1 ::1]
[certs] Generating "etcd/healthcheck-client" certificate and key
[certs] Generating "etcd/peer" certificate and key
[certs] etcd/peer serving cert is signed for DNS names [master localhost] and IPs [192.168.1.200 127.0.0.1 ::1]
[certs] Generating "apiserver-etcd-client" certificate and key
[certs] Generating "ca" certificate and key
[certs] Generating "apiserver" certificate and key
[certs] apiserver serving cert is signed for DNS names [master kubernetes kubernetes.default kubernetes.default.svc kubernetes.default.svc.cluster.local] and IPs [10.96.0.1 192.168.1.200]
[certs] Generating "apiserver-kubelet-client" certificate and key
[certs] Generating "sa" key and public key
[kubeconfig] Using kubeconfig folder "/etc/kubernetes"
[kubeconfig] Writing "admin.conf" kubeconfig file
[kubeconfig] Writing "kubelet.conf" kubeconfig file
[kubeconfig] Writing "controller-manager.conf" kubeconfig file
[kubeconfig] Writing "scheduler.conf" kubeconfig file
[control-plane] Using manifest folder "/etc/kubernetes/manifests"
[control-plane] Creating static Pod manifest for "kube-apiserver"
[control-plane] Creating static Pod manifest for "kube-controller-manager"
[control-plane] Creating static Pod manifest for "kube-scheduler"
[etcd] Creating static Pod manifest for local etcd in "/etc/kubernetes/manifests"
[wait-control-plane] Waiting for the kubelet to boot up the control plane as static Pods from directory "/etc/kubernetes/manifests". This can take up to 4m0s
[apiclient] All control plane components are healthy after 19.003093 seconds
[uploadconfig] storing the configuration used in ConfigMap "kubeadm-config" in the "kube-system" Namespace
[kubelet] Creating a ConfigMap "kubelet-config-1.13" in namespace kube-system with the configuration for the kubelets in the cluster
[patchnode] Uploading the CRI Socket information "/var/run/dockershim.sock" to the Node API object "master" as an annotation
[mark-control-plane] Marking the node master as control-plane by adding the label "node-role.kubernetes.io/master=''"
[mark-control-plane] Marking the node master as control-plane by adding the taints [node-role.kubernetes.io/master:NoSchedule]
[bootstrap-token] Using token: wip0ux.19q3dpudrnyc6q7i
[bootstrap-token] Configuring bootstrap tokens, cluster-info ConfigMap, RBAC Roles
[bootstraptoken] configured RBAC rules to allow Node Bootstrap tokens to post CSRs in order for nodes to get long term certificate credentials
[bootstraptoken] configured RBAC rules to allow the csrapprover controller automatically approve CSRs from a Node Bootstrap Token
[bootstraptoken] configured RBAC rules to allow certificate rotation for all node client certificates in the cluster
[bootstraptoken] creating the "cluster-info" ConfigMap in the "kube-public" namespace
[addons] Applied essential addon: CoreDNS
[addons] Applied essential addon: kube-proxy
Your Kubernetes master has initialized successfully!
To start using your cluster, you need to run the following as a regular user:
mkdir -p $HOME/.kube
sudo cp -i /etc/kubernetes/admin.conf $HOME/.kube/config
sudo chown $(id -u):$(id -g) $HOME/.kube/config
You should now deploy a pod network to the cluster.
Run "kubectl apply -f [podnetwork].yaml" with one of the options listed at:
https://kubernetes.io/docs/concepts/cluster-administration/addons/
You can now join any number of machines by running the following on each node
as root:
kubeadm join 192.168.1.200:6443 --token wip0ux.19q3dpudrnyc6q7i --discovery-token-ca-cert-hash sha256:e41c201f32d7aa6c57254cd78c13a5aa7242979f7152bf33ec25dde13c1dcc9a上面记录了完成的初始化输出的内容,根据输出的内容基本上可以看出手动初始化安装一个Kubernetes集群所需要的关键步骤。
其中有以下关键内容:
[kubelet] 生成kubelet的配置文件”/var/lib/kubelet/config.yaml”
[certificates]生成相关的各种证书
[kubeconfig]生成相关的kubeconfig文件
[bootstraptoken]生成token记录下来,后边使用kubeadm join往集群中添加节点时会用到
5.2、在master节点配置使用kubectl
# rm -rf $HOME/.kube
# mkdir -p $HOME/.kube
# cp -i /etc/kubernetes/admin.conf $HOME/.kube/config
# chown $(id -u):$(id -g) $HOME/.kube/config
5.3、查看node节点
# kubectl get nodes
NAME   STATUS   ROLES   AGE   VERSION
master  NotReady  master  6m19s  v1.13.0
6、配置网络插件
6.1、master节点下载yaml配置文件
特别说明:版本会经常更新,如果配置成功,就手动去
https://
raw.githubusercontent.com
/coreos/flannel/master/Documentation/
下载最新版yaml文件
# cd ~ && mkdir flannel && cd flannel
# curl -O https://raw.githubusercontent.com/coreos/flannel/master/Documentation/kube-flannel.yml
6.2、修改配置文件kube-flannel.yml
说明:默认的镜像是
http://
quay.io/coreos/flannel:
v0.10.0-amd64
,如果你能pull下来就不用修改镜像地址,否则,修改yml中镜像地址为阿里镜像源,要修改所有的镜像版本,里面有好几条flannel镜像地址
image:
http://
registry.cn-shanghai.aliyuncs.com
/gcr-k8s/flannel:v0.10.0-amd64
指定启动网卡
flanneld启动参数加上–iface=<iface-name>
⚠️⚠️⚠️–iface=ens33 的值,是你当前的网卡,或者可以指定多网卡
启动
# kubectl apply -f ~/flannel/kube-flannel.yml查看
# kubectl get pods --namespace kube-system
NAME READY STATUS RESTARTS AGE
coredns-6955765f44-g767b 1/1 Running 0 14m
coredns-6955765f44-l8zzs 1/1 Running 0 14m
etcd-master 1/1 Running 0 14m
kube-apiserver-master 1/1 Running 0 14m
kube-controller-manager-master 1/1 Running 0 14m
kube-flannel-ds-amd64-qjpzg 1/1 Running 0 28s
kube-proxy-zklq2 1/1 Running 0 14m
kube-scheduler-master 1/1 Running 0 14m
# kubectl get service
NAME TYPE CLUSTER-IP EXTERNAL-IP PORT(S) AGE
kubernetes ClusterIP 10.96.0.1 <none> 443/TCP 14m
# kubectl get svc --namespace kube-system
NAME TYPE CLUSTER-IP EXTERNAL-IP PORT(S) AGE
kube-dns ClusterIP 10.96.0.10 <none> 53/UDP,53/TCP,9153/TCP 15m只有网络插件也安装配置完成之后,才能会显示为ready状态
7、配置所有node节点加入集群
在所有node节点操作,此命令为初始化master成功后返回的结果
# kubeadm join 192.168.1.200:6443 --token ccxrk8.myui0xu4syp99gxu --discovery-token-ca-cert-hash sha256:e3c90ace969aa4d62143e7da6202f548662866dfe33c140095b020031bff29868、集群检测
查看pods
说明:节点加入到集群之后需要等待几分钟再查看
# kubectl get pods -n kube-system
NAME                                    READY  STATUS       RESTARTS  AGE
coredns-6c66ffc55b-l76bq        1/1   Running       0      16m
coredns-6c66ffc55b-zlsvh        1/1   Running       0      16m
etcd-node1                          1/1   Running       0      16m
kube-apiserver-node1            1/1   Running       0      16m
kube-controller-manager-node1 1/1   Running         0      15m
kube-flannel-ds-sr6tq           0/1   CrashLoopBackOff  6      7m12s
kube-flannel-ds-ttzhv           1/1   Running       0      9m24s
kube-proxy-nfbg2                1/1   Running       0      7m12s
kube-proxy-r4g7b                1/1   Running       0      16m
kube-scheduler-node1            1/1   Running       0      16m
遇到异常状态0/1的pod长时间启动不了可删除它等待集群创建新的pod资源
# kubectl delete pod kube-flannel-ds-sr6tq -n kube-system
pod "kube-flannel-ds-sr6tq" deleted
删除后再次查看,发现状态为正常
[root@master flannel]# kubectl get pods -n kube-system
NAME                             READY   STATUS    RESTARTS   AGE
coredns-6955765f44-g767b         1/1     Running   0          18m
coredns-6955765f44-l8zzs         1/1     Running   0          18m
etcd-master                      1/1     Running   0          18m
kube-apiserver-master            1/1     Running   0          18m
kube-controller-manager-master   1/1     Running   0          18m
kube-flannel-ds-amd64-bsdcr      1/1     Running   0          60s
kube-flannel-ds-amd64-g8d7x      1/1     Running   0          2m33s
kube-flannel-ds-amd64-qjpzg      1/1     Running   0          5m9s
kube-proxy-5pmgv                 1/1     Running   0          2m33s
kube-proxy-r962v                 1/1     Running   0          60s
kube-proxy-zklq2                 1/1     Running   0          18m
kube-scheduler-master            1/1     Running   0          18m
再次查看节点状态
[root@master flannel到此集群配置完成