ViewModel和LiveData的使用
时(摸)隔(鱼)了小半个月, 终于开始了ViewModel和LiveData.
首先, 在开始之前, 说明一下: 什么是ViewModel? 什么又是LiveData?
什么是ViewModel?
老套路, ViewModel英文直译: 视图模型。官方原话:ViewModel旨在以注重生命周期的方式存储和管理界面相关的数据。
的确, 这话很官方, 用直白的话来讲: ** 视图(View) 和 数据(Data) 的桥梁(MVVM亦或者MVC中都有的概念), 是将视图和数据分离开来, 降低UI与数据的耦合性, 即提高代码的可读性、可维护性。**
在官方的介绍中, ViewModel可谓是掌控全局, 就因为它活得久。
从生命周期的onCreate开始, 一直到onDestroy结束, 期间不管应用是切后台、还是转前台, 它都不会消失。
以下又是官方原话:
ViewModel 对象存在的时间范围是获取 ViewModel 时传递给 ViewModelProvider 的 Lifecycle。ViewModel 将一直留在内存中,直到限定其存在时间范围的 Lifecycle 永久消失:对于 Activity,是在 Activity 完成时;而对于 Fragment,是在 Fragment 分离时。
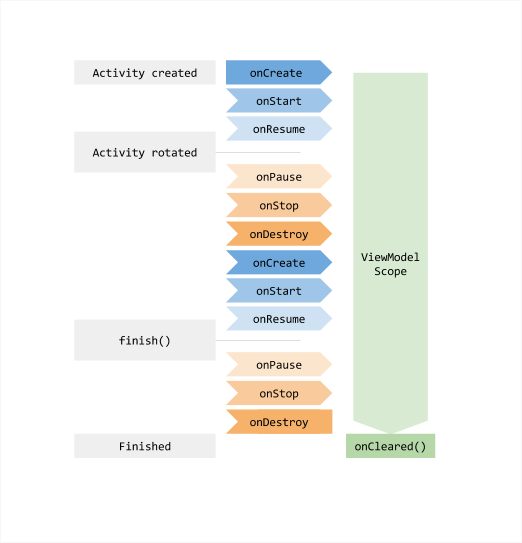
还有需要特别注意的是:
ViewModel通常是在onCreate中被开发者手动构建, 而它会在onDestroy时被系统自动抹除onCleared()。
!注意! ViewModel 绝对不要引用任何携带
Context(包括Lifecycle也是携带有Activity)的对象; 正如上面所说, ViewModel命长, 对Context的引用可能会造成内存泄露, 如果确要使用Context可以试试AndroidViewModel, 因为AndroidViewModel默认携带了一个Application。
什么是LiveData?
LiveData的英文直译: 具有生命的数据, 它是可观察的数据存储类(这里又出现了: 观察者模式), 那既然是具有生命的我们前文提到的Lifecycle就派上用场了。
那么LiveData中的可观察就是生命周期(Lifecycle)的可观察了。
好了, 这里需要补充一下前文Lifecycle的内容。
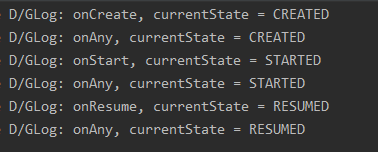
前面这张图上Log了一个currentState表示当前的生命周期状态, 不难看出currentState和生命周期函数的命名是一样的。
LiveData只会通知currentState处于STARTED或RESUMED状态下的数据进行更新, 在其它情况下LiveData会判定为非活跃状态, 将不会对这些状态下的数据下发更新通知。
该扯的都扯完了, 接下来进入正文。
本文所用开发环境以及SDK版本如下,读者应该使用不低于本文所使用的开发环境.
Android Studio 4.0.1
minSdkVersion 21
targetSdkVersion 30
正文
ViewModel的基本使用
在使用LiveData之前我们需要先自定义自己的ViewModel视图模型.
class MainVM : ViewModel() {}
然后在MainActivity.kt中构建它, 这里介绍两种方式。
方式一, 通过 ViewModelProvider 构建:
    private lateinit var mainVm: MainVM
    override fun onCreate(savedInstanceState: Bundle?) {
        super.onCreate(savedInstanceState)
        binding = ActivityMainBinding.inflate(layoutInflater)
        setContentView(binding.root)
        mainVm = ViewModelProvider(MainActivity@ this).get(MainVM::class.java)
        //mainVm = ViewModelProvider(MainActivity@ this, ViewModelProvider.NewInstanceFactory()).get(MainVM::class.java)
    }
方式二, 通过kotlin扩展依赖构建(仅适用kotlin):
-
首先在App级的
build.gradle中, 添加kotlin扩展依赖
androidx所支持的依赖.def fragment_version = "1.3.1" /// 本文所依赖的开发环境不支持1.3.1以上的版本, 读者自行更改版本号 implementation "androidx.activity:activity-ktx:$fragment_version" implementation "androidx.fragment:fragment-ktx:$fragment_version" -
然后修改
MainActivity.kt中的代码import androidx.activity.viewModels class MainActivity : AppCompatActivity() { private lateinit var binding: ActivityMainBinding private val mainVm: MainVM by viewModels() /// 委托加载 override fun onCreate(savedInstanceState: Bundle?) { binding = ActivityMainBinding.inflate(layoutInflater) setContentView(binding.root) } }
到这一步, ViewModel就已经能够被使用了, 它将一直存活至当前Activity结束。
LiveData的基本使用
LiveData自己实现了一套观察者机制, 它在监测到数据改变之后会自动的到通知observe()方法, 你可以在observe()方法中书写UI更新的代码。
计数器这个例子好像已经被写烂了, 但是不妨碍它是最简单的例子。
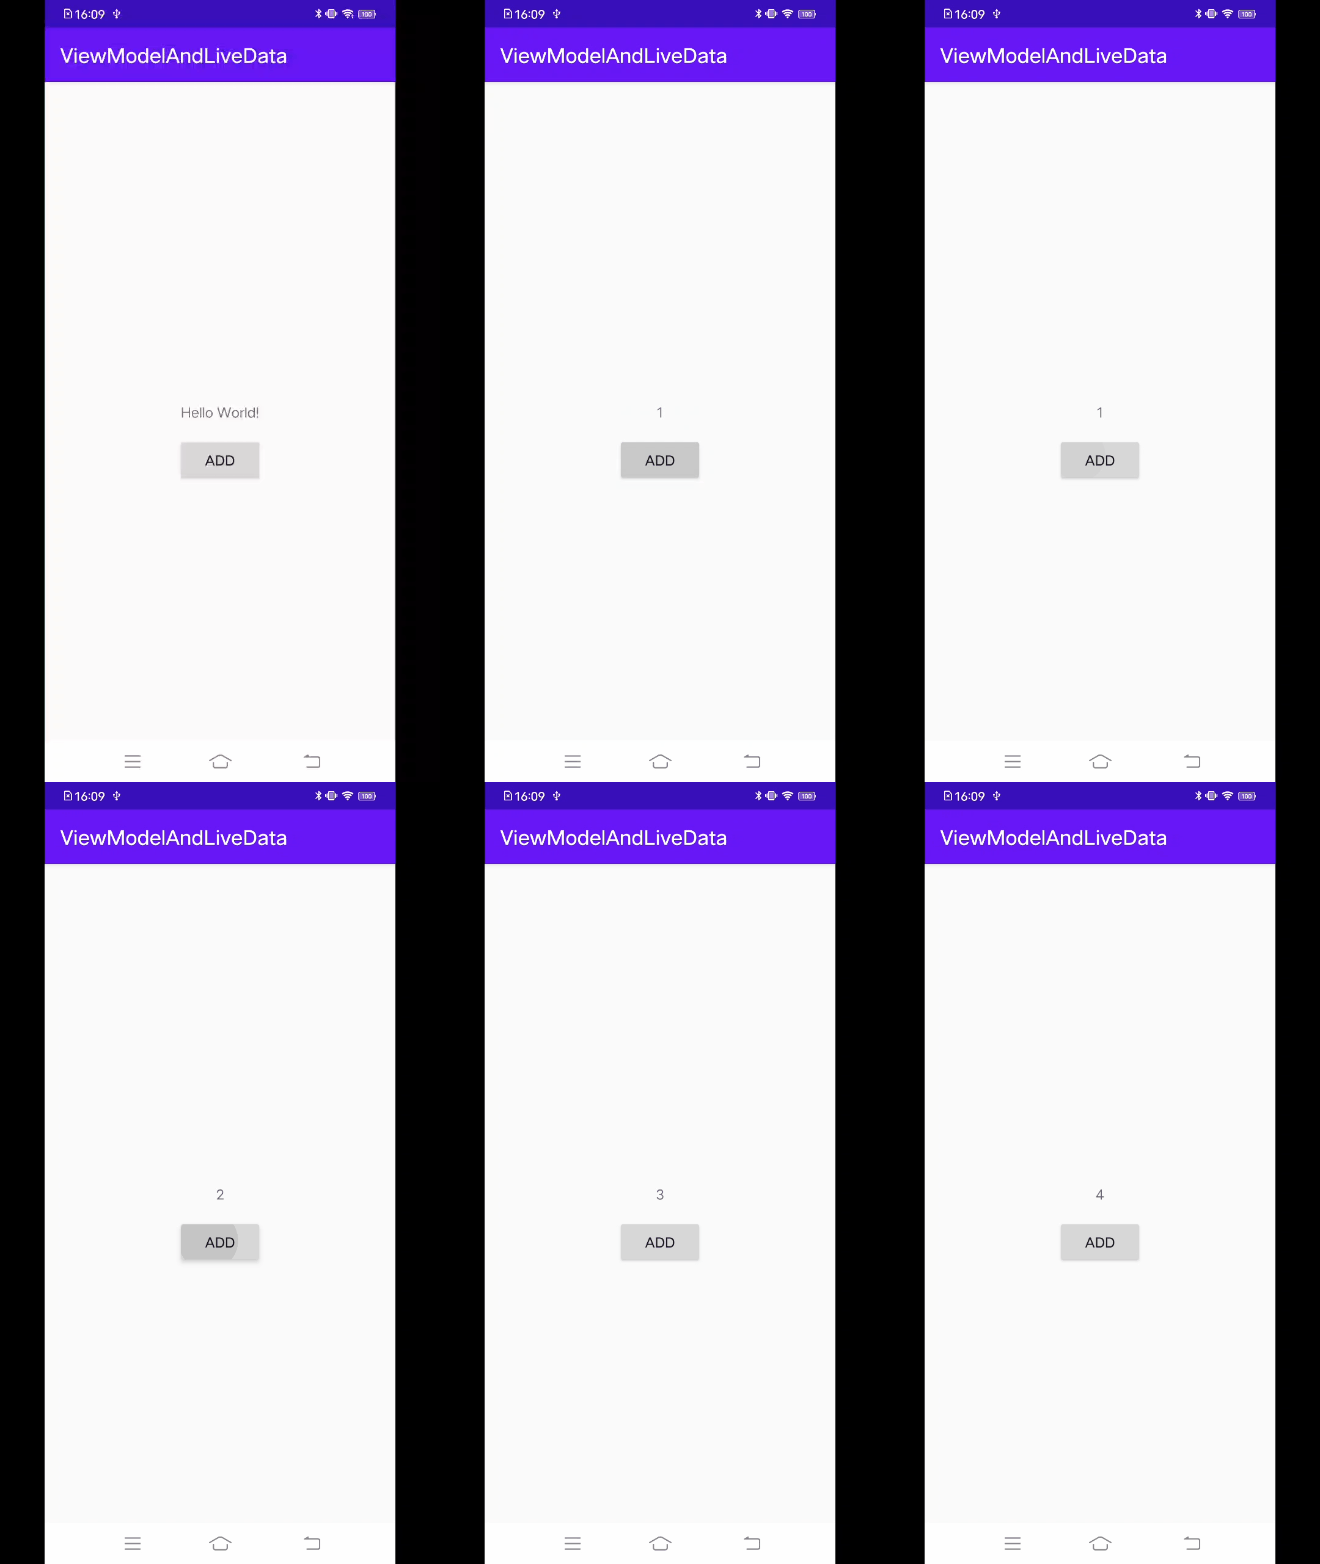
LiveData需要配合ViewModel一起使用, 使用很简单, 一行代码就能搞定。
我们修改代码MainVM.kt中的代码
  class MainVM : ViewModel() {
    var count: MutableLiveData<Int> = MutableLiveData()
  }
然后, 就可以在MainActivity.kt中调用它。
  import androidx.activity.viewModels
  class MainActivity : AppCompatActivity() {
      private lateinit var binding: ActivityMainBinding
      private val mainVm: MainVM by viewModels()
      override fun onCreate(savedInstanceState: Bundle?) {
        binding = ActivityMainBinding.inflate(layoutInflater)
        setContentView(binding.root)

        /// 只需要在这里写观察回调, liveData将自动监测数据变化
        mainVm.count.observe(MainActivity@ this) {
            binding.myTextView.text = "$it"  //setText()
        }

        /// add按钮, 设置点击事件, 直接更改 count 的值
        binding.add.setOnClickListener {
            mainVm.count.value = (mainVm.count.value ?: 0) + 1
        }
      }
  }
好了, 这个例子就这么完了, ViewModel和LiveData的使用到此结束。
LiveData和ViewModel在Fragment中的使用
LiveData和ViewModel的强大不止于此, 在此之前Framgent之间的通信很繁琐, 然而有了ViewModel之后, 彻底被简化了。
上图, 上代码!
首先是Fragment容器
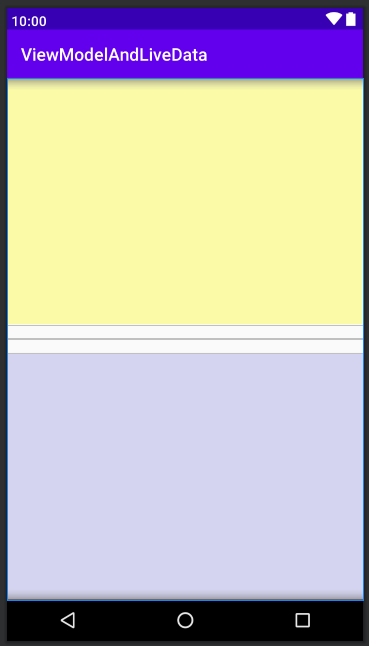
activity_second.xml
<?xml version="1.0" encoding="utf-8"?>
<LinearLayout xmlns:android="http://schemas.android.com/apk/res/android"
    android:layout_width="match_parent"
    android:layout_height="match_parent"
    android:orientation="vertical">

    <androidx.fragment.app.FragmentContainerView
        android:id="@+id/firstFragment"
        android:name="com.example.vl.fragment.FirstFragment"
        android:layout_width="match_parent"
        android:layout_height="0dp"
        android:layout_weight="1"
        android:background="#55fafa00" />

    <View
        android:layout_width="match_parent"
        android:layout_height="1dp"
        android:layout_marginVertical="16dp"
        android:background="@color/colorPrimary" />

    <androidx.fragment.app.FragmentContainerView
        android:id="@+id/secondFragment"
        android:name="com.example.vl.fragment.SecondFragment"
        android:layout_width="match_parent"
        android:layout_height="0dp"
        android:layout_weight="1"
        android:background="#558787dd" />
</LinearLayout>
然后是fragment_first.xml
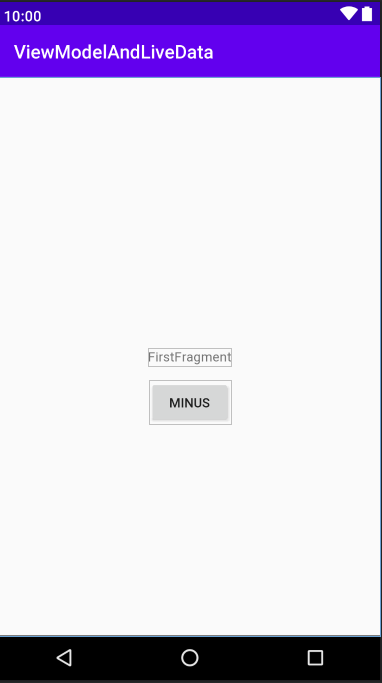
<?xml version="1.0" encoding="utf-8"?>
<androidx.constraintlayout.widget.ConstraintLayout xmlns:android="http://schemas.android.com/apk/res/android"
    xmlns:app="http://schemas.android.com/apk/res-auto"
    xmlns:tools="http://schemas.android.com/tools"
    android:layout_width="match_parent"
    android:layout_height="match_parent"
    tools:context=".fragment.FirstFragment">

    <TextView
        android:id="@+id/textView"
        android:layout_width="wrap_content"
        android:layout_height="wrap_content"
        android:text="FirstFragment"
        app:layout_constraintBottom_toBottomOf="parent"
        app:layout_constraintLeft_toLeftOf="parent"
        app:layout_constraintRight_toRightOf="parent"
        app:layout_constraintTop_toTopOf="parent" />

    <Button
        android:id="@+id/minus"
        android:layout_width="wrap_content"
        android:layout_height="wrap_content"
        android:layout_marginTop="16dp"
        android:text="minus"
        app:layout_constraintEnd_toEndOf="parent"
        app:layout_constraintStart_toStartOf="parent"
        app:layout_constraintTop_toBottomOf="@+id/textView" />

</androidx.constraintlayout.widget.ConstraintLayout>
再然后是fragment_second.xml
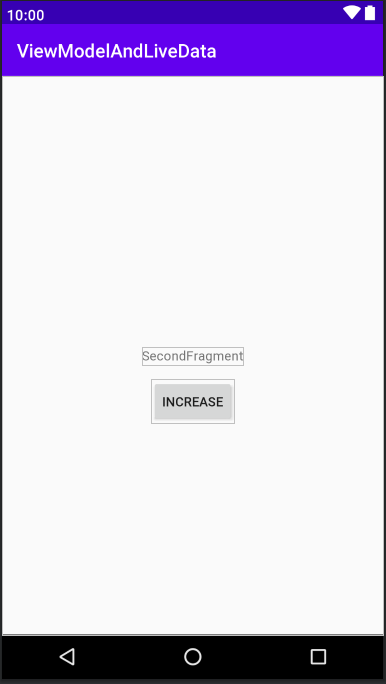
<?xml version="1.0" encoding="utf-8"?>
<androidx.constraintlayout.widget.ConstraintLayout xmlns:android="http://schemas.android.com/apk/res/android"
    xmlns:app="http://schemas.android.com/apk/res-auto"
    xmlns:tools="http://schemas.android.com/tools"
    android:layout_width="match_parent"
    android:layout_height="match_parent"
    tools:context=".fragment.SecondFragment">

    <TextView
        android:id="@+id/textView2"
        android:layout_width="wrap_content"
        android:layout_height="wrap_content"
        android:text="SecondFragment"
        app:layout_constraintBottom_toBottomOf="parent"
        app:layout_constraintLeft_toLeftOf="parent"
        app:layout_constraintRight_toRightOf="parent"
        app:layout_constraintTop_toTopOf="parent" />

    <Button
        android:id="@+id/increase"
        android:layout_width="wrap_content"
        android:layout_height="wrap_content"
        android:layout_marginTop="16dp"
        android:text="increase"
        app:layout_constraintEnd_toEndOf="parent"
        app:layout_constraintStart_toStartOf="parent"
        app:layout_constraintTop_toBottomOf="@+id/textView2" />

</androidx.constraintlayout.widget.ConstraintLayout>
布局画好了之后, 就是代码了, Fragment只列出关键代码了。
FirstFragment.kt
class FirstFragment : Fragment() {
    private val secondVM:SecondVM by activityViewModels()
    ...
    override fun onCreateView(inflater: LayoutInflater, container: ViewGroup?, savedInstanceState: Bundle?): View {
        binding = FragmentFirstBinding.inflate(inflater, container, false)

        secondVM.number.observe(requireActivity()) {
            binding.textView.text = "$it"
        }

        binding.minus.setOnClickListener {
            secondVM.onMinus()  //递减
        }

        return binding.root
    }
}
SecondFragment.kt
class SecondFragment : Fragment() {
    private lateinit var secondVM: SecondVM
    ...
    override fun onCreate(savedInstanceState: Bundle?) {
        super.onCreate(savedInstanceState)
        secondVM = ViewModelProvider(requireActivity(), ViewModelProvider.NewInstanceFactory()).get(SecondVM::class.java)
    }
    ...
    override fun onCreateView(inflater: LayoutInflater, container: ViewGroup?, savedInstanceState: Bundle?): View {
        // Inflate the layout for this fragment
        binding = FragmentSecondBinding.inflate(inflater, container, false)

        secondVM.number.observe(requireActivity()) {
            binding.textView2.text = "$it"
        }

        binding.increase.setOnClickListener {
            secondVM.onIncrease()  //递增
        }

        return binding.root
    }
}
SecondVM.kt
class SecondVM : ViewModel() {
    private var _number: MutableLiveData<Int> = MutableLiveData()
    val number: LiveData<Int> = _number //LiveData不允许通过 setValue 和 postsValue 更新数据

    fun onIncrease() {
        //前文没提, 这里的 value = ... 因为kotlin的特性, 调用的是 setValue() 方法
        _number.value = (_number.value ?: 0) + 1
    }

    fun onMinus() {
        _number.value = (_number.value ?: 0) - 1
    }
}
SecondFragment.kt
class SecondActivity : AppCompatActivity() {
    //private val secondVM: SecondVM by viewModels()
    override fun onCreate(savedInstanceState: Bundle?) {
        super.onCreate(savedInstanceState)
        setContentView(R.layout.activity_second)
    }
}
这里可以不用书写 secondVM: SecondVM by viewModels() 为什么?
因为我们创建ViewModel对象并不是通过new去创建的(也千万不要通过new去创建), 而ViewModelProvider.Factory下文将做解释。
ViewModelProvider会寻找内存中已经被创建的ViewModel, 如果没有找到, 那么它会去创建一个新的。
我们跑一遍上面的代码。
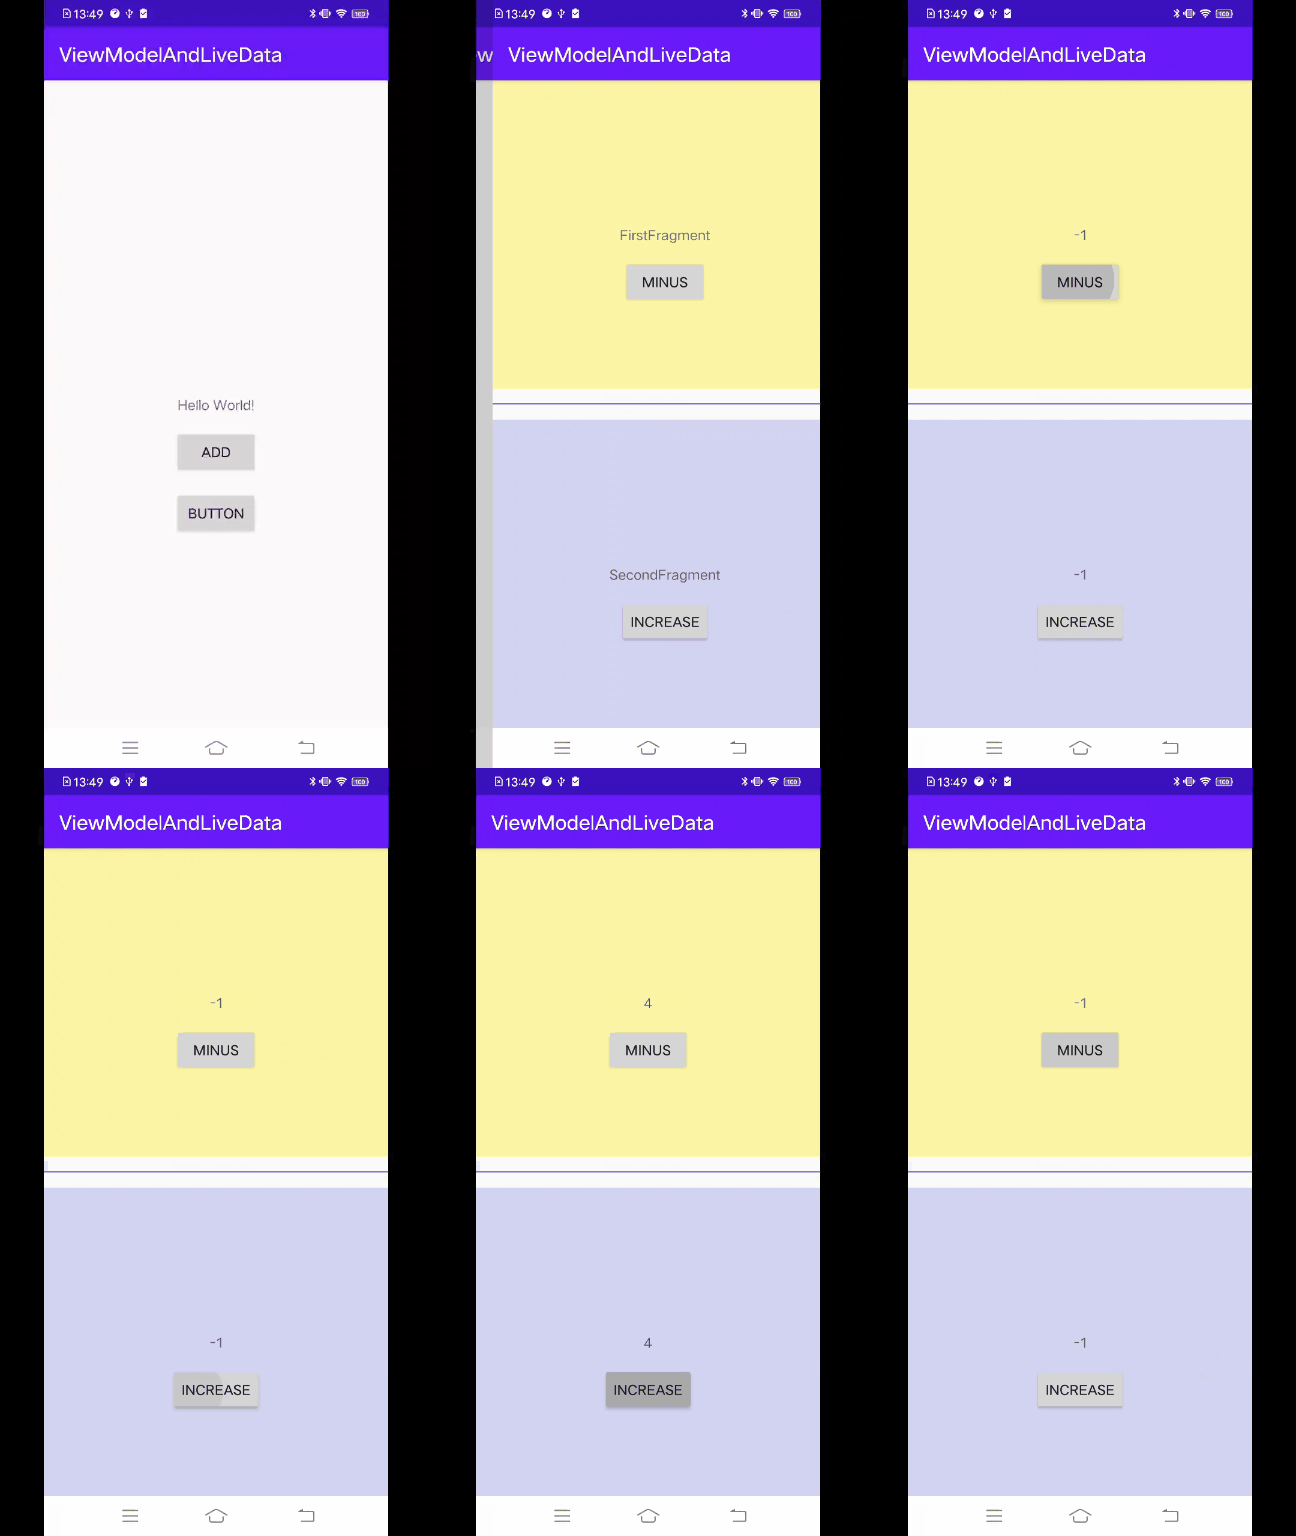
可以发现, 不管是点击上面的按钮, 还是点击下面的按钮, 两个TextView的内容都发生了改变。
LiveData和MutableLiveData
通过上面的代码发现, 我们既使用LiveData又使用了MutableLiveData, 那么它们的关系如何呢? 为什么说LiveData不能修改(更新)数据?
我们看到MutableLiveData的源码
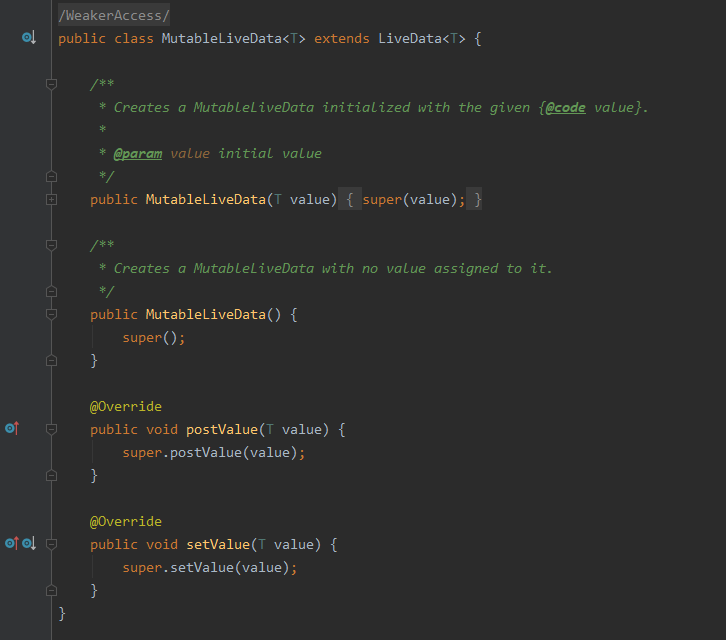
发现它是直接继承LiveData的, 虽然重写了setValue()和postValue()这两个方法, 但是没有加入任何新的代码, 而是直接super父类方法。
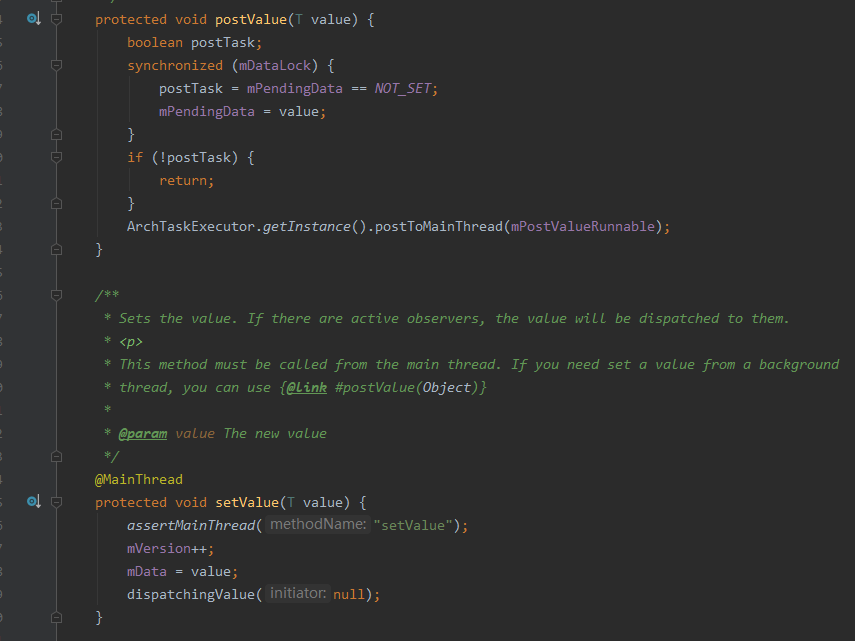
点开父类LiveData才发现, 原来MutableLiveData只做了一件事情, 就是将protected -> public 了。
至于postValue和setValue的区别:在于postsValue处理多线程模式下的数据更新(但是UI的更新还是在主线程下), setValue只能在单线程模式下使用(你可以试试在多线程中调用setValue的情况)
值得注意的是postsValue可能会造成数据丢失, 具体查看【面试官:你了解 LiveData 的 postValue 吗?】这篇文章, 这里就不做赘述了。
为什么要用ViewModelProvider去构建ViewModel?
前面提到了千万不要通过new去创建ViewModel, 至于原因, 我们这里简单看一下ViewModelProvider的相关源码。
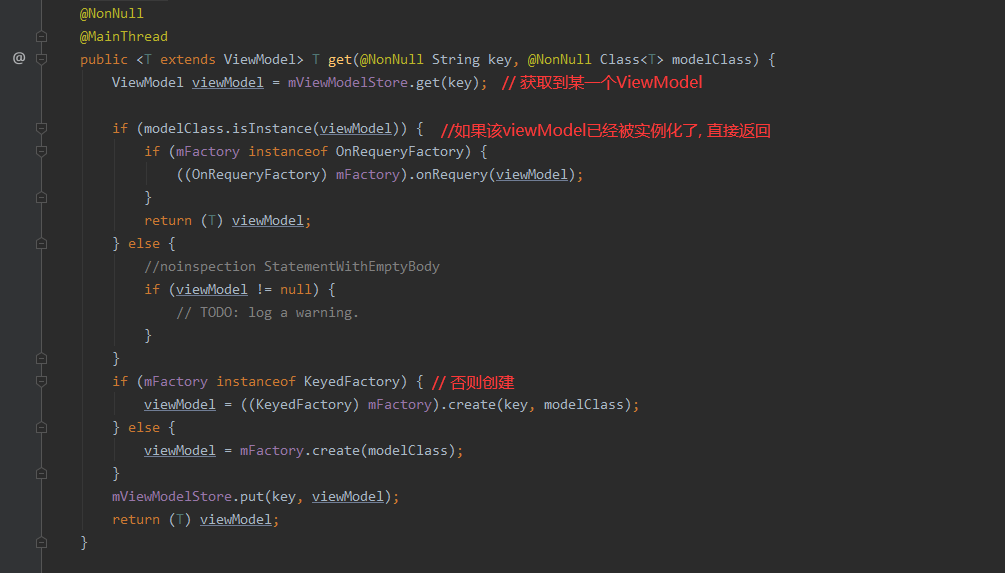
上图可以看到, ViewModelProvider内部维护了一个private final ViewModelStore mViewModelStore, 如果没有找到对应的ViewModel, 那么就通过mFactory.create(modelClass)去创建实例(ViewModelFactory马上登场)。
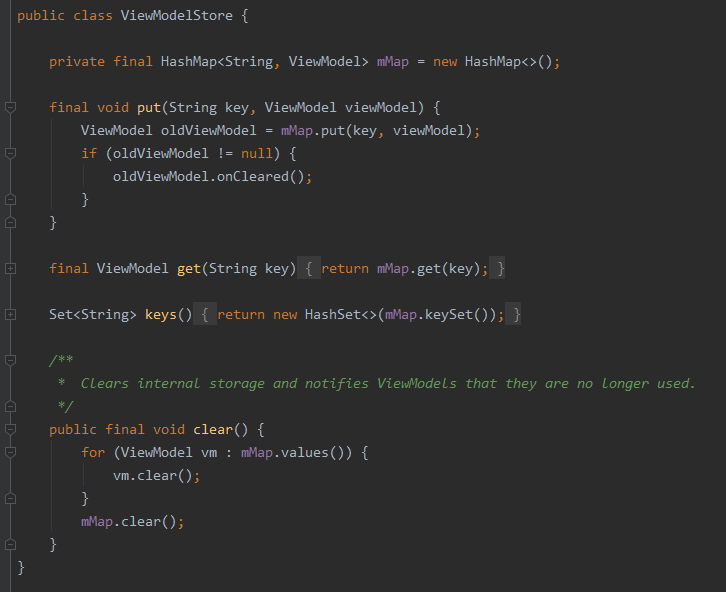
而ViewModelStore内部就是通过HashMap的特性来确保ViewModel的唯一性。
上面提到了, get()方法通过ViewModelProvider.ViewModelFactory的create(modelClass)方法来创建实例。
而且, 我们在使用ViewModelProvider的时候, 通常都提供了一个ViewModelProvider.NewInstanceFactory(), 来看到下图它的结构。
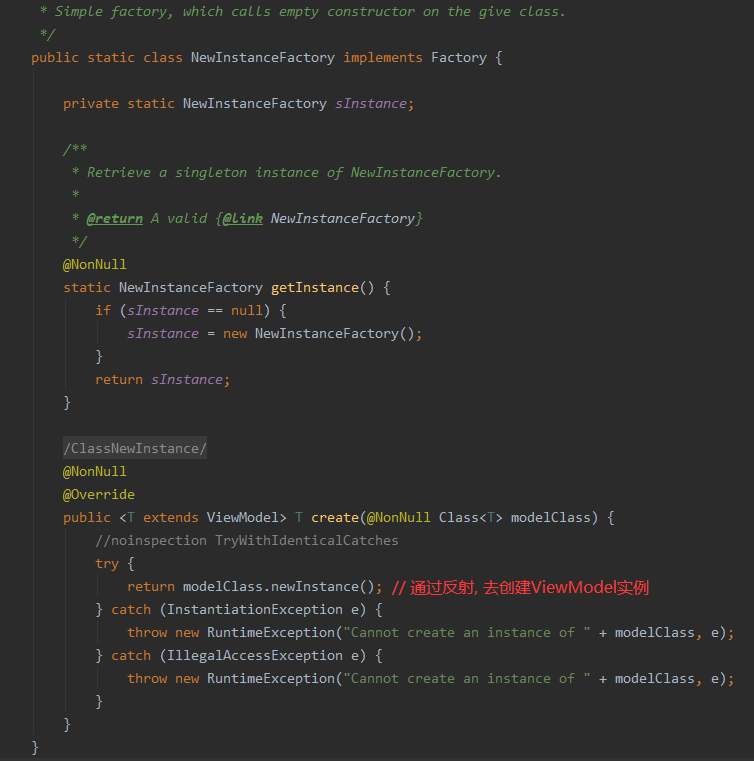
反射!好家伙, 原来ViewModel实例就在这里创建的。
自定义ViewModelFactory
既然知道了ViewModel是通过反射创建的, 那就好办了; 现在有个需求: 在ViewModel初始化的时候, 需要参数初始化。
图来!!
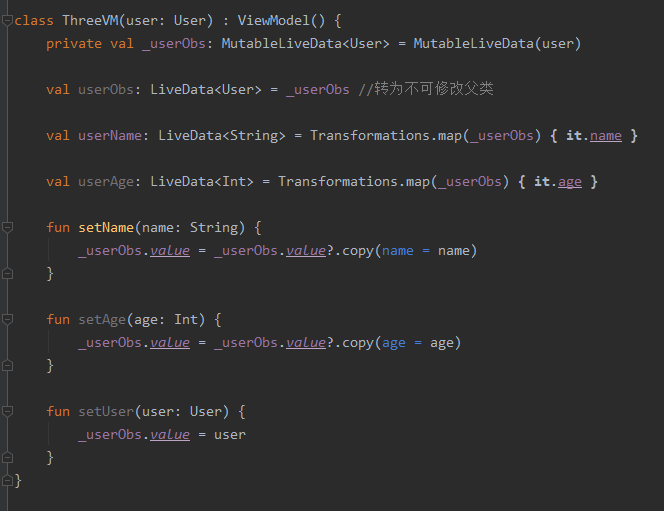
就需要我们自己实现ViewModelProvider.ViewModelFactory了
/// 自定义 ViewModelFactory
class ThreeViewModelFactory(var user: User) : ViewModelProvider.Factory {

    override fun <T : ViewModel?> create(modelClass: Class<T>): T {
        return modelClass.getConstructor(User::class.java).newInstance(user)
    }
}
自定义 ViewModelFactory只需要继承ViewModelFactory` 然后重写create方法即可。
通过getConstructor(User::class.java)获取到带参数构造函数, 然后newInstance传入user实例。
最后在activity中使用即可
class ThreeActivity : AppCompatActivity() {
    private lateinit var binding: ActivityThreeBinding
    private lateinit var vm: ThreeVM
    override fun onCreate(savedInstanceState: Bundle?) {
        super.onCreate(savedInstanceState)
        binding = ActivityThreeBinding.inflate(layoutInflater)
        setContentView(binding.root)

        vm = ViewModelProvider(this, ThreeViewModelFactory(User("张三", 18))).get(ThreeVM::class.java)

        // 观察数据变化
        vm.userName.observe(this) {
            binding.nameText.text = it
        }

        // 点击按钮改变user
        binding.changeName.setOnClickListener {
            // kotlin中的三目运算
            vm.setName(if (vm.userName.value == "李四") "张三" else "李四")
        }
    }
}
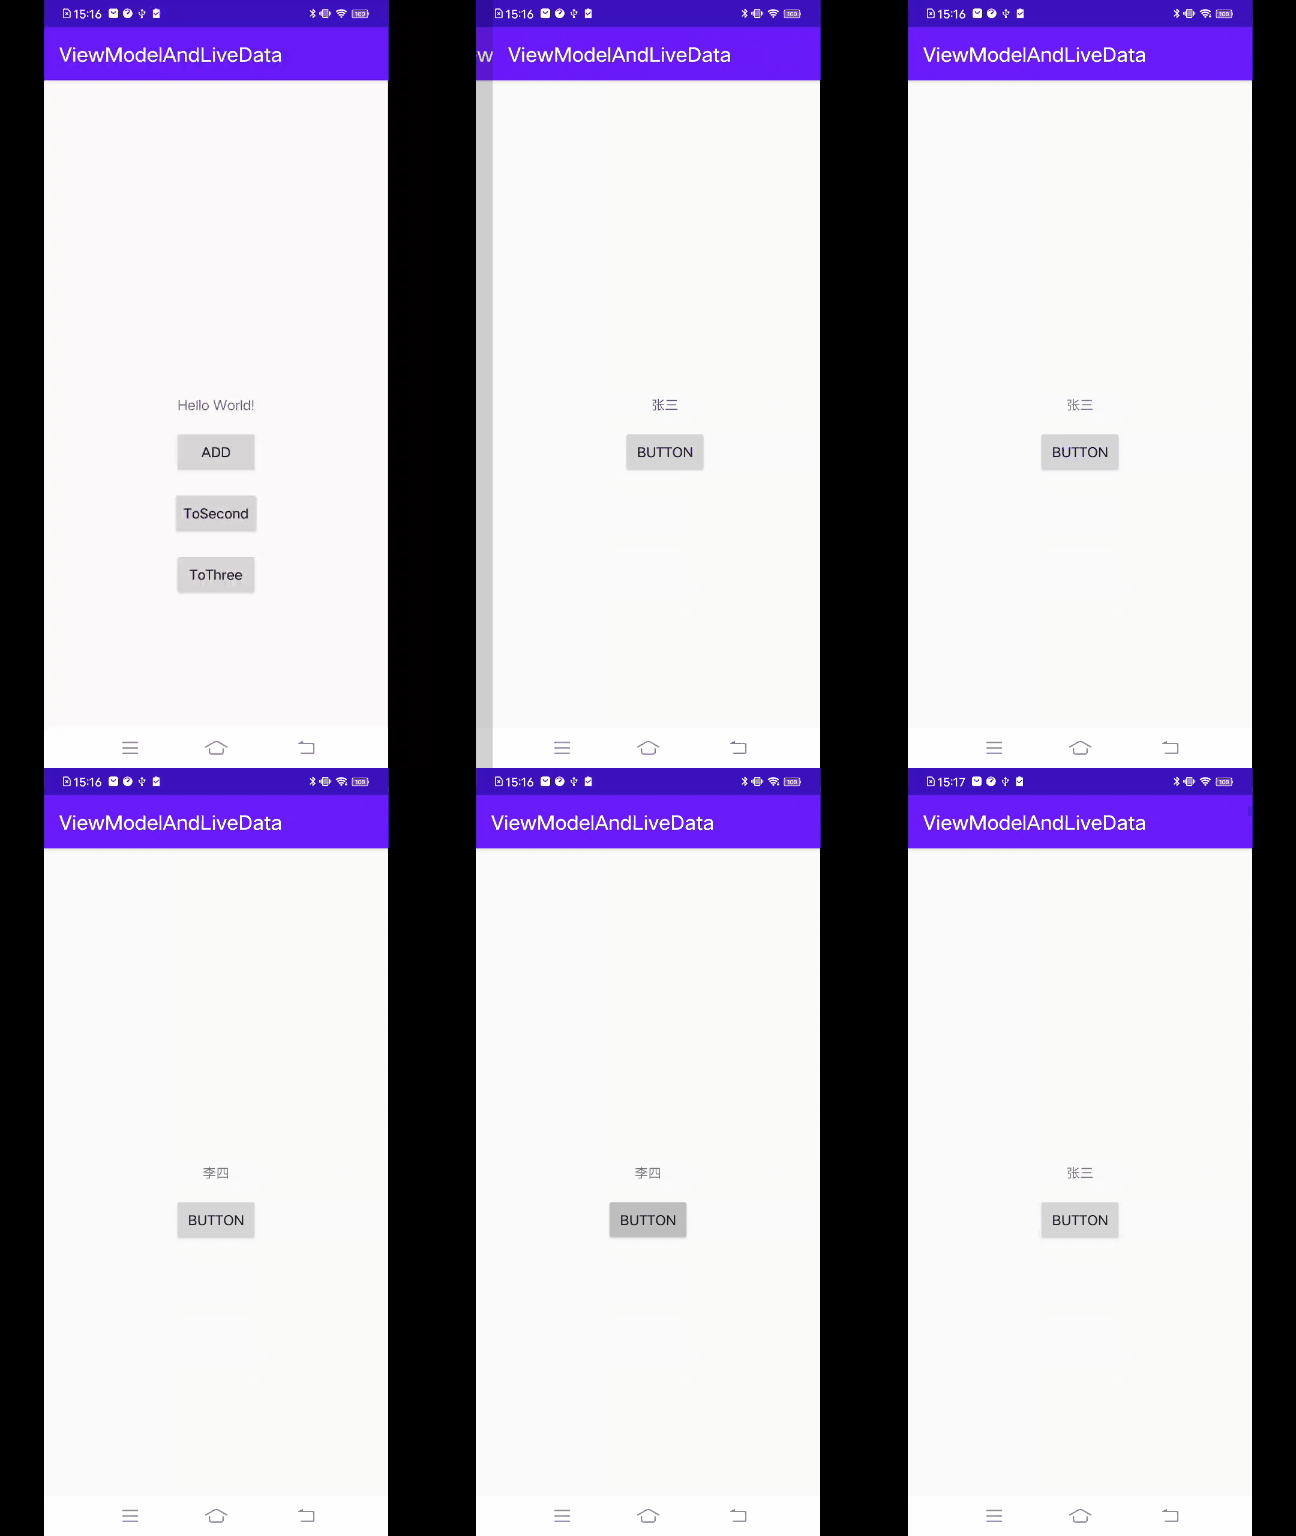
运行结果图
