Spring Boot日志
1.SLF4j使用
(1)如何在系统中使用SLF4j
开发中,日志记录方法的调用,不应该来直接调用日志的实现类,而是调用日志抽象层里面的方法。给系统里面导入slf4j的jar和logback的实现jar
import org.slf4j.Logger;
import org.slf4j.LoggerFactory;

public class HelloWorld{
	public static void main(String[] args){
		Logger logger = LoggerFactory.getLogger(HelloWorld.class);
		logger.info("Hello World");
	}
}
每一个日志的实现框架都有自己的配置文件。使用slf4j以后,配置文件还是做成日志实现框架的配置文件
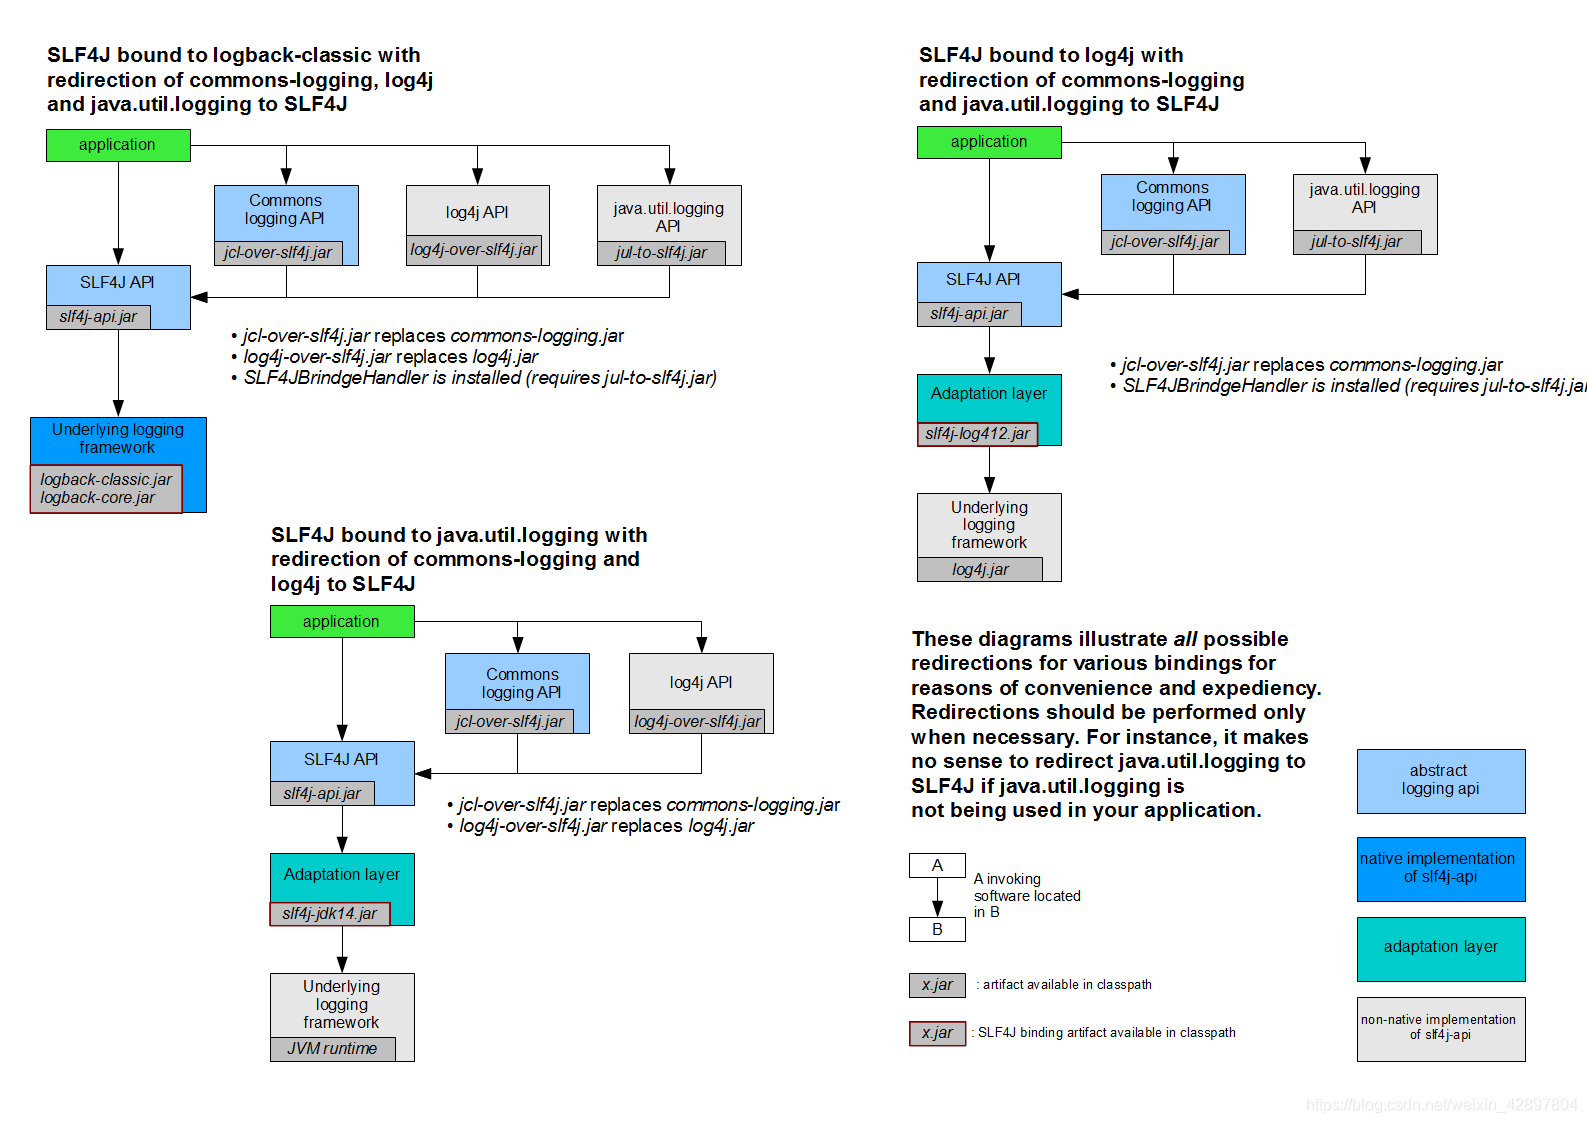
(2)如何让系统中所有的日志都统一到slf4j
(1)将系统中其他日志框架先排除出去
(2)用中间包来替换原有的日志框架
(3)我们导入slf4j其他的实现
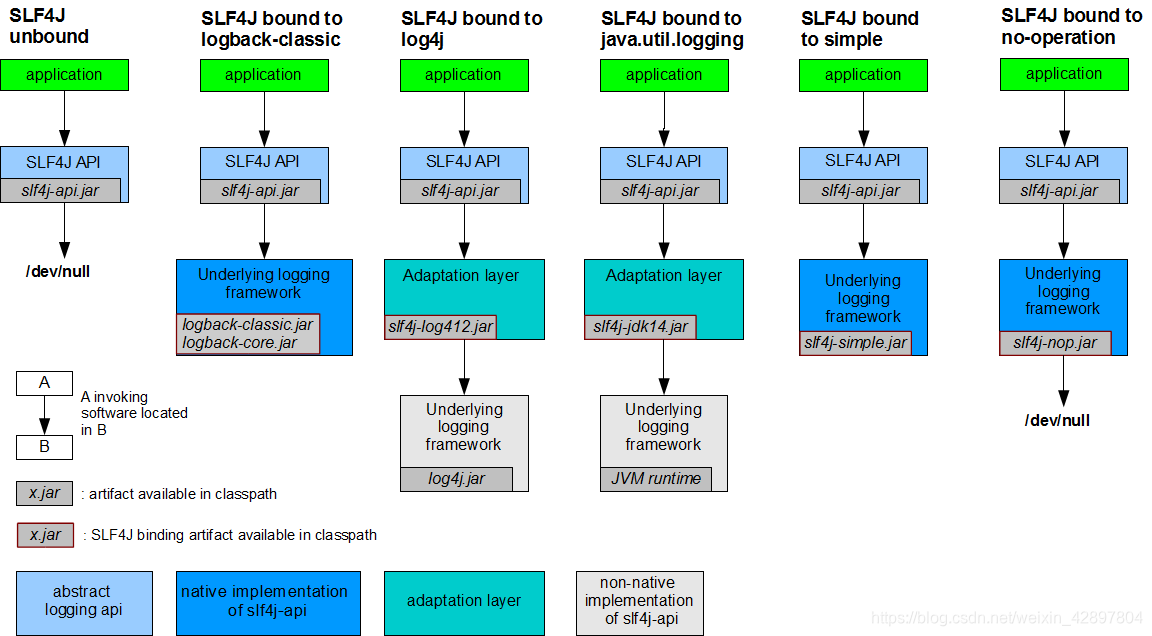
2.日志关系

总结:
(1)SpringBoot底层也是使用slf4j+logback的方式进行日志记录
(2)SpringBoot也把其他的日志都替换成了slf4j
注意:如果我们要引入其他框架,一定要把这个框架的默认日志依赖移除掉。
SpringBoot能自动适配所有的日志,而且底层使用slf4j+logback的方式记录日志,引入其他框架的时候,只需要把这个框架依赖的日志框架派出的
3.日志使用
/**
 * 记录器
 */
Logger logger = LoggerFactory.getLogger(getClass());
@Test
void contextLoads() {
    //日志的级别
    //由低到高 trace<debug<info<warn<error
    //可以调整输出的日志级别,日志就只会在这个级别以后的高级别生效
    logger.trace("这是trace日志...");
    logger.debug("这是debug日志...");
    //SpringBoot默认给我们使用的是info级别的
    logger.info("这是debug日志...");
    logger.warn("这是warn日志...");
    logger.error("这是error日志...");
}
(1)指定配置
给类路径下放上每个日志框架自己的配置文件即可,SpringBoot就不使用默认配置
logback.xml:直接就被日志框架识别
logback-spring.xml:日志框架不直接加载日志的配置项,而由SpringBoot解析日志配置,可以使用SpringBoot的高级功能Profile功能
<springProfile name="staging">
	可以指定某段配置只在某个环境下生效
</springProfile>
Spring Boot Web开发简介
1.使用Spring Boot
(1)创建SpringBoot应用,选择需要的模板
(2)SpringBoot已经默认将这些场景配置好,只需要在配置文件中指定少量配置就可以运行
(3)编写业务代码
2.自动配置原理
3.对静态资源的映射规则
@ConfigurationProperties(
    prefix = "spring.resources",
    ignoreUnknownFields = false
)
public class ResourceProperties {

//可以设置和资源有关的参数,比如:缓存时间等
public void addResourceHandlers(ResourceHandlerRegistry registry) {
    if (!this.resourceProperties.isAddMappings()) {
        logger.debug("Default resource handling disabled");
    } else {
        Duration cachePeriod = this.resourceProperties.getCache().getPeriod();
        CacheControl cacheControl = this.resourceProperties.getCache().getCachecontrol().toHttpCacheControl();
        if (!registry.hasMappingForPattern("/webjars/**")) {
            this.customizeResourceHandlerRegistration(registry.addResourceHandler(new String[]{"/webjars/**"}).addResourceLocations(new String[]{"classpath:/META-INF/resources/webjars/"}).setCachePeriod(this.getSeconds(cachePeriod)).setCacheControl(cacheControl));
        }
        String staticPathPattern = this.mvcProperties.getStaticPathPattern();
        if (!registry.hasMappingForPattern(staticPathPattern)) {
            this.customizeResourceHandlerRegistration(registry.addResourceHandler(new String[]{staticPathPattern}).addResourceLocations(WebMvcAutoConfiguration.getResourceLocations(this.resourceProperties.getStaticLocations())).setCachePeriod(this.getSeconds(cachePeriod)).setCacheControl(cacheControl));
        }
    }
}
(1)所有/webjars/**,都去classpath:/META-INF/resources/webjars/找资源。webjars:以jar包的方式引入静态资源
webjars官方网站
http://localhost:8080/webjars/jquery/3.3.1/jquery.js
<!-- 引入jquery-webjar -->
<dependency>
    <groupId>org.webjars</groupId>
    <artifactId>jquery</artifactId>
    <version>3.3.1</version>
</dependency>
(2)”/**”访问当前项目的任何资源(静态资源的文件夹)
"classpath:/META-INF/resources/",
"classpath:/resources/",
"classpath:/static/",
"classpath:/public/"
"/" //当前项目的根路径
(3)欢迎页,静态资源文件夹下的所有indx.html页面,被”/**”映射
//配置欢迎页的映射
@Bean
public WelcomePageHandlerMapping welcomePageHandlerMapping(ApplicationContext applicationContext, FormattingConversionService mvcConversionService, ResourceUrlProvider mvcResourceUrlProvider) {
    WelcomePageHandlerMapping welcomePageHandlerMapping = new WelcomePageHandlerMapping(new TemplateAvailabilityProviders(applicationContext), applicationContext, this.getWelcomePage(), this.mvcProperties.getStaticPathPattern());
    welcomePageHandlerMapping.setInterceptors(this.getInterceptors(mvcConversionService, mvcResourceUrlProvider));
    return welcomePageHandlerMapping;
}
(4)所有的 **/favicon.ico 都是在静态资源文件下找
Thymeleaf入门
1.模板引擎
JSP、Velocity、Freemarker、Thymeleaf
2.模板引擎思想(作用)
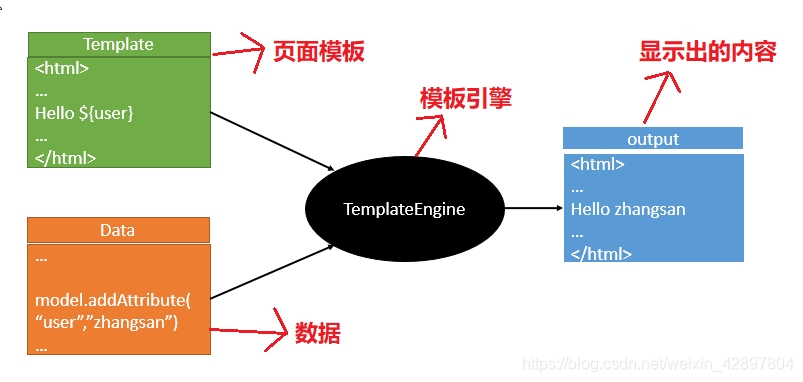
SpringBoot推荐的Thymeleaf,语法更简单,功能更强大。
3.引入模板引擎
<dependency>
   <groupId>org.springframework.boot</groupId>
   <artifactId>spring-boot-starter-thymeleaf</artifactId>
</dependency>
4.Thymeleaf使用&语法
(1)Thymeleaf使用
@ConfigurationProperties(
    prefix = "spring.thymeleaf"
)
public class ThymeleafProperties {
    private static final Charset DEFAULT_ENCODING;
    public static final String DEFAULT_PREFIX = "classpath:/templates/";
    public static final String DEFAULT_SUFFIX = ".html";
    private boolean checkTemplate = true;
    private boolean checkTemplateLocation = true;
    private String prefix = "classpath:/templates/";
    private String suffix = ".html";
只要把HTML页面放在classpath:/templates/,thymeleaf就能自动渲染;
(2)Thymeleaf语法
(1)导入thymeleaf的名称空间
<html lang="en" xmlns:th="http://www.thymeleaf.org">
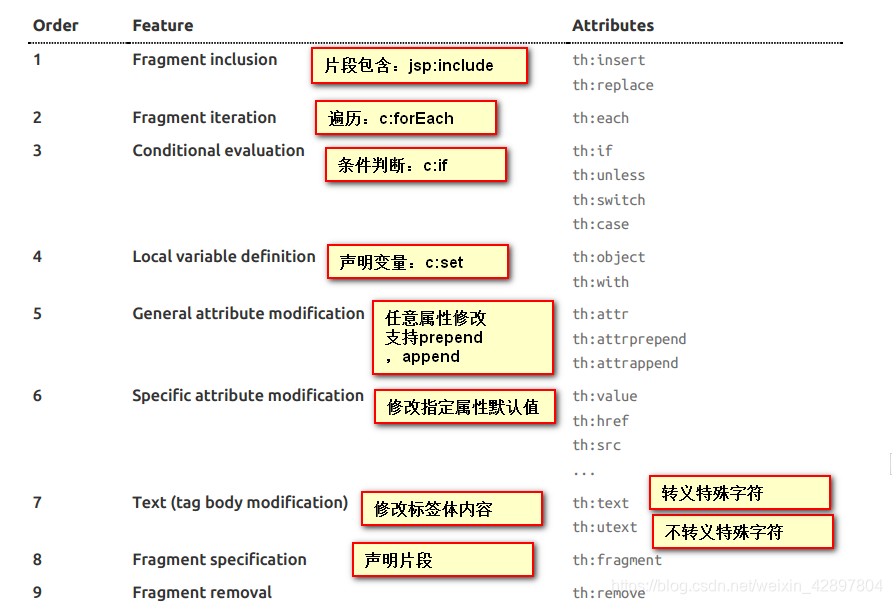
(2)语法规则
th:text 改变当前元素里面的文本内容
th 可搭配任意HTML属性,例如:th:href,来替换原生属性的值。
(3)表达式
Simple expressions:(表达式语法)
	Variable Expressions: ${...}:获取变量值;OGNL;
		1)、获取对象的属性、调用方法
		2)、使用内置的基本对象:
			${session.foo}
		3)、内置的一些工具对象;
	Selection Variable Expressions: *{...}:选择表达式:和${}在功能上是一样;
	补充:配合 th:object="${session.user}";
	Selection Variable Expressions: *{...};
	选择表达式:和${}在功能上是一样;
	补充:配合 th:object="${session.user}";
	<div th:object="${session.user}">
		<p>Name: <span th:text="*{firstName}">Sebastian</span>.</p>
		<p>Surname: <span th:text="*{lastName}">Pepper</span>.</p>
		<p>Nationality: <span th:text="*{nationality}">Saturn</span>.</p>
	</div>
	Message Expressions: #{...}:获取国际化内容
	Link URL Expressions: @{...}:定义URL;
	@{/order/process(execId=${execId},execType='FAST')}
	Fragment Expressions: ~{...}:片段引用表达式
	<div th:insert="~{commons :: main}">...</div>
Literals(字面量)
	Text literals: 'one text' , 'Another one!' ,…
	Number literals: 0 , 34 , 3.0 , 12.3 ,…
	Boolean literals: true , false
	Null literal: null
	Literal tokens: one , sometext , main ,…
Text operations:(文本操作)
	String concatenation: +
	Literal substitutions: |The name is ${name}|
Arithmetic operations:(数学运算)
    Binary operators: + , ‐ , * , / , %
Boolean operations:(布尔运算)
	Binary operators: and , or
	Boolean negation (unary operator): ! , not
Comparisons and equality:(比较运算)
	Comparators: > , < , >= , <= ( gt , lt , ge , le )
	Equality operators: == , != ( eq , ne )
Conditional operators:条件运算(三元运算符)
	If‐then: (if) ? (then)
	If‐then‐else: (if) ? (then) : (else)
	Default: (value) ?: (defaultvalue)
Special tokens:
	No‐Operation: _
数据访问
1.JDBC
(1)引入依赖
<dependency>
	<groupId>org.springframework.boot</groupId>
	<artifactId>spring-boot-starter-jdbc</artifactId>
</dependency>

<dependency>
	<groupId>mysql</groupId>
	<artifactId>mysql-connector-java</artifactId>
	<scope>runtime</scope>
</dependency>
(2)在主配置文件中进行配置
spring:
  datasource:
    username: root
    password: 123456
    url: jdbc:mysql:///huawen
    driver-class-name: com.mysql.jdbc.Driver
(3)自动配置原理
org.springframework.boot.autoconfigure.jdbc
(1)参考DataSourceConfiguration
根据配置创建数据源,默认使用Hikari连接池,可以使用 spring.datasource.type指定自定义的数据源类型。
(2)SpringBoot默认可以支持
org.apache.tomcat.jdbc.pool.DataSource、HikariDataSource、BasicDataSource
(3)自定义数据源类型
@ConditionalOnMissingBean({DataSource.class})
@ConditionalOnProperty(
    name = {"spring.datasource.type"}
)
static class Generic {
    Generic() {
    }

    @Bean
    DataSource dataSource(DataSourceProperties properties) {
    	//使用DataSourceBuilder创建数据源,利用反射创建响应type的数据源,并且绑定相关属性
        return properties.initializeDataSourceBuilder().build();
    }
}
2.整合Druid数据源
(1)引入Druid依赖
<dependency>
    <groupId>com.alibaba</groupId>
    <artifactId>druid</artifactId>
    <version>1.1.10</version>
</dependency>
(2)配置主配置文件
spring:
  datasource:
    username: root
    password: 123456
    url: jdbc:mysql:///huawen
    driver-class-name: com.mysql.jdbc.Driver
    type: com.alibaba.druid.pool.DruidDataSource
    #数据源其他配置
    initialSize: 5
    minIdle: 5
    maxActive: 20
    maxWait: 60000
    timeBetweenEvictionRunsMillis: 60000
    minEvictableIdleTimeMillis: 300000
    validationQuery: SELECT 1 FROM DUAL
    testWhileIdle: true
    testOnBorrow: false
    testOnReturn: false
    poolPreparedStatements: true
    #配置监控统计拦截的filters,去掉后监控界面sql无法统计,'wall'用于防火墙
    filters: stat,wall,slf4j
    maxPoolPreparedStatementPerConnectionSize: 20
    useGlobalDataSourceStat: true
    connectionProperties: druid.stat.mergeSql=true;druid.stat.slowSqlMillis=500
/**
 * 测试类
 */
@SpringBootTest
class SpringBoot05ApplicationTests {

    @Autowired
    DataSource dataSource;

    @Test
    void contextLoads() {
        System.out.println(dataSource.getClass());
    }

}
数据源其他配置需要在配置类中配置,才能起作用

(3)整合Druid详细配置类
@Configuration
public class DruidConfig {

    @ConfigurationProperties(prefix = "spring.datasource")
    @Bean
    public DataSource druid(){
        return new DruidDataSource();
    }

    //配置Druid的监控
    /**
     * 1、配置一个管理后台的Servlet
     * @return
     */
    @Bean
    public ServletRegistrationBean statViewServlet(){
        ServletRegistrationBean bean = new ServletRegistrationBean(new StatViewServlet(), "/druid/*");
        Map<String,String> initParams = new HashMap<>();
        //设置Druid后台管理登录名和登录密码
        initParams.put("loginUsername","admin");
        initParams.put("loginPassword","123456");
        /*设置允许访问的路径,默认允许所有可访问*/
        initParams.put("allow","");
        /*设置拒绝访问的路径
        initParams.put("deny","");*/
        bean.setInitParameters(initParams);
        return bean;
    }

    /**
     * 2、配置Web监控的filter
     * @return
     */
    @Bean
    public FilterRegistrationBean webStatFilter(){
        FilterRegistrationBean bean = new FilterRegistrationBean();
        bean.setFilter(new WebStatFilter());
        Map<String,String> initParams = new HashMap<>();
        initParams.put("exclusions","*.js,*.css,/druid/*");
        bean.setUrlPatterns(Arrays.asList("/*"));
        return bean;
    }

}
3.整合MyBatis
(1)引入依赖
<dependency>
    <groupId>org.mybatis.spring.boot</groupId>
    <artifactId>mybatis-spring-boot-starter</artifactId>
    <version>2.1.2</version>
</dependency>
(2)注解实现
//指定这是一个操作数据库的mapper
@Mapper
public interface NewsMapper {

    /**
     * 按ID查询数据
     * @param id
     * @return
     */
    @Select("select * from t_news where id = #{id}")
    News getNewsById(String id);
}
//使用MapperScan批量扫描所有的Mapper接口;
@MapperScan(value = "com.guan.springboot06.mapper")
@SpringBootApplication
public class SpringBoot06Application {
    public static void main(String[] args) {
        SpringApplication.run(SpringBoot06Application.class, args);
    }
}
如果数据库字段命名为下划线命名法(xx_xx),而实体类字段命名为驼峰命名法(xxXx),该如何映射?
自定义MyBatis的配置规则,给容器中添加一个ConfigurationCustomizer。
@org.springframework.context.annotation.Configuration
public class MyBatisConfig {
    @Bean
    public ConfigurationCustomizer configurationCustomizer() {
        return new ConfigurationCustomizer(){
            @Override
            public void customize(Configuration configuration) {
                configuration.setMapUnderscoreToCamelCase(true);
            }
        };
    }
}
(3)配置文件实现
(1)创建mybatis主配置文件和映射文件
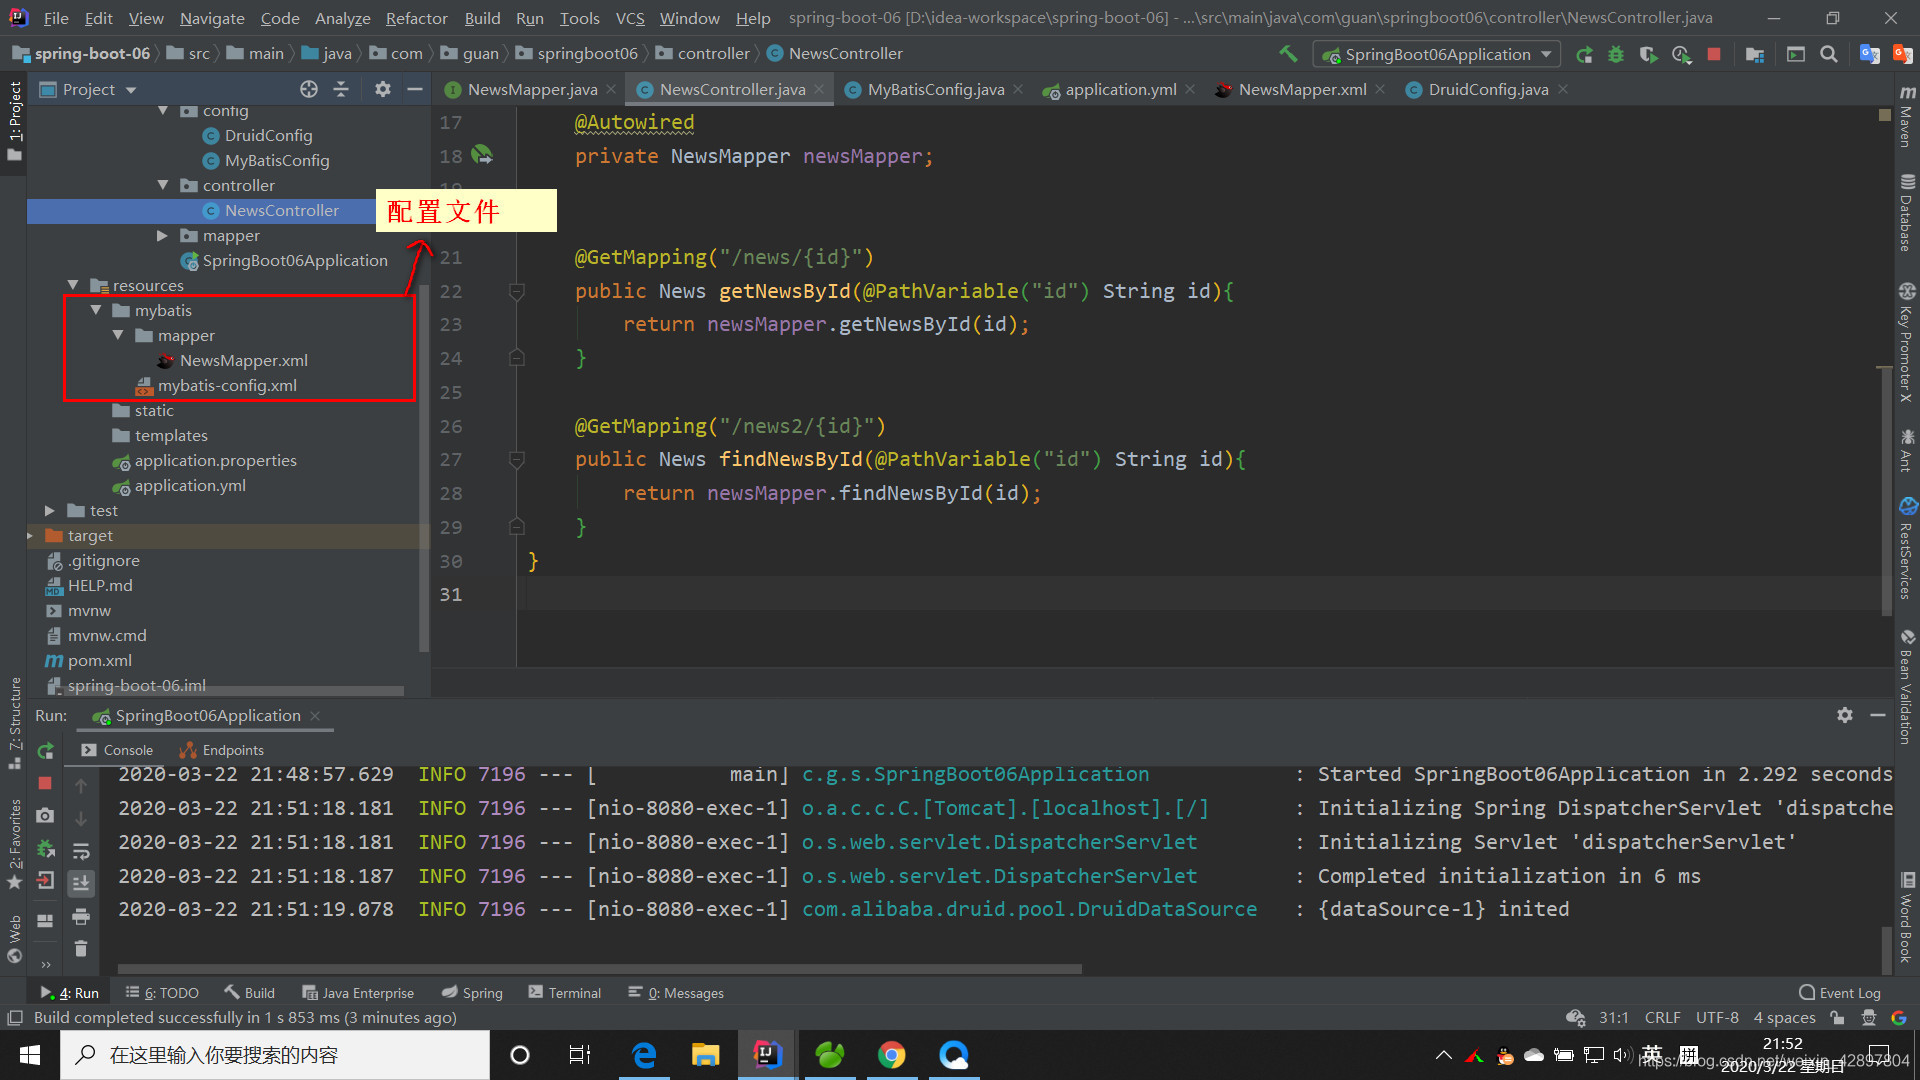
(2)配置主配置文件
mybatis:
  #指定全局配置文件的位置
  config-location: classpath:mybatis/mybatis-config.xml
  #指定sql映射文件的位置
  mapper-locations: classpath:mybatis/mapper/*.xml
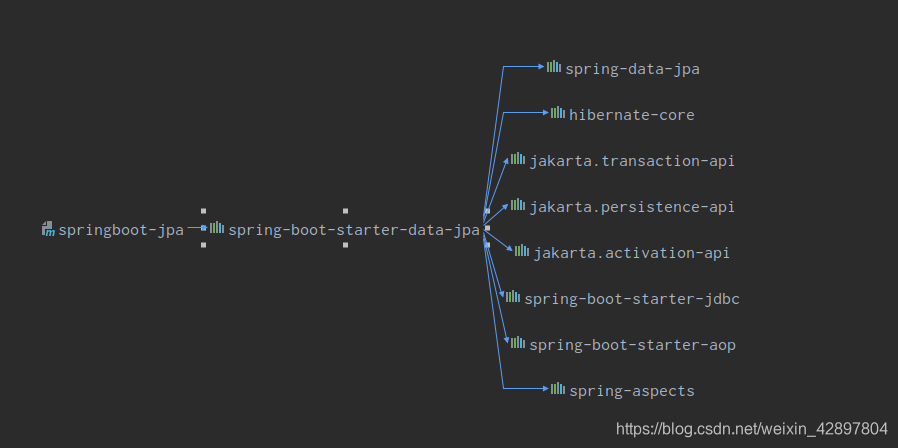
4. Spring Data JPA
(1)引入依赖
<dependency>
    <groupId>org.springframework.boot</groupId>
    <artifactId>spring-boot-starter-data-jpa</artifactId>
</dependency>
(2)配置主配置文件
spring:
  datasource:
    username: root
    password: 123456
    url: jdbc:mysql:///jpa?serverTimezone=GMT%2B8&useUnicode=true&characterEncoding=utf-8
    driver-class-name: com.mysql.cj.jdbc.Driver
  jpa:
    hibernate:
      #更新或者创建数据表结构
      ddl-auto: update
    #控制台显示SQL
    show-sql: true
(3)创建实体类
/**
 * @author
 * 使用JPA注解配置映射关系
 */
@Entity  //告诉JPA这是一个实体类(和数据库表映射的类)
@Table(name = "t_user")  //指定和哪个数据库表对应;如果省略默认表明就是实体类名
public class User {

    @Id  //这是一个主键
    @GeneratedValue(strategy = GenerationType.IDENTITY) //自增主键
    /**
     * 主键ID
     */
    private Integer id;

    @Column(name = "name", length = 50) //和数据库表对应的列
    private String name;

    @Column //省略默认列名就是属性名
    private String email;
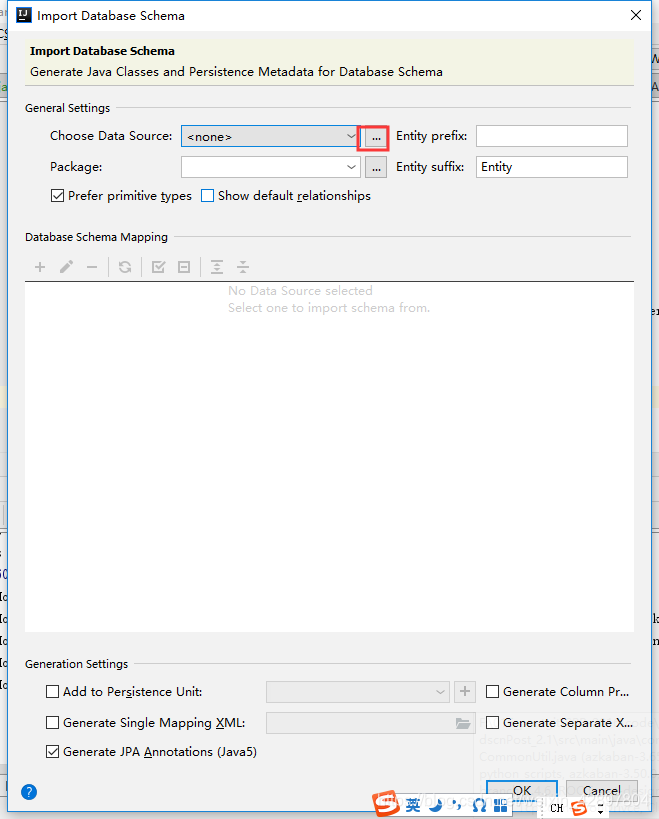
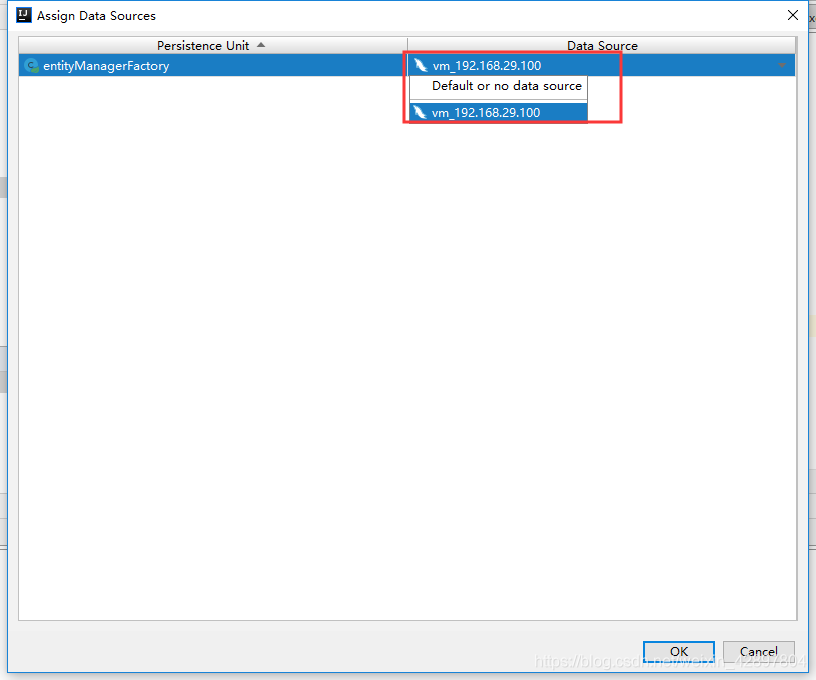
如果@Table(name = “t_user”)注解报错Cannot resolve table ‘xx’,可以使用以下方法解决。

(4)编写Dao接口来操作实体类对应的数据表(Repository)
/**
 * @author 11653
 * 继承JpaRepository来完成对数据库的操作
 */
public interface UserRepository extends JpaRepository<User,Integer> {
}
(5)编写Controller类中的方法
@RestController
public class UserController {

    @Autowired
    UserRepository userRepository;

    @GetMapping("/user/{id}")
    public User findUserById(@PathVariable("id") Integer id){
        User user = userRepository.findById(id).orElse(null);
        return user;
    }

    @GetMapping("/user")
    public User insertUser(User user){
        User user1 = userRepository.save(user);
        return user1;
    }

}