学习java这一篇就够了,从入门到精通,由浅至深,共8章,此篇为第四章中第2小节。附带安装包下载。
配套资料,免费下载
链接:https://pan.baidu.com/s/1G1YUANaBvGjzE-c-Z0xUWw
提取码:txnf
4.5、Servlet继承体系
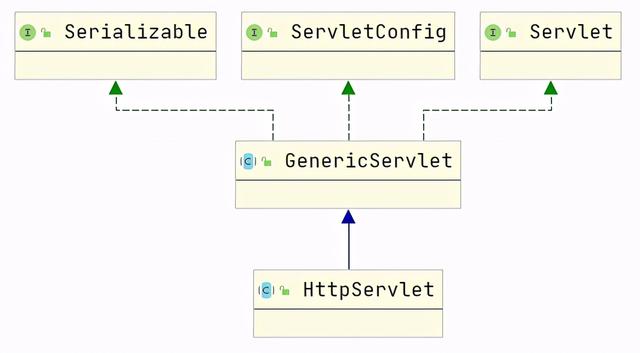
其实我们不难发现,现有的Servlet它的方法比较多,而且大多需要我们自己来实现,那有没有一种它的实现子类,把大部分方法都是实现了,而我们只要关注请求处理就行了,那答案肯定是有的,这个类就是HttpServlet,我们只要继承这个类重写GET、POST方法就能实现一个简单的Servlet请求处理,Servlet的继承体系如下图:
既然我们知道HttpServlet这个类了,我们就要使用一下:
第一步:创建类(com.caochenlei.servlet.demo.MyHttpServlet),并且需要继承HttpServlet实现doPost、doGet方法。
package com.caochenlei.servlet.demo;import javax.servlet.ServletException;import javax.servlet.http.HttpServlet;import javax.servlet.http.HttpServletRequest;import javax.servlet.http.HttpServletResponse;import java.io.IOException;public class MyHttpServlet extends HttpServlet { protected void doPost(HttpServletRequest request, HttpServletResponse response) throws ServletException, IOException { System.out.println("doPost method invoke ..."); } protected void doGet(HttpServletRequest request, HttpServletResponse response) throws ServletException, IOException { System.out.println("doGet method invoke ..."); }}第二步:配置映射(在web.xml文件中新增以下代码)
MyHttpServletcom.caochenlei.servlet.demo.MyHttpServletMyHttpServlet/MyHttpServlet第三步:重启应用,然后浏览器访问(http://localhost:8080/myJavaWebDemo_war_exploded/MyHttpServlet),观察控制台
注意:doPost需要提交表单模拟,这里就不演示了,效果都一样!

我们注意url-pattern它可以有多种拦截形式:
- 全路径匹配:/a
- 前半段匹配:/a/b/c/*
- 扩展名匹配:*.action
4.6、ServletContext
每个web工程都只有一个ServletContext对象,也就是不管在哪个Servlet里面,获取到的这个类的对象都是同一个,它用来获取Servlet的上下文,在服务器启动的时候,会为托管的每一个web应用程序,创建一个ServletContext对象,当从服务器移除托管或者是关闭服务器时,ServletContext将会被销毁。它主要有以下几方面作用:
- 获取全局配置参数
- 获取web工程中的资源
- 在servlet间共享数据域对象
4.6.1、获取全局配置参数
第一步:在web.xml中新增以下代码
usernamezhangsanpassword123456第二步:在MyHttpServlet的doGet方法中新增以下代码
protected void doGet(HttpServletRequest request, HttpServletResponse response) throws ServletException, IOException { System.out.println("doGet method invoke ..."); // 获取全部初始化名称和其对应的内容 Enumeration initParameterNames = getServletContext().getInitParameterNames(); while(initParameterNames.hasMoreElements()){ String initParameterName = initParameterNames.nextElement(); String initParameterValue = getServletContext().getInitParameter(initParameterName); System.out.println(initParameterName+":"+initParameterValue); }}第三步:重启Tomcat服务器,在浏览器中访问(http://localhost:8080/myJavaWebDemo_war_exploded/MyHttpServlet)

4.6.2、获取web工程中的资源
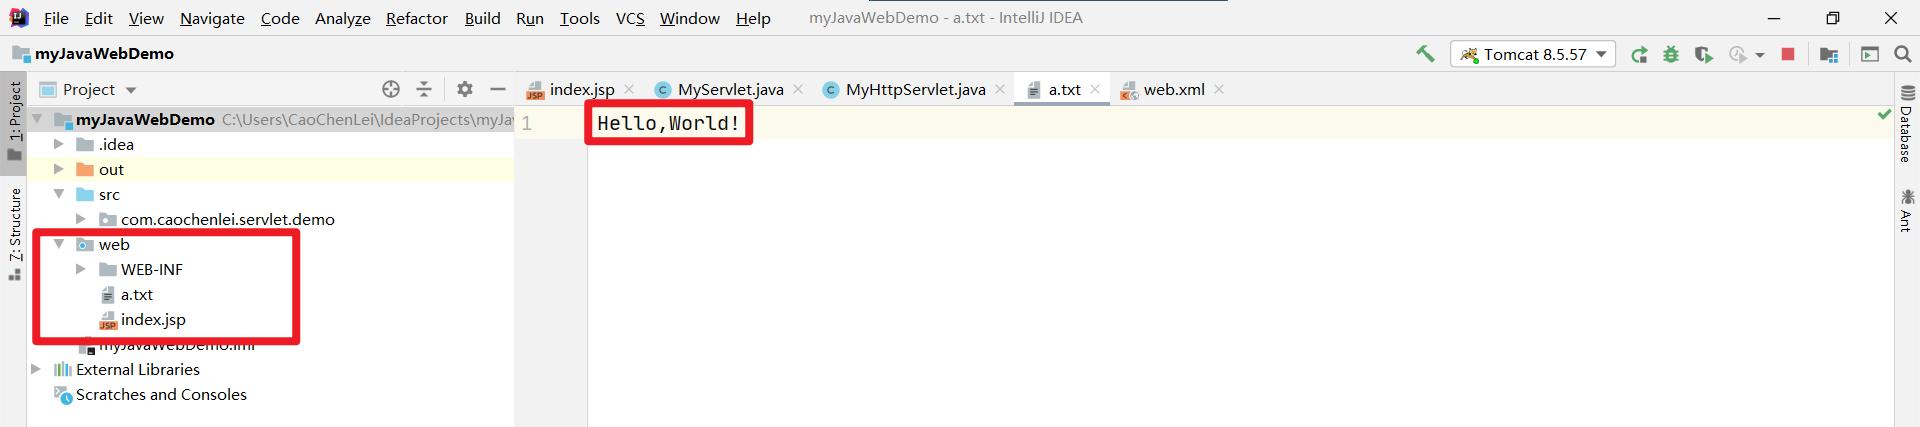
第一步:在 myJavaWebDemo 的 web 文件夹中右键创建 a.txt 文件,内容为 Hello,World!
第二步:在MyHttpServlet的doGet方法中新增以下代码
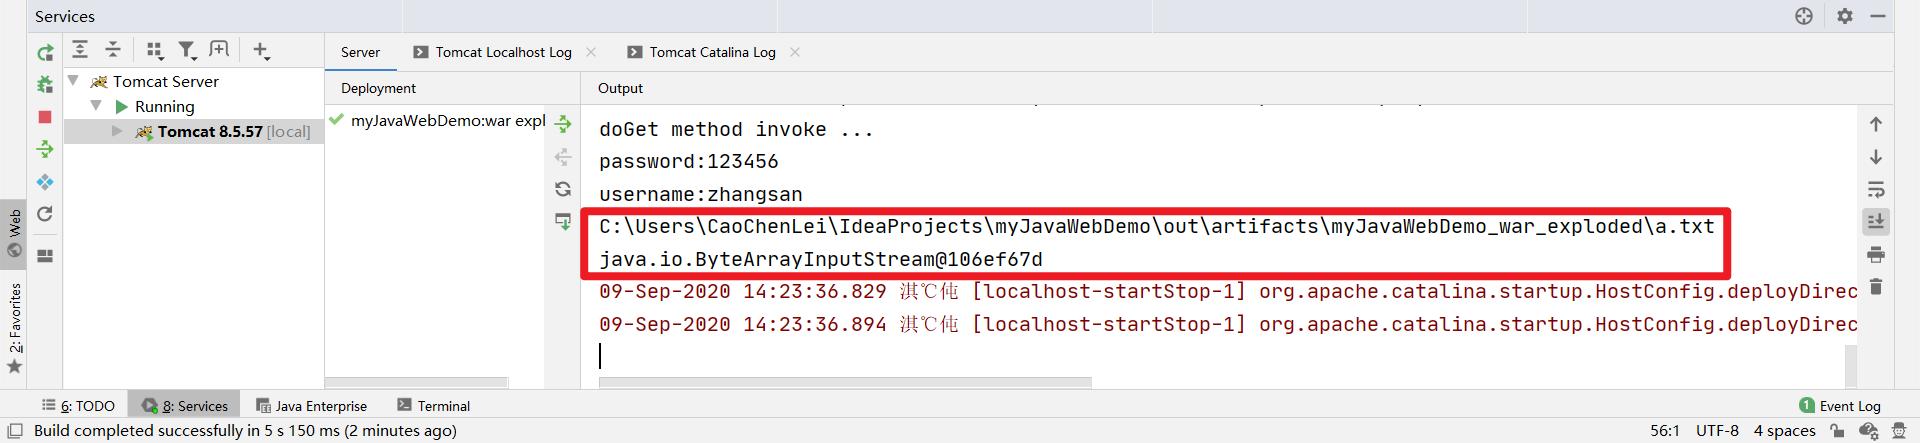
protected void doGet(HttpServletRequest request, HttpServletResponse response) throws ServletException, IOException { System.out.println("doGet method invoke ..."); // 获取全部初始化名称和其对应的内容 Enumeration initParameterNames = getServletContext().getInitParameterNames(); while (initParameterNames.hasMoreElements()) { String initParameterName = initParameterNames.nextElement(); String initParameterValue = getServletContext().getInitParameter(initParameterName); System.out.println(initParameterName + ":" + initParameterValue); } // 获取web工程中的资源的绝对路径 String realPath = getServletContext().getRealPath("a.txt"); System.out.println(realPath); // 获取web工程中的资源的输入流对象 InputStream resourceAsStream = getServletContext().getResourceAsStream("a.txt"); System.out.println(resourceAsStream);}第三步:重启Tomcat服务器,在浏览器中访问(http://localhost:8080/myJavaWebDemo_war_exploded/MyHttpServlet)
注意:当你能拿到一个文件的绝对路径或者输入流以后,就可以对它进行操作了!
4.6.3、在Servlet间共享数据域对象
第一步:创建 LoginServlet 并配置请求映射
LoginServlet
package com.caochenlei.servlet.demo;import javax.servlet.ServletException;import javax.servlet.http.HttpServlet;import javax.servlet.http.HttpServletRequest;import javax.servlet.http.HttpServletResponse;import java.io.IOException;public class LoginServlet extends HttpServlet { protected void doPost(HttpServletRequest request, HttpServletResponse response) throws ServletException, IOException { doGet(request, response); } protected void doGet(HttpServletRequest request, HttpServletResponse response) throws ServletException, IOException { }}web.xmlweb.xml
LoginServletcom.caochenlei.servlet.demo.LoginServletLoginServlet/LoginServlet第二步:在 LoginServlet的 doGet 中实现登录次数的修改,默认为1
protected void doGet(HttpServletRequest request, HttpServletResponse response) throws ServletException, IOException { // 获取当前登录次数 Integer count = (Integer) getServletContext().getAttribute("count"); // 如果当前登录为null,则设置默认值为1 if (count == null) { getServletContext().setAttribute("count", 1); } else { getServletContext().setAttribute("count", count + 1); }}第三步:在 MyHttpServlet 的 doGet 中新增以下查看代码,用于查看当前登录次数
protected void doGet(HttpServletRequest request, HttpServletResponse response) throws ServletException, IOException { System.out.println("doGet method invoke ..."); // 获取全部初始化名称和其对应的内容 Enumeration initParameterNames = getServletContext().getInitParameterNames(); while (initParameterNames.hasMoreElements()) { String initParameterName = initParameterNames.nextElement(); String initParameterValue = getServletContext().getInitParameter(initParameterName); System.out.println(initParameterName + ":" + initParameterValue); } // 获取web工程中的资源的绝对路径 String realPath = getServletContext().getRealPath("a.txt"); System.out.println(realPath); // 获取web工程中的资源的输入流对象 InputStream resourceAsStream = getServletContext().getResourceAsStream("a.txt"); System.out.println(resourceAsStream); // 查看当前网站登录次数,这个数据是保存在ServletContext中的 Integer count = (Integer) getServletContext().getAttribute("count"); // 判断是否登录过,如果没有登录过,提示未登录,如果已经登录过,显示登录次数 if (count == null) { response.getWriter().write("no login!"); } else { response.getWriter().write("count:" + count); }}第四步:重启Tomcat服务器
在浏览器中访问(http://localhost:8080/myJavaWebDemo_war_exploded/MyHttpServlet),查看是否登录

在浏览器中访问(http://localhost:8080/myJavaWebDemo_war_exploded/LoginServlet),模拟登录场景

在浏览器中访问(http://localhost:8080/myJavaWebDemo_war_exploded/MyHttpServlet),查看登录次数

4.7、ServletConfig
通过ServletConfig对象可以获取servlet在配置的时候一些信息。
第一步:创建类(HelloServlet)
package com.caochenlei.servlet.demo;import javax.servlet.ServletException;import javax.servlet.http.HttpServlet;import javax.servlet.http.HttpServletRequest;import javax.servlet.http.HttpServletResponse;import java.io.IOException;public class HelloServlet extends HttpServlet { protected void doPost(HttpServletRequest request, HttpServletResponse response) throws ServletException, IOException { } protected void doGet(HttpServletRequest request, HttpServletResponse response) throws ServletException, IOException { }}第二步:在web.xml中配置映射关系
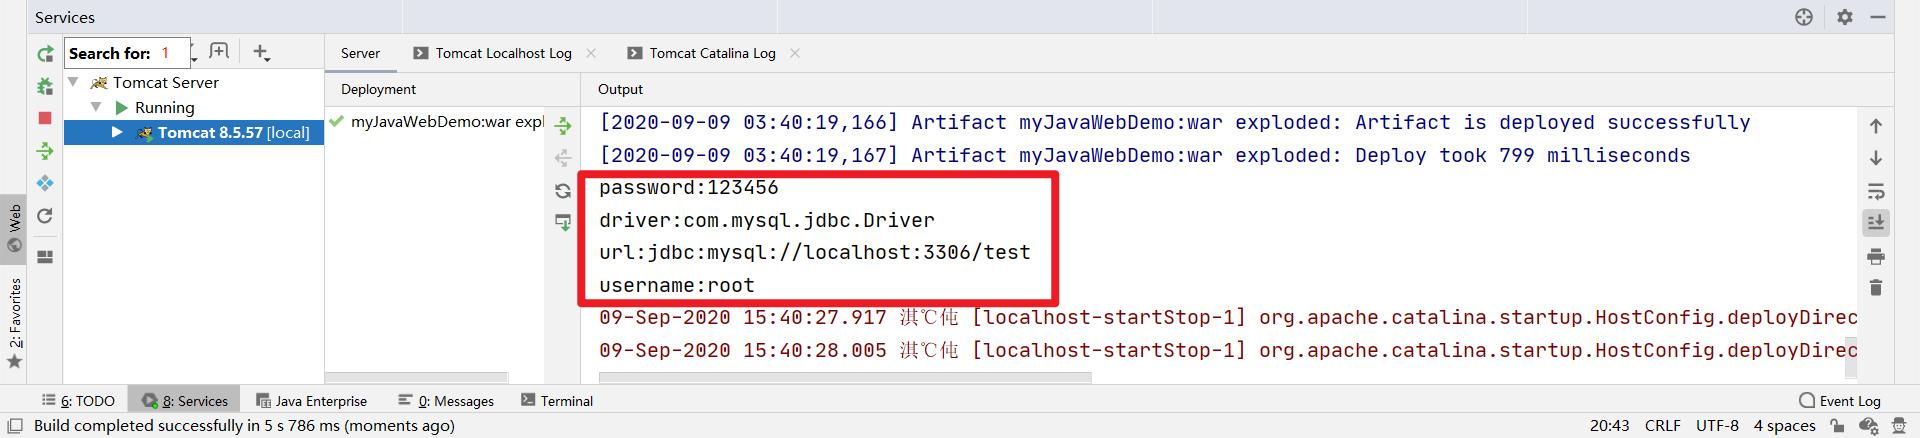
HelloServletcom.caochenlei.servlet.demo.HelloServletdrivercom.mysql.jdbc.Driverurljdbc:mysql://localhost:3306/testusernamerootpassword1234562HelloServlet/HelloServlet第三步:在HelloServlet的doGet方法中新增以下代码
protected void doGet(HttpServletRequest request, HttpServletResponse response) throws ServletException, IOException { Enumeration initParameterNames = getServletConfig().getInitParameterNames(); while (initParameterNames.hasMoreElements()) { String initParameterName = initParameterNames.nextElement(); String initParameterValue = getServletConfig().getInitParameter(initParameterName); System.out.println(initParameterName + ":" + initParameterValue); }}第四步:重启Tomcat服务器,在浏览器中访问(http://localhost:8080/myJavaWebDemo_war_exploded/HelloServlet)
4.8、HttpServletRequest
HttpServletRequest这个对象封装了客户端提交过来的一切数据。
第一步:修改 index.jsp
    账户:
    密码:
第二步:创建类(RegisterServlet)
package com.caochenlei.servlet.demo;import javafx.print.Collation;import javax.servlet.ServletException;import javax.servlet.http.HttpServlet;import javax.servlet.http.HttpServletRequest;import javax.servlet.http.HttpServletResponse;import java.io.IOException;import java.util.*;public class RegisterServlet extends HttpServlet { protected void doPost(HttpServletRequest request, HttpServletResponse response) throws ServletException, IOException { doGet(request, response); } protected void doGet(HttpServletRequest request, HttpServletResponse response) throws ServletException, IOException { // 获取客户端传递过来的头部信息 Enumeration headerNames = request.getHeaderNames(); while (headerNames.hasMoreElements()) { String headerName = headerNames.nextElement(); String headerValue = request.getHeader(headerName); System.out.println(headerName + ":" + headerValue); } System.out.println("===================="); // 获取客户端传递过来的参数信息 Enumeration parameterNames = request.getParameterNames(); while (parameterNames.hasMoreElements()) { String parameterName = parameterNames.nextElement(); String parameterValue = request.getParameter(parameterName); // 如果值有多个请使用:request.getParameterValues(parameterName) System.out.println(parameterName + ":" + parameterValue); } System.out.println("===================="); // 以Map集合的形式获取客户端传递过来的参数信息 Map parameterMap = request.getParameterMap(); Set names = parameterMap.keySet(); for (String name : names) { String[] value = parameterMap.get(name); System.out.println(name + ":" + Arrays.toString(value)); } System.out.println("===================="); // 获取一些其它地址、查询等信息 StringBuffer requestURL = request.getRequestURL(); String requestURI = request.getRequestURI(); String servletPath = request.getServletPath(); String queryString = request.getQueryString(); System.out.println("requestURL:" + requestURL); System.out.println("requestURI:" + requestURI); System.out.println("servletPath:" + servletPath); System.out.println("queryString:" + queryString); }}第三步:在web.xml中新增映射信息
RegisterServletcom.caochenlei.servlet.demo.RegisterServletRegisterServlet/RegisterServlet第四步:重启Tomcat服务器,在浏览器中访问(http://localhost:8080/myJavaWebDemo_war_exploded/)
在表单输入数据,然后点击提交

查看IDEA的控制台信息
host:localhost:8080connection:keep-aliveupgrade-insecure-requests:1user-agent:Mozilla/5.0 (Windows NT 10.0; Win64; x64) AppleWebKit/537.36 (KHTML, like Gecko) Chrome/85.0.4183.83 Safari/537.36accept:text/html,application/xhtml+xml,application/xml;q=0.9,image/avif,image/webp,image/apng,*/*;q=0.8,application/signed-exchange;v=b3;q=0.9sec-fetch-site:same-originsec-fetch-mode:navigatesec-fetch-user:?1sec-fetch-dest:documentreferer:http://localhost:8080/myJavaWebDemo_war_exploded/accept-encoding:gzip, deflate, braccept-language:zh-CN,zh;q=0.9cookie:JSESSIONID=4342FA7CB5F51C5E4A5251E485E36E38====================username:zhangsanpassword:123456====================username:[zhangsan]password:[123456]====================requestURL:http://localhost:8080/myJavaWebDemo_war_exploded/RegisterServletrequestURI:/myJavaWebDemo_war_exploded/RegisterServletservletPath:/RegisterServletqueryString:username=zhangsan&password=123456如何解决请求数据中文乱码问题?
- GET方式
// 先用原来的编码解码再用UTF—8重新编码。String newUsername = new String(username.getBytes("ISO-8859-1"), "UTF-8");- POST方式
// 这行设置一定要写在getParameter之前。request.setCharacterEncoding("UTF-8");