在WPF中,微软把数据绑定放到了非常重要的位置。
数据绑定是将数据从后台代码输送到界面层的首选方法。当然,你也可以通过设置控件的属性或者通过一个循环将数据项填充到ListBox的方法来显示数据,但是,在数据源和目标界面元件之间建立一个绑定的方式是最纯净的。
控件绑定到另一个控件的属性
<Window x:Class="数据绑定.MainWindow"
        xmlns="http://schemas.microsoft.com/winfx/2006/xaml/presentation"
        xmlns:x="http://schemas.microsoft.com/winfx/2006/xaml"
        xmlns:d="http://schemas.microsoft.com/expression/blend/2008"
        xmlns:mc="http://schemas.openxmlformats.org/markup-compatibility/2006"
        xmlns:local="clr-namespace:数据绑定"
        mc:Ignorable="d"
        Title="MainWindow" Height="110" Width="300">
    <StackPanel Margin="10">
        <TextBox Name="txtValue" />
        <WrapPanel Margin="0,10">
            <TextBlock Text="Value: " FontWeight="Bold" />
            <TextBlock Text="{Binding Path=Text, ElementName=txtValue}" />
        </WrapPanel>
    </StackPanel>
</Window>
把第三个textblock的text属性绑定到了第一个控件textbox上。
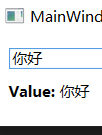
TextBox輸入文字,TextBlock會自動的更新。
在沒有使用挷定方法的時候,要做到這個功能,我們必需要監聽TextBox的事件並且在每次輸入文字時更新TextBlock。但是有了数据挷定功能之後,这个功能很容易被建立。
语法是:Binding Path=属性名,path可以省略不写。
ElementName=控件名
其含义: 绑定到某一个源上的某一个属性。
所以这样写,感觉更符合逻辑。
<TextBlock Text="{Binding ElementName=txtValue, Path=Text}" />
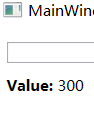
想要绑定window的属性,以上代码可以这样改写:
<Window x:Class="数据绑定.MainWindow"
        xmlns="http://schemas.microsoft.com/winfx/2006/xaml/presentation"
        xmlns:x="http://schemas.microsoft.com/winfx/2006/xaml"
        xmlns:d="http://schemas.microsoft.com/expression/blend/2008"
        xmlns:mc="http://schemas.openxmlformats.org/markup-compatibility/2006"
        xmlns:local="clr-namespace:数据绑定"
        mc:Ignorable="d"
        Title="MainWindow" Height="110" Width="300" Name="mywindow">
    <StackPanel Margin="10">
        <TextBox Name="txtValue" />
        <WrapPanel Margin="0,10">
            <TextBlock Text="Value: " FontWeight="Bold" />
            <TextBlock Text="{Binding Width,ElementName=mywindow}"  />
        </WrapPanel>
    </StackPanel>
</Window>
另外要想绑定,需要有一个源,要么用ElementName显示指定,如果不写,可以考虑用DataContext属性,它保存是绑定的默认源,默认值为null。
以上代码也可以这样写,省略ElementName=mywindow:
<Window x:Class="数据绑定.MainWindow"
        xmlns="http://schemas.microsoft.com/winfx/2006/xaml/presentation"
        xmlns:x="http://schemas.microsoft.com/winfx/2006/xaml"
        xmlns:d="http://schemas.microsoft.com/expression/blend/2008"
        xmlns:mc="http://schemas.openxmlformats.org/markup-compatibility/2006"
        xmlns:local="clr-namespace:数据绑定"
        mc:Ignorable="d"
        Title="MainWindow" Height="110" Width="300" >
    <StackPanel Margin="10">
        <TextBox Name="txtValue" />
        <WrapPanel Margin="0,10">
            <TextBlock Text="Value: " FontWeight="Bold" />
            <TextBlock Text="{Binding Width}"/>
        </WrapPanel>
    </StackPanel>
</Window>
此时绑定源需要DataContext来指定,在cs代码中
using System.Windows;

namespace 数据绑定
{
    /// <summary>
    /// MainWindow.xaml 的交互逻辑
    /// </summary>
    public partial class MainWindow : Window
    {
        public MainWindow()
        {
            InitializeComponent();
            this.DataContext = this;
        }
    }
}
使用DataContext属性, 可以节省手动命名每个源的麻烦,由于每个控件都有自己的DataContext属性,所以可以这样,比如在窗口上有一个全局DataContext,然后在一个Panel上指定一个特定的DataContext上,这个Panel所有的子控件都使用这个特定的DataContext。
DataContext既可以用代码方式来指定,也可以用xaml来指定,比如第一个示例,可以改成这样,稍显罗嗦:
<TextBlock DataContext="{Binding ElementName=txtValue}" Text="{Binding Text}"/>
控件绑定到后台变量
查了蛮久的资料,好像wpf的绑定是不能直接绑在单个变量上。
比如想绑一个整型变量,直接是做不到的,必须弄成class的形式,继承一个接口。
把整型变量做成class中的一个属性。
using System.ComponentModel;
using System.Threading;
using System.Windows;
namespace 数据绑定
{
/// <summary>
/// MainWindow.xaml 的交互逻辑
/// </summary>
public partial class MainWindow : Window
{
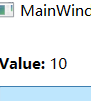
NUMBER n = new NUMBER();
public MainWindow()
{
InitializeComponent();
tb.DataContext = n;
n.Num = 10;
}
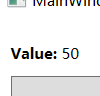
private void change(object sender, RoutedEventArgs e)
{
n.Num = 50;
}
}
class NUMBER : INotifyPropertyChanged
{
int _num;
public int Num
{
get { return _num; }
set
{
if (this._num != value)
{
this._num = value;
// 一旦执行了赋值操作说明其值被修改了,则立马通过INotifyPropertyChanged接口告诉UI
PropertyChanged?.Invoke(this, new PropertyChangedEventArgs("Num"));
}
}
}
public event PropertyChangedEventHandler PropertyChanged;
public void NotifyPropertyChanged(string propName)
{
if (this.PropertyChanged != null)
this.PropertyChanged(this, new PropertyChangedEventArgs(propName));
}
}
}
<Window x:Class="数据绑定.MainWindow"
        xmlns="http://schemas.microsoft.com/winfx/2006/xaml/presentation"
        xmlns:x="http://schemas.microsoft.com/winfx/2006/xaml"
        xmlns:d="http://schemas.microsoft.com/expression/blend/2008"
        xmlns:mc="http://schemas.openxmlformats.org/markup-compatibility/2006"
        xmlns:local="clr-namespace:数据绑定"
        mc:Ignorable="d"
        Title="MainWindow" Height="110" Width="300" >
    <StackPanel Margin="10">

        <WrapPanel Margin="0,10">
            <TextBlock Text="Value: " FontWeight="Bold" />
            <TextBlock Name="tb" Text="{Binding Num}" />

        </WrapPanel>
        <Button Click="change">改变数字</Button>
    </StackPanel>
</Window>
可见比起第一种控件绑控件,为了绑一个简单的整型变量,第二种方式复杂太多,怪不得网上还是很多人用设置控件的属性或者通过一个循环赋值来做。
微软说很简洁,我没感觉出来,唯一的好处可能是第一次写比较痛苦,每绑一个属性,那个属性就要写一次。以后用起来就简洁了吧。