一 应用场景
在x86 (Ubuntu18.04)cpu,在pytorch1.10框架下,使用detectron2模型库模型训练自己的数据集,并进行目标检测推理。
二 环境配置
我的环境是:
pytorch==1.10+cpu
torchvision==0.11.2+cpu
detectron2==0.6
opencv==4.5.5
1 基础环境配置
这里可使用conda,或者python3-venv创建虚拟环境,这里不做赘述,仅讲解基础环境搭建。
$ sudo apt-get install python3-pip git cmake make gcc g++

$ python3 -m pip intall –upgrade pip在官网(https://pytorch.org/ )根据自己的实际情况安装pytorch和torchvison

$ pip3 install torch==1.10.1+cpu torchvision==0.11.2+cpu torchaudio==0.10.1+cpu -f https://download.pytorch.org/whl/cpu/torch_stable.html
$ pip3 install opencv-python
$ pip3 install setuptools==58.2.0
2 detectron2 搭建
$ git clone https://github.com/facebookresearch/detectron2.git
$ python3 -m pip install -e detectron2
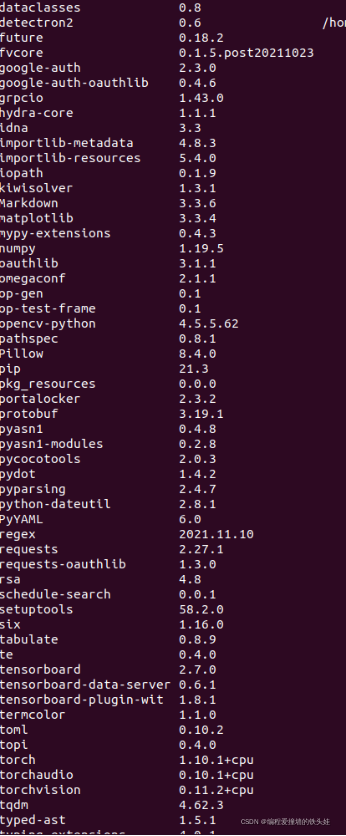
安装后,主要库版本如下:
3 demo运行测试
先在detecron2/demo文件夹,下载好测试图片,这里我下载命名为dog.jpg

运行demo
$python3 demo.py --config-file ../configs/COCO-InstanceSegmentation/mask_rcnn_R_50_FPN_3x.yaml \

--input dog.jpg –output dog_out.jpg \

--opts MODEL.DEVICE cpu MODEL.WEIGHTS detectron2://COCO-InstanceSegmentation/mask_rcnn_R_50_FPN_3x/137849600/model_final_f10217.pkl
参数解释:
–config-file 后面接配置文件,可以在detectron2/configs下找到
–input 后面接输入文件
–output 后面接预测保存图片
–opt为配置选项,后面需要加具体参数 MODEL.DEVICE 后面接设备,这里是cpu,不加这个默认cud
MODEL.WEIGHTS 后面接模型的权重
模型运行预测结果:
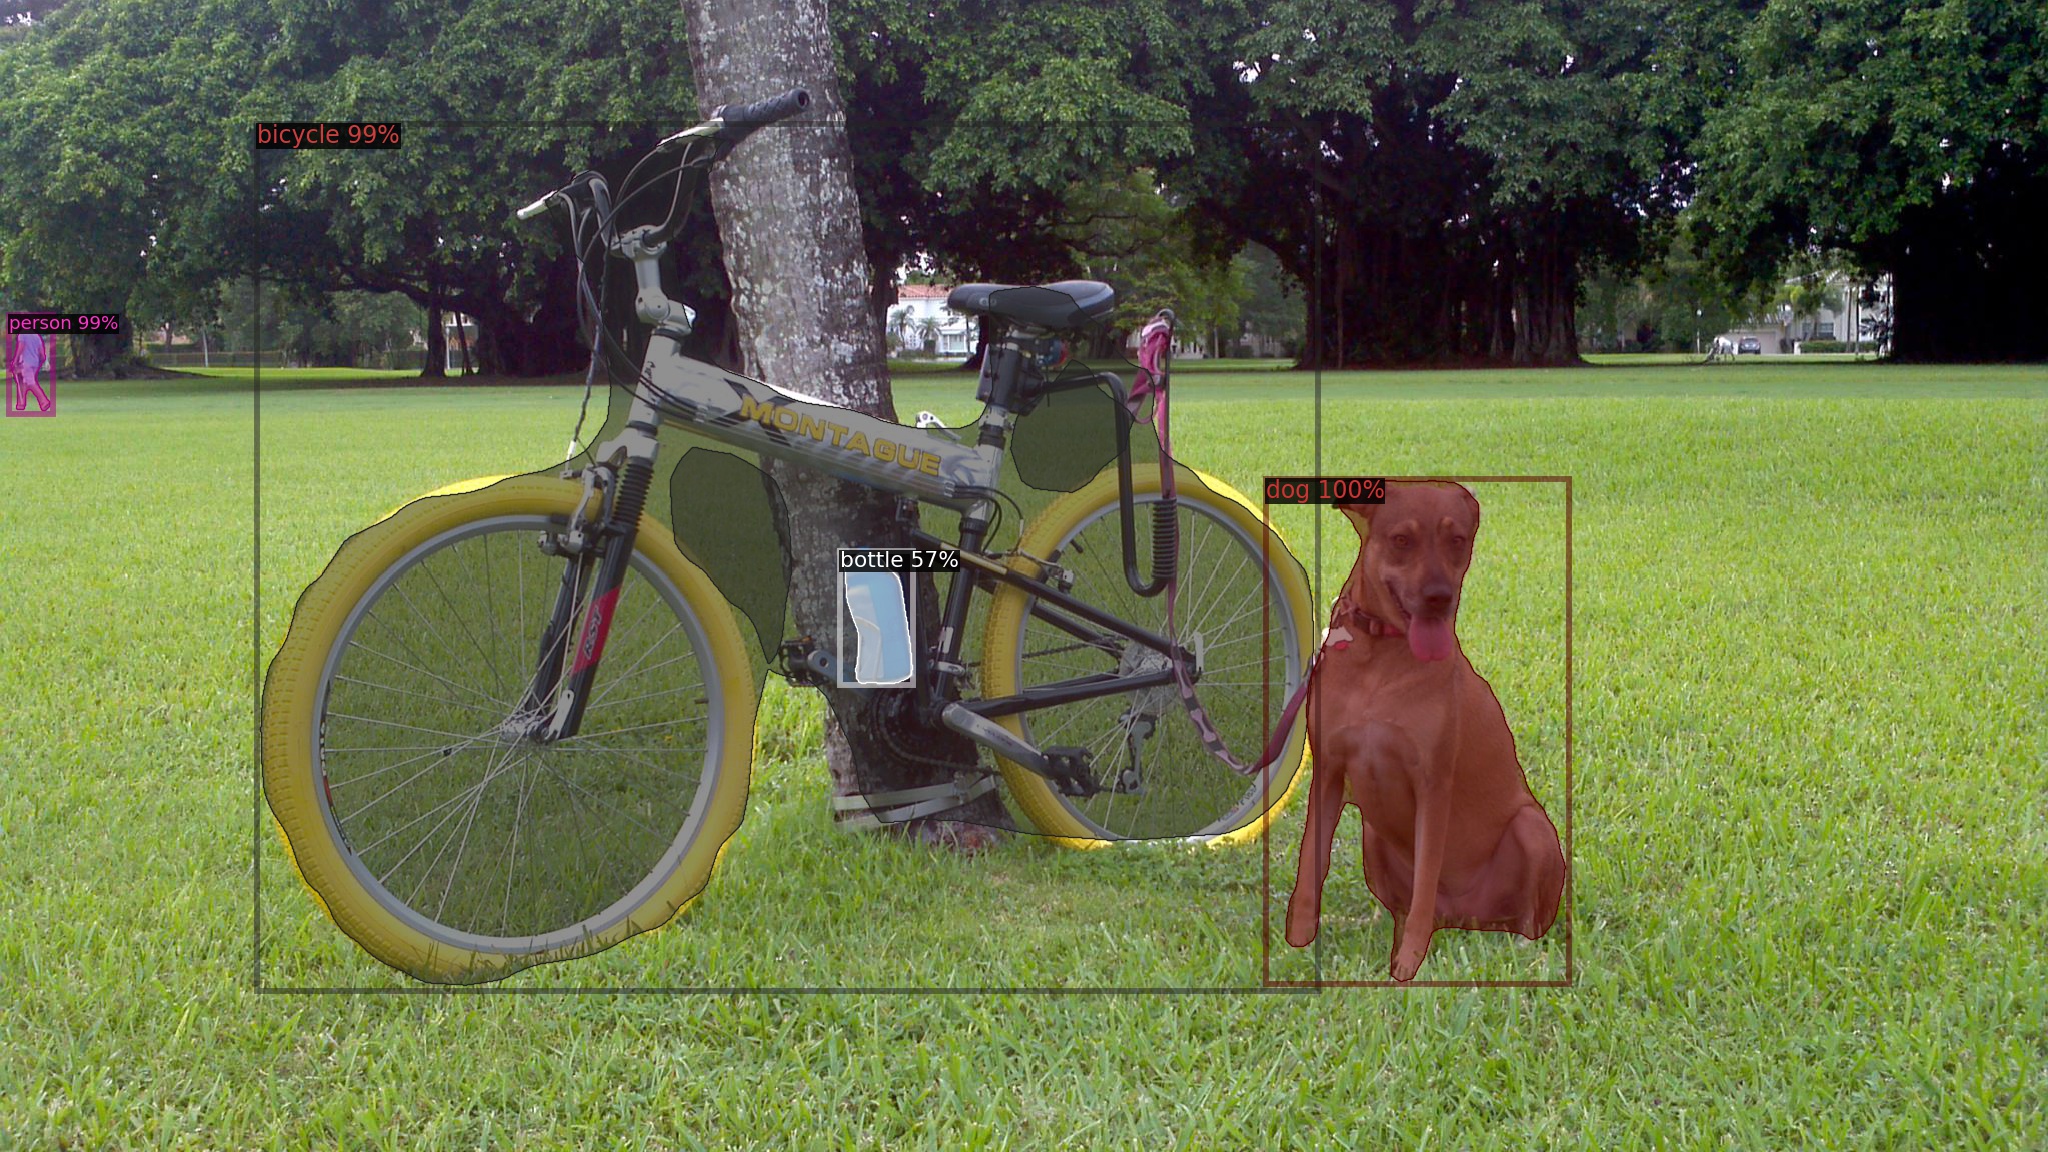
测试成功,api安装没问题,下面开始操作流程。
三 数据集准备
这里涉及到的文件操作较为复杂,请仔细阅读。这里使用labelimg数据标注工具,先将图片标注为xml文件,后转化为coco2017数据集格式
1 labelimg安装
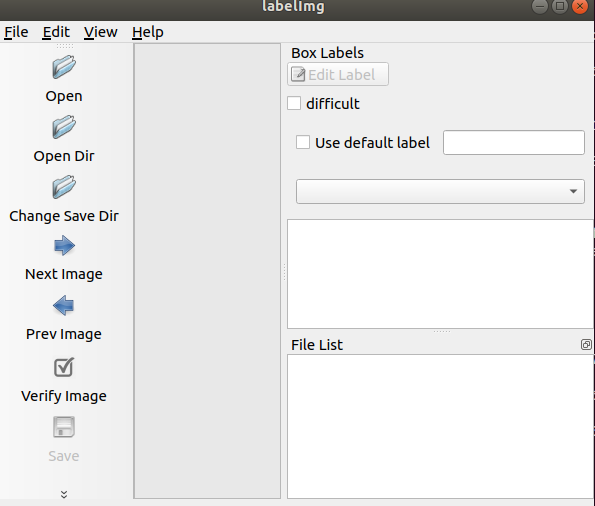
$ pip3 install labelimg打开labelimg:
2 voc数据处理
在 detectron2/datasets文件夹新建文件夹生成以下目录:
VOC2007
—-Annotations #手动创建
—-JPEGImages #手动创建
—-ImageSets #手动创建
——–Main #手动创建
—-split.py #脚本
—-train_JPEGImages #自己创建
—-val_JPEGImages #自己创建
—-val_annotations #自己创建
—-train_annotations #自己创建
mv.py #脚本
(1) 准备操作
将准备的原始图片放在JPEGImages,统一命名,类似与字母+序号。
打开labelimg,点击open dir将输入指向这里的JPEGImages
点击change save dir 将生成的xml文件指向Annotations文件夹。
确保标签格式是pascal VOC格式。
之后可以开始正常标注。
(2) 划分数据集
标注完成后,对数据集进行划分
1 生成索引文件
先运行split.py(detectron2/datasets/VOC2007/)代码如下:
import os
import random

trainval_percent = 0.2
train_percent = 0.8
xmlfilepath = 'Annotations'
txtsavepath = r'ImageSets\Main'
total_xml = os.listdir(xmlfilepath)

num = len(total_xml)
list = range(num)
tv = int(num * trainval_percent)
tr = int(tv * train_percent)
trainval = random.sample(list, tv)
train = random.sample(trainval, tr)

ftrainval = open('ImageSets/Main/trainval.txt', 'w')
ftest = open('ImageSets/Main/test.txt', 'w')
ftrain = open('ImageSets/Main/train.txt', 'w')
fval = open('ImageSets/Main/val.txt', 'w')

for i in list:
    name = total_xml[i][:-4] + '\n'
    if i in trainval:
        ftrainval.write(name)
        if i in train:
            ftest.write(name)
        else:
            fval.write(name)
    else:
        ftrain.write(name)

ftrainval.close()
ftrain.close()
fval.close()
ftest.close()
生成JPEGImages/Main下个的划分txt文件
可在脚本对应位置修改分割比。

$ python3 split.py运行成功后,会在Main几个子文件夹下生成txt文件。
2 图片标记分割
根据1中生成的索引文件,对图片,xml文件进行分割和复制
先将训练集分离出来。
对mv.py(detectron2/datasets路径下):
import os
import shutil


class CopyXml():
    def __init__(self):
        # 你的xml格式的annotation的路径
        self.xmlpath = r'VOC2007/Annotations'
        self.jpgpath = r'VOC2007/JPEGImages'
        # 你训练集/测试集xml和jpg存放的路径
        self.newxmlpath = r'VOC2007/train_annotations'
        self.newjpgpath = r'VOC2007/train_JPEGImages'
    def startcopy(self):
        filelist = os.listdir(self.path)  # file list in this directory
        # print(len(filelist))
        test_list = loadFileList()
        # print(len(test_list))
        for f in filelist:
            xmldir = os.path.join(self.xmlpath, f)
            jpgdir = os.path.join(self.jpgpath, f)

            (shotname, extension) = os.path.splitext(f)
            if str(shotname) in test_list:
                #print('success')
                shutil.copyfile(str(xmldir),os.path.join(self.newxmlpath,f))
                shutil.copyfile(str(jpgdir),os.path.join(self.newjpgpath,f))


# load the list of train/test file list
def loadFileList():
    filelist = []
    f = open("VOC2007/ImageSets/Main/train.txt", "r")
    # f = open("VOC2007/ImageSets/Main/train.txt", "r")
    lines = f.readlines()
    for line in lines:
        # 去掉文件中每行的结尾字符
        line = line.strip('\r\n')  # to remove the '\n' for test.txt, '\r\n' for tainval.txt
        line = str(line)
        filelist.append(line)
    f.close()
    # print(filelist)
    return filelist

if __name__ == '__main__':
    demo = CopyXml()
    demo.startcopy()
进行修改


后运行:
$ python 3 mv.py运行没问题会看到train_annotations train_JPEGImages文件夹下分别有同名的xml文件和jpg文件。
再将测试集分离出来
对mv.py(detectron2/datasets路径下)进行修改


后运行:
$ python 3 mv.py运行没问题会看到val_annotations val_JPEGImages文件夹下分别有同名的xml文件和jpg文件
3 coco数据集制作
在 detectron2/datasets文件夹新建文件夹生成以下目录:
coco
—-train2017 ####手动创建
—-val2017 ####手动创建
—-annotations ####手动创建
——–instances_train2017.json ####脚本生成
——–instances_val2017.json ####脚本生成
xml_json.py ####脚本
将VOC2007/train_JPEGImages和VOC2007/val_JPEGImages里的图片分别对应放在coco/train2017 ,coco/val2017 文件夹里
先生成 训练集instances_train2017.json文件
对xml_json.py(datasets路径下):
import xml.etree.ElementTree as ET
import os
import json
import collections

coco = dict()
coco['images'] = []
coco['type'] = 'instances'
coco['annotations'] = []
coco['categories'] = []

#category_set = dict()
image_set = set()
image_id = 2017000001  #train:2018xxx; val:2019xxx; test:2020xxx
category_item_id = 0
annotation_id = 0
#category_set = ['open','close',"mopen","mclose"]
category_set = ['mushroom']
'''
def addCatItem(name):
    global category_item_id
    category_item = dict()
    category_item['supercategory'] = 'none'
    category_item_id += 1
    category_item['id'] = category_item_id
    category_item['name'] = name
    coco['categories'].append(category_item)
    category_set[name] = category_item_id
    return category_item_id
'''

def addCatItem(name):
    '''
    增加json格式中的categories部分
    '''
    global category_item_id
    category_item = collections.OrderedDict()
    category_item['supercategory'] = 'none'
    category_item['id'] = category_item_id
    category_item['name'] = name
    coco['categories'].append(category_item)
    category_item_id += 1

def addImgItem(file_name, size):
    global image_id
    if file_name is None:
        raise Exception('Could not find filename tag in xml file.')
    if size['width'] is None:
        raise Exception('Could not find width tag in xml file.')
    if size['height'] is None:
        raise Exception('Could not find height tag in xml file.')
    #image_item = dict()    #按照一定的顺序,这里采用collections.OrderedDict()
    image_item = collections.OrderedDict()
    print(file_name,"*******")
    # jpg_name = os.path.splitext(file_name)[0]+'.png'
    jpg_name = file_name
    image_item['file_name'] = jpg_name
    image_item['width'] = size['width']
    image_item['height'] = size['height']
    image_item['id'] = image_id
    coco['images'].append(image_item)
    image_set.add(jpg_name)
    image_id = image_id+1
    return image_id


def addAnnoItem(object_name, image_id, category_id, bbox):
    global annotation_id
    #annotation_item = dict()
    annotation_item = collections.OrderedDict()
    annotation_item['segmentation'] = []
    seg = []
    # bbox[] is x,y,w,h
    # left_top
    seg.append(bbox[0])
    seg.append(bbox[1])
    # left_bottom
    seg.append(bbox[0])
    seg.append(bbox[1] + bbox[3])
    # right_bottom
    seg.append(bbox[0] + bbox[2])
    seg.append(bbox[1] + bbox[3])
    # right_top
    seg.append(bbox[0] + bbox[2])
    seg.append(bbox[1])
    annotation_item['segmentation'].append(seg)
    annotation_item['area'] = bbox[2] * bbox[3]
    annotation_item['iscrowd'] = 0
    annotation_item['image_id'] = image_id
    annotation_item['bbox'] = bbox
    annotation_item['category_id'] = category_id
    annotation_item['id'] = annotation_id
    annotation_item['ignore'] = 0
    annotation_id += 1
    coco['annotations'].append(annotation_item)


def parseXmlFiles(xml_path):
    xmllist = os.listdir(xml_path)
    xmllist.sort()
    for f in xmllist:
        if not f.endswith('.xml'):
            continue

        bndbox = dict()
        size = dict()
        current_image_id = None
        current_category_id = None
        file_name = None
        size['width'] = None
        size['height'] = None
        size['depth'] = None

        xml_file = os.path.join(xml_path, f)
        print(xml_file)

        tree = ET.parse(xml_file)
        root = tree.getroot() #抓根结点元素

        if root.tag != 'annotation': #根节点标签
            raise Exception('pascal voc xml root element should be annotation, rather than {}'.format(root.tag))

        # elem is <folder>, <filename>, <size>, <object>
        for elem in root:
            current_parent = elem.tag
            current_sub = None
            object_name = None

            #elem.tag, elem.attrib,elem.text
            if elem.tag == 'folder':
                continue

            if elem.tag == 'filename':
                file_name = elem.text
                if file_name in category_set:
                    raise Exception('file_name duplicated')

            # add img item only after parse <size> tag
            elif current_image_id is None and file_name is not None and size['width'] is not None:
                if file_name not in image_set:
                    current_image_id = addImgItem(file_name, size)#图片信息
                    print('add image with {} and {}'.format(file_name, size))
                else:
                    raise Exception('duplicated image: {}'.format(file_name))
                    # subelem is <width>, <height>, <depth>, <name>, <bndbox>
            for subelem in elem:
                bndbox['xmin'] = None
                bndbox['xmax'] = None
                bndbox['ymin'] = None
                bndbox['ymax'] = None

                current_sub = subelem.tag
                if current_parent == 'object' and subelem.tag == 'name':
                    object_name = subelem.text
                    #if object_name not in category_set:
                    #    current_category_id = addCatItem(object_name)
                    #else:
                    #current_category_id = category_set[object_name]
                    current_category_id = category_set.index(object_name) #index默认从0开始,但是json文件是从1开始,所以+1
                elif current_parent == 'size':
                    if size[subelem.tag] is not None:
                        raise Exception('xml structure broken at size tag.')
                    size[subelem.tag] = int(subelem.text)

                # option is <xmin>, <ymin>, <xmax>, <ymax>, when subelem is <bndbox>
                for option in subelem:
                    if current_sub == 'bndbox':
                        if bndbox[option.tag] is not None:
                            raise Exception('xml structure corrupted at bndbox tag.')
                        bndbox[option.tag] = int(option.text)

                # only after parse the <object> tag
                if bndbox['xmin'] is not None:
                    if object_name is None:
                        raise Exception('xml structure broken at bndbox tag')
                    if current_image_id is None:
                        raise Exception('xml structure broken at bndbox tag')
                    if current_category_id is None:
                        raise Exception('xml structure broken at bndbox tag')
                    bbox = []
                    # x
                    bbox.append(bndbox['xmin'])
                    # y
                    bbox.append(bndbox['ymin'])
                    # w
                    bbox.append(bndbox['xmax'] - bndbox['xmin'])
                    # h
                    bbox.append(bndbox['ymax'] - bndbox['ymin'])
                    print(
                    'add annotation with {},{},{},{}'.format(object_name, current_image_id-1, current_category_id, bbox))
                    addAnnoItem(object_name, current_image_id-1, current_category_id, bbox)
    #categories部分
    for categoryname in category_set:
        addCatItem(categoryname)


if __name__ == '__main__':
    xml_path = 'VOC2007/val_annotations'
    json_file = './coco/annotations/instances_val2017.json'

    parseXmlFiles(xml_path)
json.dump(coco, open(json_file, 'w'))
进行修改
首先是数据集类别,我这里只有mushroom

然后是xml文件和输出json文件路径

后开始运行$ python3 xml_json.py
运行成功后在coco/
annotations生成instances_train2017.json
先生成 训练集instances_val2017.json文件
对xml_json.py(datasets路径下)进行修改
首先是数据集类别,我这里只有mushroom

然后是xml文件和输出json文件路径

后开始运行$ python3 xml_json.py
运行成功后在coco/
annotations生成instances_val2017.json。
至此coco数据集制作完毕。
4 数据集测试
因为数据集比较关键,我们来测试一下我们所制作的数据集
我写了一个脚本dataset_test.py放置在detectron2文件夹下:
import os
import cv2
import logging
from collections import OrderedDict

import detectron2.utils.comm as comm
from detectron2.utils.visualizer import Visualizer
from detectron2.checkpoint import DetectionCheckpointer
from detectron2.config import get_cfg
from detectron2.data import DatasetCatalog, MetadataCatalog
from detectron2.data.datasets.coco import load_coco_json
from detectron2.engine import DefaultTrainer, default_argument_parser, default_setup, launch
from detectron2.evaluation import COCOEvaluator, verify_results
from detectron2.modeling import GeneralizedRCNNWithTTA


# 数据集路径
DATASET_ROOT = './datasets/coco'
ANN_ROOT = os.path.join(DATASET_ROOT, 'annotations')

TRAIN_PATH = os.path.join(DATASET_ROOT, 'train2017')
VAL_PATH = os.path.join(DATASET_ROOT, 'val2017')

TRAIN_JSON = os.path.join(ANN_ROOT, 'instances_train2017.json')
#VAL_JSON = os.path.join(ANN_ROOT, 'val.json')
VAL_JSON = os.path.join(ANN_ROOT, 'instances_val2017.json')

CLASS_NAMES =['mushroom']
# 数据集类别元数据
DATASET_CATEGORIES = [
    # {"name": "background", "id": 0, "isthing": 1, "color": [220, 20, 60]},
    {"name": "mushroom", "id": 0, "isthing": 1, "color": [219, 142, 185]},
]


# 数据集的子集
PREDEFINED_SPLITS_DATASET = {
    "train_2019": (TRAIN_PATH, TRAIN_JSON),
    "val_2019": (VAL_PATH, VAL_JSON),
}


def register_dataset():
    """
    purpose: register all splits of dataset with PREDEFINED_SPLITS_DATASET
    """
    for key, (image_root, json_file) in PREDEFINED_SPLITS_DATASET.items():
        register_dataset_instances(name=key,
                                   metadate=get_dataset_instances_meta(),
                                   json_file=json_file,
                                   image_root=image_root)


def get_dataset_instances_meta():
    """
    purpose: get metadata of dataset from DATASET_CATEGORIES
    return: dict[metadata]
    """
    thing_ids = [k["id"] for k in DATASET_CATEGORIES if k["isthing"] == 1]
    thing_colors = [k["color"] for k in DATASET_CATEGORIES if k["isthing"] == 1]
    # assert len(thing_ids) == 2, len(thing_ids)
    thing_dataset_id_to_contiguous_id = {k: i for i, k in enumerate(thing_ids)}
    thing_classes = [k["name"] for k in DATASET_CATEGORIES if k["isthing"] == 1]
    ret = {
        "thing_dataset_id_to_contiguous_id": thing_dataset_id_to_contiguous_id,
        "thing_classes": thing_classes,
        "thing_colors": thing_colors,
    }
    return ret


def register_dataset_instances(name, metadate, json_file, image_root):
    """
    purpose: register dataset to DatasetCatalog,
             register metadata to MetadataCatalog and set attribute
    """
    DatasetCatalog.register(name, lambda: load_coco_json(json_file, image_root, name))
    MetadataCatalog.get(name).set(json_file=json_file,
                                  image_root=image_root,
                                  evaluator_type="coco",
                                  **metadate)


# 注册数据集和元数据
def plain_register_dataset():
    DatasetCatalog.register("train_2019", lambda: load_coco_json(TRAIN_JSON, TRAIN_PATH, "train_2019"))
    MetadataCatalog.get("train_2019").set(thing_classes=CLASS_NAMES,
                                                    json_file=TRAIN_JSON,
                                                    image_root=TRAIN_PATH)
    DatasetCatalog.register("val_2019", lambda: load_coco_json(VAL_JSON, VAL_PATH, "val_2019"))
    MetadataCatalog.get("val_2019").set(thing_classes=CLASS_NAMES,
                                                json_file=VAL_JSON,
                                                image_root=VAL_PATH)


# 查看数据集标注
def checkout_dataset_annotation(name="train_2019"):
    dataset_dicts = load_coco_json(TRAIN_JSON, TRAIN_PATH, name)
    for d in dataset_dicts:
        img = cv2.imread(d["file_name"])
        visualizer = Visualizer(img[:, :, ::-1], metadata=MetadataCatalog.get(name), scale=1.5)
        vis = visualizer.draw_dataset_dict(d)
        cv2.imshow('show', vis.get_image()[:, :, ::-1])
        cv2.waitKey(0)


register_dataset()

checkout_dataset_annotation()
如果你前面的操作是完全跟我走过的,那么仅需修改dataset_test.py以下部分即可。
1 标签分类
根据你自己的分类填写,要和上面xml_json.py的顺序保持一直

2 id和颜色映射
跟上面的顺序保持一致

开始运行测试脚本
$ python3 dataset_test.py

运行成功可以抽样检查一下数据集
检查无误,数据集制作完毕。
四 模型训练
因为pytorch训练自己的数据集,涉及到数据集的注册,元数据集注册和加载,过程比较麻烦,这里我参考官方样本,写了一个脚本trainsample.py放置于model_train文件夹下。
import os
import cv2
import logging
from collections import OrderedDict

import detectron2.utils.comm as comm
from detectron2.utils.visualizer import Visualizer
from detectron2.checkpoint import DetectionCheckpointer
from detectron2.config import get_cfg
from detectron2.data import DatasetCatalog, MetadataCatalog
from detectron2.data.datasets.coco import load_coco_json
from detectron2.engine import DefaultTrainer, default_argument_parser, default_setup, launch
from detectron2.evaluation import COCOEvaluator, verify_results
from detectron2.modeling import GeneralizedRCNNWithTTA


# 数据集路径
DATASET_ROOT = '../datasets/coco'
ANN_ROOT = os.path.join(DATASET_ROOT, 'annotations')

TRAIN_PATH = os.path.join(DATASET_ROOT, 'train2017')
VAL_PATH = os.path.join(DATASET_ROOT, 'val2017')

TRAIN_JSON = os.path.join(ANN_ROOT, 'instances_train2017.json')
#VAL_JSON = os.path.join(ANN_ROOT, 'val.json')
VAL_JSON = os.path.join(ANN_ROOT, 'instances_val2017.json')

CLASS_NAMES =['mushroom']
# 数据集类别元数据
DATASET_CATEGORIES = [
    # {"name": "background", "id": 0, "isthing": 1, "color": [220, 20, 60]},
    {"name": "mushroom", "id": 0, "isthing": 1, "color": [219, 142, 185]},
]


# 数据集的子集
PREDEFINED_SPLITS_DATASET = {
    "train_2019": (TRAIN_PATH, TRAIN_JSON),
    "val_2019": (VAL_PATH, VAL_JSON),
}


def register_dataset():
    """
    purpose: register all splits of dataset with PREDEFINED_SPLITS_DATASET
    """
    for key, (image_root, json_file) in PREDEFINED_SPLITS_DATASET.items():
        register_dataset_instances(name=key,
                                   metadate=get_dataset_instances_meta(),
                                   json_file=json_file,
                                   image_root=image_root)


def get_dataset_instances_meta():
    """
    purpose: get metadata of dataset from DATASET_CATEGORIES
    return: dict[metadata]
    """
    thing_ids = [k["id"] for k in DATASET_CATEGORIES if k["isthing"] == 1]
    thing_colors = [k["color"] for k in DATASET_CATEGORIES if k["isthing"] == 1]
    # assert len(thing_ids) == 2, len(thing_ids)
    thing_dataset_id_to_contiguous_id = {k: i for i, k in enumerate(thing_ids)}
    thing_classes = [k["name"] for k in DATASET_CATEGORIES if k["isthing"] == 1]
    ret = {
        "thing_dataset_id_to_contiguous_id": thing_dataset_id_to_contiguous_id,
        "thing_classes": thing_classes,
        "thing_colors": thing_colors,
    }
    return ret


def register_dataset_instances(name, metadate, json_file, image_root):
    """
    purpose: register dataset to DatasetCatalog,
             register metadata to MetadataCatalog and set attribute
    """
    DatasetCatalog.register(name, lambda: load_coco_json(json_file, image_root, name))
    MetadataCatalog.get(name).set(json_file=json_file,
                                  image_root=image_root,
                                  evaluator_type="coco",
                                  **metadate)


# 注册数据集和元数据
def plain_register_dataset():
    DatasetCatalog.register("train_2019", lambda: load_coco_json(TRAIN_JSON, TRAIN_PATH, "train_2019"))
    MetadataCatalog.get("train_2019").set(thing_classes=CLASS_NAMES,
                                                    json_file=TRAIN_JSON,
                                                    image_root=TRAIN_PATH)
    DatasetCatalog.register("val_2019", lambda: load_coco_json(VAL_JSON, VAL_PATH, "val_2019"))
    MetadataCatalog.get("val_2019").set(thing_classes=CLASS_NAMES,
                                                json_file=VAL_JSON,
                                                image_root=VAL_PATH)


class Trainer(DefaultTrainer):
    @classmethod
    def build_evaluator(cls, cfg, dataset_name, output_folder=None):
        if output_folder is None:
            output_folder = os.path.join(cfg.OUTPUT_DIR, "inference")
        return COCOEvaluator(dataset_name, cfg, distributed=False, output_dir=output_folder)

    @classmethod
    def test_with_TTA(cls, cfg, model):
        logger = logging.getLogger("detectron2.trainer")
        # In the end of training, run an evaluation with TTA
        # Only support some R-CNN models.
        logger.info("Running inference with test-time augmentation ...")
        model = GeneralizedRCNNWithTTA(cfg, model)
        evaluators = [
            cls.build_evaluator(
                cfg, name, output_folder=os.path.join(cfg.OUTPUT_DIR, "inference_TTA")
            )
            for name in cfg.DATASETS.TEST
        ]
        res = cls.test(cfg, model, evaluators)
        res = OrderedDict({k + "_TTA": v for k, v in res.items()})
        return res


def setup(args):
    """
    Create configs and perform basic setups.
    """
    cfg = get_cfg() # 拷贝default config副本
    args.config_file = "./config.yaml"
    cfg.merge_from_file(args.config_file)   # 从config file 覆盖配置
    cfg.merge_from_list(args.opts)          # 从CLI参数 覆盖配置

    # 更改配置参数
    cfg.DATASETS.TRAIN = ("train_2019",)
    cfg.DATASETS.TEST = ("val_2019",)
    cfg.DATALOADER.NUM_WORKERS = 2 # 单线程
    # cfg.INPUT.MAX_SIZE_TRAIN = 400
    # cfg.INPUT.MAX_SIZE_TEST = 400
    # cfg.INPUT.MIN_SIZE_TRAIN = (160,)
    # cfg.INPUT.MIN_SIZE_TEST = 160
    cfg.MODEL.DEVICE = 'cpu'
    cfg.MODEL.ROI_HEADS.NUM_CLASSES = 1# 类别数
    cfg.MODEL.WEIGHTS = "./model_final.pth"    # 预训练模型权重
    cfg.SOLVER.IMS_PER_BATCH = 6 # batch_size=2; iters_in_one_epoch = dataset_imgs/batch_size
    ITERS_IN_ONE_EPOCH = int(118/ cfg.SOLVER.IMS_PER_BATCH)
    # (ITERS_IN_ONE_EPOCH * ) - 1 # 12 epochs
    cfg.SOLVER.MAX_ITER = 640
    cfg.SOLVER.BASE_LR = 0.002
    cfg.SOLVER.MOMENTUM = 0.9
    cfg.SOLVER.WEIGHT_DECAY = 0.0001
    cfg.SOLVER.WEIGHT_DECAY_NORM = 0.0
    cfg.SOLVER.GAMMA = 0.1
    cfg.SOLVER.STEPS = (500,)
    cfg.SOLVER.WARMUP_FACTOR = 1.0 / 1000
    cfg.SOLVER.WARMUP_ITERS = 300
    cfg.SOLVER.WARMUP_METHOD = "linear"
    cfg.SOLVER.CHECKPOINT_PERIOD = ITERS_IN_ONE_EPOCH - 1
    cfg.OUTPUT_DIR = "./output_trainsample/"
    cfg.freeze()
    default_setup(cfg, args)
    return cfg


def main(args):
    cfg = setup(args)
    print(cfg)

    # 注册数据集
    register_dataset()

    if args.eval_only:
        model = Trainer.build_model(cfg)
        DetectionCheckpointer(model, save_dir=cfg.OUTPUT_DIR).resume_or_load(
            cfg.MODEL.WEIGHTS, resume=args.resume
        )
        res = Trainer.test(cfg, model)
        if comm.is_main_process():
            verify_results(cfg, res)
        return res

    trainer = Trainer(cfg)
    trainer.resume_or_load(resume=args.resume)
    return trainer.train()


if __name__ == "__main__":
    args = default_argument_parser().parse_args()
    print("Command Line Args:", args)
    launch(
        main,
        args.num_gpus,
        num_machines=args.num_machines,
        machine_rank=args.machine_rank,
        dist_url=args.dist_url,
        args=(args,),
    )
1训练文件修改
如果你的数据集制作过程跟我保持一致的话,仅需对trainsample.py以下地方进行修改:
1 标签分类
根据你自己的分类填写,要和上面xml_json.py的顺序保持一直

2 id和颜色映射
跟上面的顺序保持一致

3 配置文件

args.config_file = 后跟的是配置文件路径,detectron2里配置文件放在detectron2/configs

这里我要实现的是目标检测,使用COCO-Detection文件夹里的配置文件

我这里因为是多次训练后,所以使用了自己的配置文件
4 相关参数

第一项是设备,我这里是cpu,不指定cpu,默认cuda
第二项是类别数,根据你的标签类别总数修改
第三项是预训练权重 ,第一次训练可以注释掉,使用配置文件的默认权重,后面重复训练修改为你自己的权重。

cfg.SOLVER.IMS_PER_BATCH是batchsize根据你电脑性能设置
ITERS_IN_ONE_EPOCH = int(118/ cfg.SOLVER.IMS_PER_BATCH)里的118是测试集总数,所以ITERS_IN_ONE_EPOCH代表1个epoch所需要的迭代次数
cfg.SOLVER.MAX_ITER代表最大迭代次数,你可以直接设置数字,但是为了epoch次数为整数,可以等于(ITERS_IN_ONE_EPOCH * epoch次数) – 1
cfg.SOLVER.STEPS是运行步数,不大于最大迭代次数即可
cfg.OUTPUT_DIR:模型输出路径
其他部分参数,请由个人需求自行进行修改


至此训练文件配置完毕。
2 模型训练
在detectron2路径下执行
$ python3 model_train/trainsample.py
训练过程中,会在output_trainsample/生成多个中间权重
生成太多权重,可以自行清楚。
训练过程中可以打开tensorboard 查看训练损失及相关数据。
$ tensorboard --logdir output_trainsample/五 目标推理
在训练结束后,会在输出文件夹(我这里detectron2/output_trainsample文件夹)生成
config.yaml和model_final.pth,这就是我们最终获得的配置文件和权重文件。

1 推理样例
我们使用之前的demo文件,和生成的模型进行预测。
进入detectron2/demo文件夹运行
$ python demo.py --config-file ../output_trainsample/config.yaml --input mushroom2.jpg --output mushroom2_out.jpg–opts MODEL.DEVICE cpu MODEL.WEIGHTS ../output_trainsample/model_final.pth
–config-file 配置文件
–input 输入文件,如果采用文件夹/*可以输入当前文件夹的所有图片
–output 输出文件路径,如果没有,会显示在窗口上
MODEL.DEVICE设备,根据实际需求选择设备
MODEL.WEIGHTS 模型权重
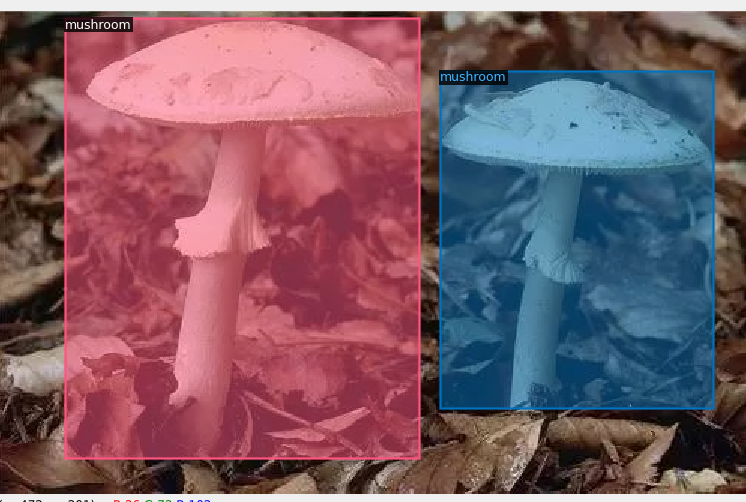
预测结果:
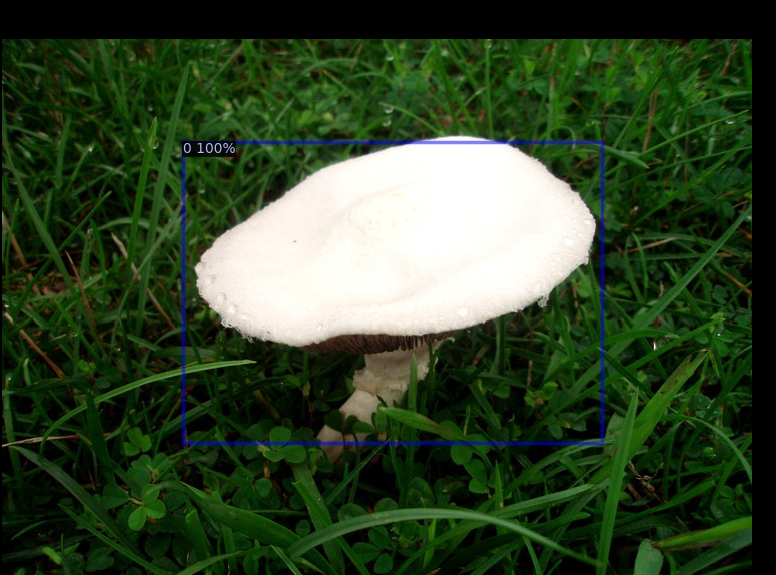
2 预测结果展示与总结
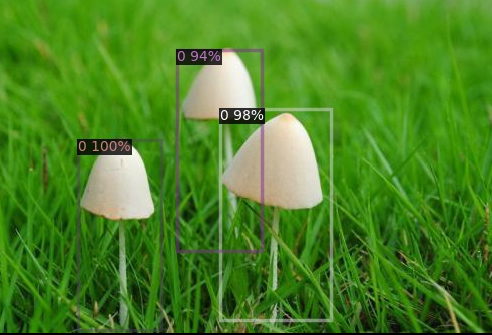
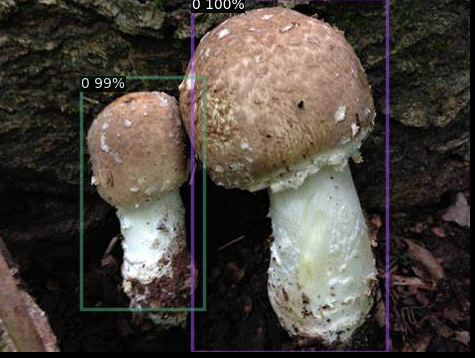
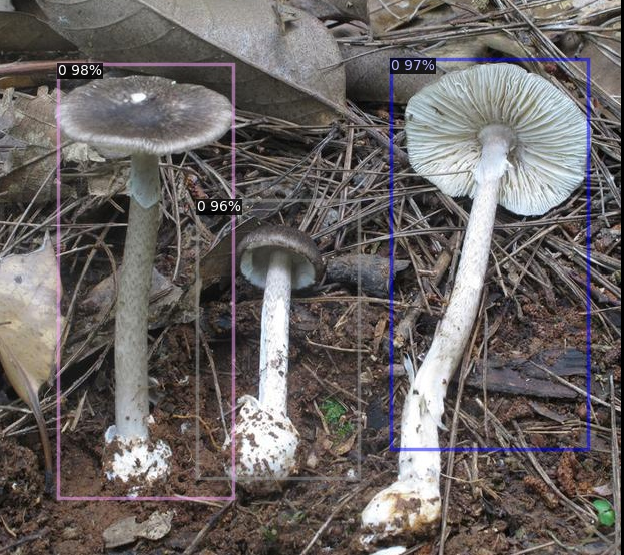
总结:训练后的模型在单目标检测和多目标目标背景差异较大的情况,推理效果良好,在多目标检测且目标背景相似度较高,容易出现检测框重复,等待后续优化修改。