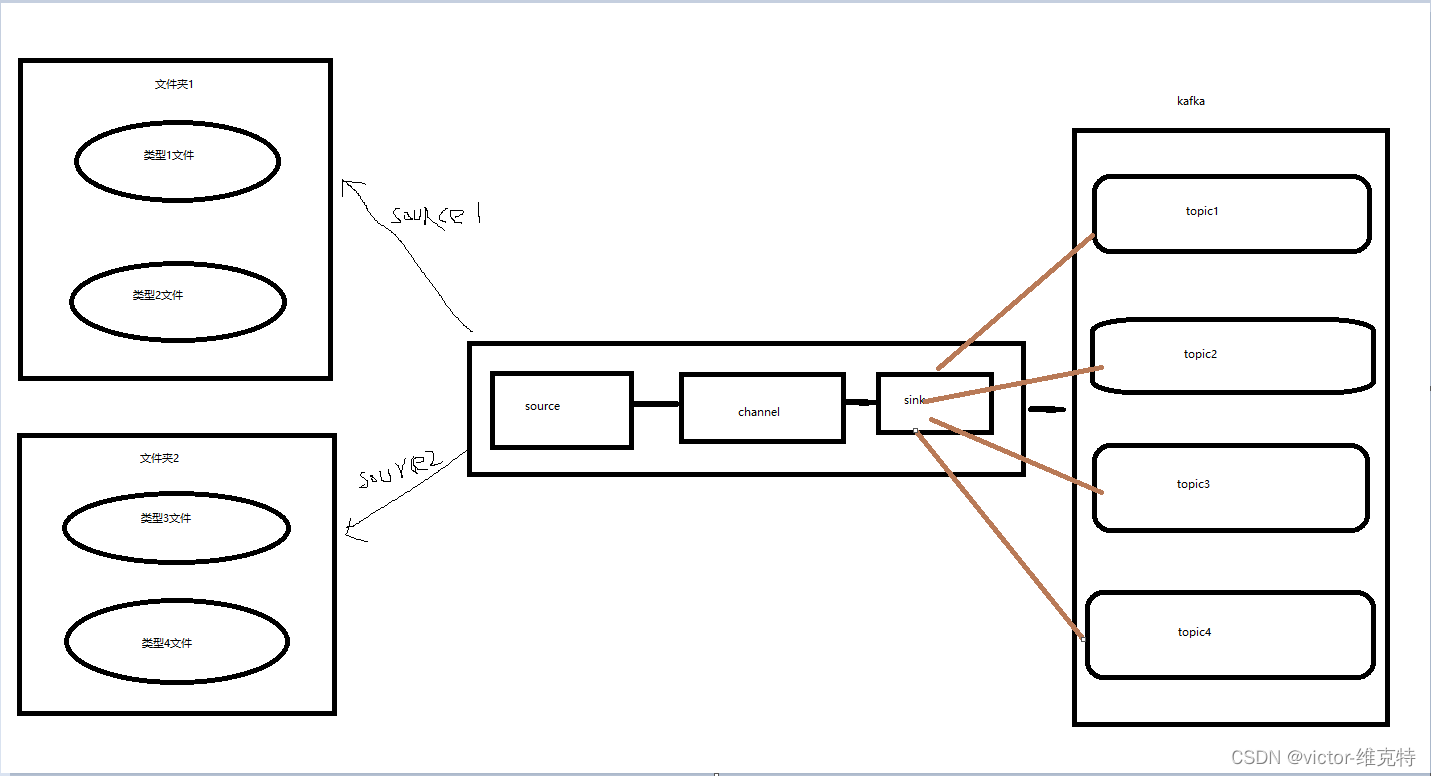
一、Flume监听多个文件目录
1. flume的环境搭建和基础配置参考
https://blog.csdn.net/qinqinde123/article/details/128130131
2. 修改配置文件flume-conf.properties
#定义两个是数据源source1、source2
agent.sources = source1 source2
agent.channels = channel1
agent.sinks = sink1

#数据源source1:监听/home/sxvbd/bigdata/flumeTestDir目录
agent.sources.source1.type = spooldir
agent.sources.source1.spoolDir = /home/sxvbd/bigdata/flumeTestDir
# 文件名带路径,header中key=filePath
agent.sources.source1.fileHeader = true
agent.sources.source1.fileHeaderKey = filePath
# 文件名不带路径,header中key=fileName
agent.sources.source1.basenameHeader = true
agent.sources.source1.basenameHeaderKey = fileName

#数据源source2:监听/home/sxvbd/bigdata/flumeTestDir/temp目录·
agent.sources.source2.type = spooldir
agent.sources.source2.spoolDir = /home/sxvbd/bigdata/flumeTestDir/temp
# 文件名带路径,header中key=filePaht
agent.sources.source2.fileHeader = true
agent.sources.source2.fileHeaderKey = filePath
# 文件名不带路径,header中key=fileName
agent.sources.source2.basenameHeader = true
agent.sources.source2.basenameHeaderKey = fileName

#定义一个channel
agent.channels.channel1.type = memory
agent.channels.channel1.capacity = 1000000
agent.channels.channel1.transactionCapacity = 10000
agent.channels.channel1.keep-alive = 60

#重写sink,根据文件名称不同,推送到不同topic中
agent.sinks.sink1.type = com.demo.flume.LogToDiffentKafkaTopic
agent.sinks.sink1.kafka.bootstrap.servers = node24:9092,node25:9092,node26:9092
agent.sinks.sink1.parseAsFlumeEvent = false

#定义source channel  sink的关系
agent.sources.source1.channels = channel1
agent.sources.source2.channels = channel1
agent.sinks.sink1.channel = channel1
二、重写Sink,根据文件名称不同,消息发送到不同的topic中
flume监听到有新文件出现的时候,会将文件内容推送到kakfa的topic中,但是如果文件夹中有不同类型的文件,直接推送到kafka的同一个topic中,如果根据内容无法区分不同类型的文件,那就需要根据文件名称来区分。flume本身根据配置无法实现,只能通过重写Sink,根据文件名称,将内容推送到kafka的不同topic。
看了一下官网的开发文档,要想自定义一个Sink也很简单,只需要继承一个抽象类 AbstractSink 和一个用于接收配置参数的接口 Configurable 即可.然后呢就需要实现两个方法一个就是public Status process() throws EventDeliveryException {}这个方法会被多次调用,反复执行,也就是通过它来实时的获取Channel流出来的数据;第二个就是public void configure(Context context) {} 这个方法主要是通过传入的这个Contex上下文对象.来个获取配置文件中的参数,一些初始化的工作可以写在这个方法里面.
1.创建springboot项目LogToDiffentKafkaTopic
2.pom.xml中引入flume相关依赖
<?xml version="1.0" encoding="UTF-8"?>
<project xmlns="http://maven.apache.org/POM/4.0.0"
         xmlns:xsi="http://www.w3.org/2001/XMLSchema-instance"
         xsi:schemaLocation="http://maven.apache.org/POM/4.0.0 http://maven.apache.org/xsd/maven-4.0.0.xsd">
    <modelVersion>4.0.0</modelVersion>

    <groupId>com.demo</groupId>
    <artifactId>flume</artifactId>
    <version>1.0</version>

    <properties>
        <maven.compiler.source>8</maven.compiler.source>
        <maven.compiler.target>8</maven.compiler.target>
        <java.version>1.8</java.version>
    </properties>

    <dependencies>
        <!--Flume 依赖-->
        <dependency>
            <groupId>org.apache.flume</groupId>
            <artifactId>flume-ng-core</artifactId>
            <version>1.9.0</version>
        </dependency>

        <dependency>
            <groupId>org.apache.flume</groupId>
            <artifactId>flume-ng-configuration</artifactId>
            <version>1.9.0</version>
        </dependency>

        <!--Kafka 依赖-->
        <dependency>
            <groupId>org.apache.kafka</groupId>
            <artifactId>kafka-clients</artifactId>
            <version>2.4.1</version>
        </dependency>

        <dependency>
            <groupId>org.apache.kafka</groupId>
            <artifactId>kafka_2.11</artifactId>
            <version>2.4.1</version>
        </dependency>

        <dependency>
            <groupId>org.slf4j</groupId>
            <artifactId>slf4j-nop</artifactId>
            <version>1.7.30</version>
        </dependency>

    </dependencies>
	<!--构建-->
    <build>
        <plugins>
            <plugin>
                <groupId>org.apache.maven.plugins</groupId>
                <artifactId>maven-compiler-plugin</artifactId>
                <configuration>
                    <source>${java.version}</source>
                    <target>${java.version}</target>
                    <encoding>UTF-8</encoding>
                </configuration>
            </plugin>
            <plugin>
                <groupId>org.springframework.boot</groupId>
                <artifactId>spring-boot-maven-plugin</artifactId>
            </plugin>
        </plugins>
    </build>

</project>
3. 创建一个类LogToDiffentKafkaTopic.java,继承自AbstractSink
public class LogToDiffentKafkaTopic extends AbstractSink implements Configurable {

    private MessageClassifier messageClassifier;

    @Override
    public Status process() throws EventDeliveryException {
        System.out.println("========>process");
        Status status = null;
        Channel channel = getChannel();
        Transaction transaction = channel.getTransaction();
        transaction.begin();
        try{
            Event event = channel.take();
            if (event == null){
                transaction.rollback();
                status = Status.BACKOFF;
                return status;
            }
            System.out.println("========>event:" + event.toString());
            //根据配置文件中定义的agent.sources.source1.basenameHeader = true和agent.sources.source1.basenameHeaderKey = fileName获取文件名称
            String fileName = event.getHeaders().get("fileName");
            byte[] body = event.getBody();
            final String msg = new String(body);
            System.out.println("========>msg:" + msg.toString());
            status = messageClassifier.startClassifier(msg, fileName) ;
            // 提交事务
            transaction.commit();
        }catch (Exception e){
            transaction.rollback();
            e.printStackTrace();
            status = Status.BACKOFF;
        }finally {
            transaction.close();
        }
        return status;
    }

    @Override
    public void configure(Context context) {
        ImmutableMap<String, String> parameters = context.getParameters();
        //启动的时候,从配置文件flume-conf.properties中读取的配置信息
        System.out.println("========>parameters: " + parameters.toString());
        Properties properties = new Properties();
        properties.put("bootstrap.servers", context.getString("kafka.bootstrap.servers", "localhost:9092"));
        properties.put("acks", context.getString("acks", "all"));
        properties.put("retries", Integer.parseInt(context.getString("retries", "0")));
        properties.put("batch.size", Integer.parseInt(context.getString("batch.size", "16384")));
        properties.put("linger.ms", Integer.parseInt(context.getString("linger.ms", "1")));
        properties.put("buffer.memory", Integer.parseInt(context.getString("buffer.memory", "33554432")));
        properties.put("key.serializer", "org.apache.kafka.common.serialization.StringSerializer");
        properties.put("value.serializer", "org.apache.kafka.common.serialization.StringSerializer");
        messageClassifier = new MessageClassifier(properties);
    }
4. 创建一个类MessageClassifier.java,继承自AbstractSink
public class MessageClassifier {

    /*文件名称中包含_CDSS_,则消息推送到data-ncm-hljk-cdss-topic*/
    private static final String HJSJ_SSSJ_CDSS = ".*_CDSS_.*";
    private static final String HJSJ_SSSJ_CDSS_TOPIC = "data-ncm-hljk-cdss-topic";

     /*文件名称中包含_FZSS_,则消息推送到data-ncm-hljk-fzss-topic*/
    private static final String HJSJ_SSSJ_FZSS = ".*_FZSS_.*";
    private static final String HJSJ_SSSJ_FZSS_TOPIC = "data-ncm-hljk-fzss-topic";

    private final KafkaProducer<String, String> producer;

    public MessageClassifier(Properties kafkaConf) {
        producer = new KafkaProducer<>(kafkaConf);
    }

    public Sink.Status startClassifier(String msg, String fileName) {
        System.out.println("===========>msg: " + msg);
        System.out.println("===========>fileName: " + fileName);
        try {
            if (Pattern.matches(HJSJ_SSSJ_CDSS, fileName)) {
                System.out.println("===========>HJSJ_SSSJ_CDSS");
                producer.send(new ProducerRecord<>(HJSJ_SSSJ_CDSS_TOPIC, msg));
            } else if (Pattern.matches(HJSJ_SSSJ_FZSS, fileName)) {
                System.out.println("===========>HJSJ_SSSJ_FZSS");
                producer.send(new ProducerRecord<>(HJSJ_SSSJ_FZSS_TOPIC, msg));
            }
        } catch (Exception e) {
            e.printStackTrace();
            System.out.println("===========>exception: " + e.getMessage());
            return Sink.Status.BACKOFF;
        }
        return Sink.Status.READY;
    }
}
5. 打jar包: flume-1.0.jar
mvn clean install -DskipTests
6. 在flume的安装目录下创建plugins.d目录
mkdir -p /home/sxvbd/bigdata/flume-1.9.0/plugins.d
7. 在plugins.d目录下创建一个目录(名字任意,例如demo)
mkdir -p /home/sxvbd/bigdata/flume-1.9.0/plugins.d/demo
8. 在demo目录下创建两个目录:lib和libext
mkdir -p /home/sxvbd/bigdata/flume-1.9.0/plugins.d/demo/lib
mkdir -p /home/sxvbd/bigdata/flume-1.9.0/plugins.d/demo/libext
9. 将jar包上传到lib目录下(libext不用管)
10. 在配置文件flume-conf.properties中配置自定义sink
#Each channel's type is defined.
agent.sinks.sink1.type = com.demo.flume.LogToDiffentKafkaTopic
agent.sinks.sink1.kafka.bootstrap.servers = node24:9092,node25:9092,node26:9092
agent.sinks.sink1.parseAsFlumeEvent = false
11.启动
nohup ../bin/flume-ng agent --conf conf -f /home/sxvbd/bigdata/flume-1.9.0/conf/flume-conf.properties -n agent -Dflume.root.logger=INFO,console > flume.log 2>&1 &
12.在对应的目录下拖入文件
目录/home/sxvbd/bigdata/flumeTestDir/和目录/home/sxvbd/bigdata/flumeTestDir/temp
13.监听kafka的topic

版权声明:本文为qinqinde123原创文章,遵循 CC 4.0 BY-SA 版权协议,转载请附上原文出处链接和本声明。