安装服务前的环境配置
例:要求网段 192.168.10.0/24
1.关闭防火墙
临时关闭: systemctl stop firewalld
开机不启动: systemctl disable firewalld
[root@localhost]systemctl stop firewalld
2.关闭selinux
临时关闭: setenforce 0
开机不启动:vi /etc/selinux/config
将参数修改为SELINUX=disabled
# This file controls the state of SELinux on the system .
# SELINUX= can take one of these three va lues :
#
enforcing——
SELinux security policy is enforced .
#
permissive——SELinux prints warnings instead of enforcing
#
disabled - No SELinux policy is loaded.
SELINUX=disabled
SELINUXTYPE= can take one of three values:
#
targeted - Targeted processes are protected ,
minimum - Modif ication of targeted policy. Only selected processes are protected .
mls - Multi Level Security protection .
SELINUXTYPE=targeted


 "/etc/sel inux/conf ig" 14L,543C
3.网络接口配置文件
/etc/sysconfig/network-scripts/目录下的
Ifcfg-eth0:第一块以太网卡的配置文件
Ifcfg-eth1:第二块以太网卡的配置网卡
TYPE网络类型
BOOTPROTO=dhcp
NAME=ens33
DEVICE=ens33
ONBOOT=yes
4.修改IP为静态IP
打开网卡配置文件:vi /etc/sysconfig/network-scripts/ifcfg-网卡名称
[root@localhost]vi /etc/sysconfig/network-scripts/ifcfg-网卡名称
添加&修改参数:
BOOTPROTO=static
ONBOOT=yes
IPADDR=
NETMASK=
GATEWAY=
TYPE -EthernetI
PROXY_ METHOD=none
BROWSER ONLY=no
BOOTPROTO=static
IPADDR-192.168.10.23
NETMASK=255.255.255.0
GATELAY=192.168.10.2
DEFROUTE=yes
IPV4_FAILURE_FATAL=no
IPV6_INIT=yes
IPV6_AUTOCONF=yes
IPV6_DEFROUTE=yes
IPV6_FAILURE_FATAL=no
IPV6_ADDRGENMODE=stable-privacy
NAME=ens33
UUID= 15987483-1d6341ec-aa7f-7d11475030fa
DEUICE=ens33
ONBOOT=yes


"/etc/sysconf ig/network scr ipts/ ifcfg-ens33" 18L, 346C
注:通信三要素的值,需要通过“虚拟网络编辑器”中的NAT配置来确认
5.配置DNS
打开DNS配置文件:vi /etc/resolv.conf
[root@localhost]vi /etc/resolv.conf
添加或者修改参数:search 值–当前主机域名,如果没有域名 则无需添加
nameserver 值—DNS服务器中的IP,虚拟机默认为自己的网关
search localdomain
nameserver 192.168.10.2

"etc/resolv.conf"
6.修改主机名
直接使用命令生效:hostname set-hostname 名字
[root@localhost]hostname zhangsan
[root@localhost]hostname
zhangsan
7.快速域名访问文件/etc/hosts
[root@localhost]vi /etc/hosts
IP地址 主机名
192.168.10.2~254 localdomain


"/etc/hosts"
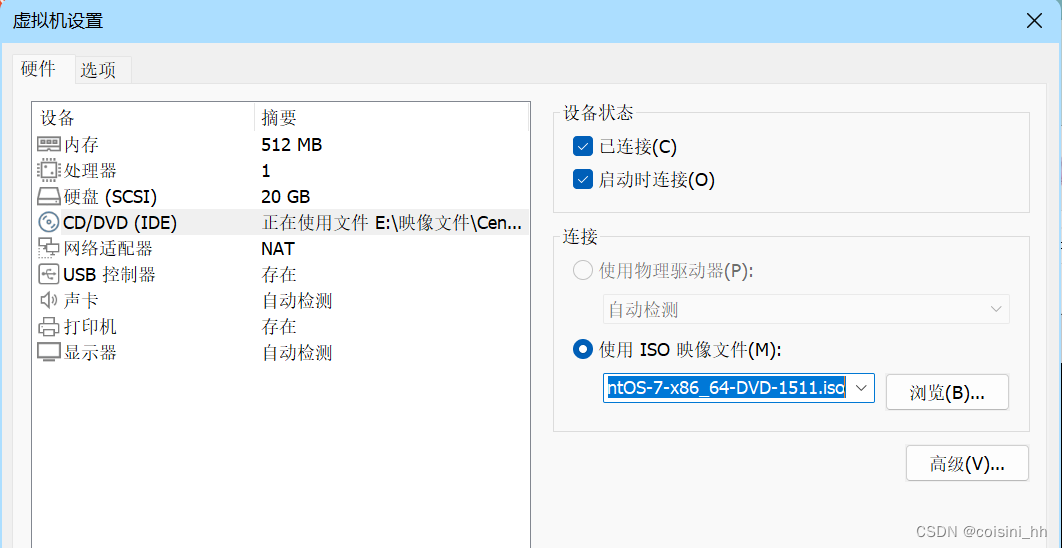
8.使用本地ISO镜像配置YUM源
第一步:添加本地镜像到光驱 设置–CD/DVD 连接状态 全部勾选,连接选择ISO镜像,找到对应镜像
第二步:备份原有网络源,再删除原有网络源
归档压缩命令 :tar -zcf 压缩包名称tar.gz 被压缩的文件或目录
注:选项z本质上是使用命令gzip完成压缩,所以需要额外安装gzip命令
解压:tar -xf 压缩包名称.tar.gz -C 解压位置
备份网络源:tar -zcf /yum.tar.gz /etc/yum.repos.d/*
删除网络源: rm -rf /etc/yum.repos.d/*
[root@localhost]tar -zcf /yum.tar.gz /etc/yum.repos.d/*
[root@localhost] rm -rf /etc/yum.repos.d/*
第三步:创建本地yum源文件
vi /etc/yum.repos.d/文件名(dvd).repo
[源标识]此文件独一无二,代表yum仓库的名字
name=centos描述语 简述仓库的软件主要是哪些部分
enabled=1代表使用,0代表禁用是否开始使用这个仓库
gpgcheck=0 1代表每个软件都检测,0代表不检测。从仓库中下载软件时,是否检测用户权限(数字标签认证)
baseurl=file:///mnt 仓库的位置(协议与路径)
[root@localhost] vi /etc/yum.repos.d/dvd.repo
[centos7]//注意不要有空格
name=centos7的镜像
enabled=1
gpgcheck=0
baseurl=filed:///mnt
第四步:挂载本地镜像到/mnt
临时挂载: mount /dev/sr0 /mnt
[root@localhost]mount /dev/sr0 /mnt
开机自动挂载:vi /etc/fstab
在最后一行添加:设备绝对路径 挂载点 文件系统类型 defaults 0 0
如: /dev/sr0 /mnt iso9660 defaults 0 0
[root@localhost]vi /etc/fstab
# /etc/fstab
# Created by anaconda on Thu Dec 1 19:10:41 2022
# Accessible filesystems, by reference, are maintained under' /dev/disk'
# See manpages fstab(5), findfs(8), mount(8) and/or blkid(8) for more info
/dev/mapper/centos -root /      xfs defaults 0 0
UUID=76b67e0d-5161-4472-8d45-36dcaa8fc911 /boot xfs defaults 0 0
dev/mapper/centos-swap swap    swap defaults 0 0
dev/sr0 /mnt iso9660 defaults 0 0


"/etc/fstab" 11L, 465C
验证文件内容是否正确: mount -a

第五步:验证yum可用
使用命令:yum repolist
[root@localhost]yum repolist

清空原有yum缓存: yum clean all
生成新的缓存: yum repolist
使用yum源做软件安装部署
检索某命令存在于那个软件包:yum -search 命令
安装软件:yum install -y 软件名
卸载软件:yum remove 软件名
软件单独安装:rpm -ivh 软件名
软件单独卸载:rpm -e 软件名
查看软件是否安装: rpm -qa | grep 软件名