前言
这段时间因工作需要,学习了ElasticSearch的相关知识。下面就自己在实践中遇到问题以及操作要点做一个总结。
一、如何启动
安装
官网 =》
Elasticsearch:官方分布式搜索和分析引擎 | Elastic
下载压缩包,解压
进入配置,修改配置,主要有两个文件需要修改。
1.
elasticsearch.yml
(里面的配置默认都是注释了的,将下面的四个配置的打开,名称可以自定义)
cluster.name: my-application

node.name: node-1

network.host: 0.0.0.0

cluster.initial_master_nodes: ["node-1"]
2.
jvm.options
(默认配置内存是1G,可以修改小点,如我修改成256m,具体根据你的机器配置)
-Xms256m
-Xmx256m
启动报错1
@VM-16-12-centos bin]$ ./elasticsearch could not find java in bundled jdk at ...
解决:上述报错并非没有装jdk,而是你从root用户切换到普通用户时,ES安装目录的所有者还是root,普通用户没有权限,因此先给非root用户授权,使用
chmod -R 组:成员 文件名
,之后再切换到该用户启动ES
启动报错2
ERROR: [1] bootstrap checks failed
[1]: max virtual memory areas vm.max_map_count [65530] is too low, increase to at least [262144]
ERROR: Elasticsearch did not exit normally - check the logs at /usr/local/ES/logs/my-application.log
[2022-10-17T16:53:35,547][INFO ][o.e.n.Node               ] [node-1] stopping ...
[2022-10-17T16:53:35,556][INFO ][o.e.n.Node               ] [node-1] stopped
[2022-10-17T16:53:35,557][INFO ][o.e.n.Node               ] [node-1] closing ...
[2022-10-17T16:53:35,581][INFO ][o.e.n.Node               ] [node-1] closed
[2022-10-17T16:53:35,583][INFO ][o.e.x.m.p.NativeController] [node-1] Native controller process has stopped - no new native processes can be started
解决:内存不足。用root身份编辑
/etc/sysctl.conf
,在里面添加一行:
vm.max_map_count=655360
保存,切换到非root用户,再次启动ES即可。
后台启动
# 下面的方式后台启动不好使
[wyp@VM-16-12-centos bin]$ nohup . elasticsearch &
[1] 25834
[wyp@VM-16-12-centos bin]$ nohup: 忽略输入并把输出追加到"nohup.out"
nohup: 无法运行命令".": 权限不够
^C
[1]+  退出 126              nohup . elasticsearch
[wyp@VM-16-12-centos bin]$ sudo  nohup . elasticsearch &
[1] 26670
[wyp@VM-16-12-centos bin]$ curl http://localhost:9200
curl: (7) Failed connect to localhost:9200; 拒绝连接

[1]+  已停止               sudo nohup . elasticsearch
[wyp@VM-16-12-centos bin]$ ps
  PID TTY          TIME CMD
24627 pts/0    00:00:00 bash
29107 pts/0    00:00:00 ps
[wyp@VM-16-12-centos bin]$ jps
30835 Jps

# 后台启动,直接在命令后面加上'-d'即可
[wyp@VM-16-12-centos bin]$ ./elasticsearch -d
[wuyanping@VM-16-12-centos bin]$ jps
806 Jps
31831 Elasticsearch
测试ES是否启动成功
格式:
[ip]:[端口]
,(get请求)
如果是云服务器,记得先去开放相应的端口。
如:http://localhost:9200,响应如下:(安装ok)
{
"name": "LIYANSHENG",
"cluster_name": "elasticsearch",
"cluster_uuid": "o7KAFPvPTA-d75SUy_TuOQ",
-"version": {
"number": "7.8.0",
"build_flavor": "default",
"build_type": "zip",
"build_hash": "757314695644ea9a1dc2fecd26d1a43856725e65",
"build_date": "2020-06-14T19:35:50.234439Z",
"build_snapshot": false,
"lucene_version": "8.5.1",
"minimum_wire_compatibility_version": "6.8.0",
"minimum_index_compatibility_version": "6.0.0-beta1"
},
"tagline": "You Know, for Search"
}
二、基本操作
创建索引(put)
格式:
[ip]:[端口]/[索引名称]
如我要创建一个”teacher”索引,往 http://localhost:9200/teacher 发送put请求即可,响应如下:
{
    "acknowledged": true,
    "shards_acknowledged": true,
    "index": "teacher"
}
如果索引已经存在了,会看到如下的响应:
{
    "error": {
        "root_cause": [
            {
                "type": "resource_already_exists_exception",
                "reason": "index [teacher/n0laWxSFQmaMYSKDF5WFhw] already exists",
                "index_uuid": "n0laWxSFQmaMYSKDF5WFhw",
                "index": "teacher"
            }
        ],
        "type": "resource_already_exists_exception",
        "reason": "index [teacher/n0laWxSFQmaMYSKDF5WFhw] already exists",
        "index_uuid": "n0laWxSFQmaMYSKDF5WFhw",
        "index": "teacher"
    },
    "status": 400
}
获取索引消息(get)
格式:
[ip]:[端口]/[索引名称]
http://localhost:9200/shop
{
     "shop": {
          "aliases": {},
          "mappings": {
               "properties": {
                    "age": {
                         "type": "long"
                    },
                    "category": {
                         "type": "text",
                         "fields": {
                              "keyword": {
                                   "type": "keyword",
                                   "ignore_above": 256
                              }
                         }
                    },
                    "images": {
                         "type": "text",
                         "fields": {
                              "keyword": {
                                   "type": "keyword",
                                   "ignore_above": 256
                              }
                         }
                    },
                    "name": {
                         "type": "text",
                         "fields": {
                              "keyword": {
                                   "type": "keyword",
                                   "ignore_above": 256
                              }
                         }
                    },
                    "price": {
                         "type": "float"
                    },
                    "title": {
                         "type": "text",
                         "fields": {
                              "keyword": {
                                   "type": "keyword",
                                   "ignore_above": 256
                              }
                         }
                    }
               }
          },
          "settings": {
               "index": {
                    "creation_date": "1663133757735",
                    "number_of_shards": "1",
                    "number_of_replicas": "1",
                    "uuid": "nbTbT1AOT2aSXAn3-uchJQ",
                    "version": {
                         "created": "7080099"
                    },
                    "provided_name": "shop"
               }
          }
     }
}
查询所有的索引(get)
格式:
[ip]:[端口]/_cat/indices?v
如:http://localhost:9200/_cat/indices?v
health status index   uuid                   pri rep docs.count docs.deleted store.size pri.store.size
yellow open   shop    -cxpw_nYQCegHFdLfmmGYg   1   1          1            0      8.5kb          8.5kb
yellow open   teacher n0laWxSFQmaMYSKDF5WFhw   1   1          0            0       208b           208b
yellow open   student nimW9qq5RMmgST1VQKbjNQ   1   1          0            0       208b           208b
创建文档(添加数据)(post)
格式:
[ip]:[端口]/[索引名称]/_doc
,数据放在body里面
如:http://localhost:9200/teacher/_doc
body的json数据:
{
    "name":"liming",
    "age":20
}
发送请求反馈:
{
    "_index": "teacher",
    "_type": "_doc",
    "_id": "u-no7YMBmUlMW95VUwbG",
    "_version": 1,
    "result": "created",
    "_shards": {
        "total": 2,
        "successful": 1,
        "failed": 0
    },
    "_seq_no": 0,
    "_primary_term": 1
}
发送数据时自定义主键(post)
格式:
[ip]:[端口]/[索引名称]/_doc/[键名称]
如:http://localhost:9200/teacher/_doc/1001 (在后面接上主键名即可,同样在body里提供要提交的数据)
根据主键查询信息(get)
格式:
[ip]:[端口]/[索引名称]/_doc/[键名称]
如:http://localhost:9200/teacher/_doc/1001
{
    "_index": "teacher",
    "_type": "_doc",
    "_id": "1001",
    "_version": 1,
    "_seq_no": 1,
    "_primary_term": 1,
    "found": true,
    "_source": {
        "name": "zhangsan",
        "age": 20
    }
}
更新文档(post)
格式:
[ip]:[端口]/[索引名称]/_doc/[键名称]
,(在body附上数据即可)
查询全部
格式:
[ip]:[端口]/[索引名称]/_search
发送get请求:http://localhost:9200/teacher/_search
{
    "took": 633,
    "timed_out": false,
    "_shards": {
        "total": 1,
        "successful": 1,
        "skipped": 0,
        "failed": 0
    },
    "hits": {
        "total": {
            "value": 2,
            "relation": "eq"
        },
        "max_score": 1.0,
        "hits": [
            {
                "_index": "teacher",
                "_type": "_doc",
                "_id": "u-no7YMBmUlMW95VUwbG",
                "_score": 1.0,
                "_source": {
                    "name": "liming",
                    "age": 20
                }
            },
            {
                "_index": "teacher",
                "_type": "_doc",
                "_id": "1001",
                "_score": 1.0,
                "_source": {
                    "name": "lisi",
                    "age": 20
                }
            }
        ]
    }
}
三、条件查询
可以直接在地址栏后接查询参数,
q=[key][value]
直接在url拼接:如 http://localhost:9200/shop/_search?q=title:苹果
{
    "took": 47,
    "timed_out": false,
    "_shards": {
        "total": 1,
        "successful": 1,
        "skipped": 0,
        "failed": 0
    },
    "hits": {
        "total": {
            "value": 1,
            "relation": "eq"
        },
        "max_score": 1.9616582,
        "hits": [
            {
                "_index": "shop",
                "_type": "_doc",
                "_id": "daDNOoMBS9TfkFcrrh5_",
                "_score": 1.9616582,
                "_source": {
                    "title": "苹果手机",
                    "category": "苹果",
                    "images": "http://www.gulixueyuan.com/xm.jpg",
                    "price": 6999.00
                }
            }
        ]
    }
}
在请求体给参数,如:
{
    "query":{
        "match":{
            "title":"华"
        }
    }
}
补充
:
查询全部也可以这样:
{
	"query":{
		"match_all":{}
	}
}
查指定字段:
{
	"query":{
		"match_all":{}
	},
	"_source":["title"]
}
分页
{
	"query":{
		"match_all":{}
	},
	"from":0,
	"size":2
}
排序
{
	"query":{
		"match_all":{}
	},
	"sort":{
		"price":{
			"order":"desc"
		}
	}
}
多条件匹配
用到
must
相当于数据库的&&,举例:
{
    "query":{
        "bool":{
            "must":[
                {
                    "match":{
                        "title":"小米手机"
                    }
                },{
				"match":{
					"price":3999.00
				}
			}
            ]
        }
    }
}
should
相当于数据库的||,如:
{
	"query":{
		"bool":{
			"should":[{
				"match":{
					"category":"小米"
				}
			},{
				"match":{
					"category":"华为"
				}
			}]
		}
	}
}
范围查询
{
    "query":{
        "filter":{
            "range":{
                "price":{
                    "gt":2000
                }
            }
        }
    }
}
匹配
半匹配:类似模糊查询,只要命中条件关键字,都给提出来
{
    "query":{
        "match":{
            "title":"手机"
        }
    }
}
完全匹配
{
	"query":{
		"match_phrase":{
			"category" : "小米"
		}
	}
}
高亮
{
    "query":{
        "match":{
            "title":"手机"
        }
    },
    "highlight":{
        "fields":{
            "title":{}   //要高亮的字段
        }
    }

}
聚合
聚合允许使用者对 es 文档进行统计分析,类似与关系型数据库中的 group by,当然还有很多其他的聚合,例如取最大值max、平均值avg等等。
{
	"aggs":{//聚合操作
		"price_group":{//名称,随意起名
			"terms":{//分组
				"field":"price"//分组字段
			}
		}
	}
}
映射关系
(就好比数据库的“表结构”)
创建数据库表需要设置字段名称,类型,长度,约束等;索引库也一样,需要知道这个类型下有哪些字段,每个字段有哪些约束信息,这就叫做映射(mapping)。
查询
http://localhost:9200/shop/_mapping ( index/ _mapping 即可)
创建
-
先创建一个索引:http://localhost:9200/stu
-
创建映射: http://localhost:9200/stu/_mapping (post请求)
{ "properties":{ "name":{ "type":"text", "index":true }, "tel":{ "type":"keyword", "index":false //查询时不能以此为关键字命中 } } } -
添加数据:http://localhost:9200/stu/_create/1005 (post)
{ "name":"liyansheng", "tel":17236723 } -
查询:http://localhost:9200/stu/_doc/1005
{
    "_index": "stu",
    "_type": "_doc",
    "_id": "1005",
    "_version": 1,
    "_seq_no": 0,
    "_primary_term": 1,
    "found": true,
    "_source": {
        "name": "liyansheng",
        "tel": 17236723
    }
}
修改
全量
同样的请求,直接覆盖原来的数据
局部
修改一条数据的局部信息(
注意
:局部修改只能用post请求完成,由于局部更新, 每次更新的结果不是相同的, 因此不是幂等性操作, 因此不支持put操作, 只支持post请求操作.)
删除
(逻辑删除)
http://localhost:9200/shop/_doc/aqCwOoMBS9TfkFcreB4E ( /index / _doc / key_name)
{
    "_index": "shop",
    "_type": "_doc",
    "_id": "aqCwOoMBS9TfkFcreB4E",
    "_version": 2,
    "result": "deleted",
    "_shards": {
        "total": 2,
        "successful": 1,
        "failed": 0
    },
    "_seq_no": 11,
    "_primary_term": 1
}
四、环境搭建
win集群
三台服务器启动:(记得修改各自的端口和服务名),三台的
elasticsearch.yml
配置如下:
node-1:
cluster.name: my-application
node.name: node-1
node.master: true
node.data: true
http.port: 9201
transport.tcp.port: 9301
http.cors.enabled: true
http.cors.allow-origin: "*"
node-2:
cluster.name: my-application
node.name: node-2
node.master: true
node.data: true
http.port: 9202
transport.tcp.port: 9302
discovery.seed_hosts: ["localhost:9301"]
discovery.zen.fd.ping_timeout: 1m
discovery.zen.fd.ping_retries: 5
http.cors.enabled: true
http.cors.allow-origin: "*"
node-3:
cluster.name: my-application
node.name: node-3
node.master: true
node.data: true
http.port: 9203
transport.tcp.port: 9303
discovery.seed_hosts: ["localhost:9301", "localhost:9302"]
discovery.zen.fd.ping_timeout: 1m
discovery.zen.fd.ping_retries: 5
http.cors.enabled: true
http.cors.allow-origin: "*"
注意
:如果你的内存不是很足,可以给es分配少一些内存,其默认是1G的,在
jvm.options
里面修改即可
默认如下:
-Xms1g
-Xmx1g
假如我要将分配内存修改为256m,如下:
-Xms256m
-Xmx256m
启动测试:

查看集群状态
http://localhost:9203/_cluster/health
{
    "cluster_name": "my-application",
    "status": "green",
    "timed_out": false,
    "number_of_nodes": 3,
    "number_of_data_nodes": 3,
    "active_primary_shards": 0,
    "active_shards": 0,
    "relocating_shards": 0,
    "initializing_shards": 0,
    "unassigned_shards": 0,
    "delayed_unassigned_shards": 0,
    "number_of_pending_tasks": 0,
    "number_of_in_flight_fetch": 0,
    "task_max_waiting_in_queue_millis": 0,
    "active_shards_percent_as_number": 100.0
}
linux集群
方式:
1.一台机器上装多个ES
2.多台机器上装多个ES
不管是哪个方式,集群操作都是差不多的。
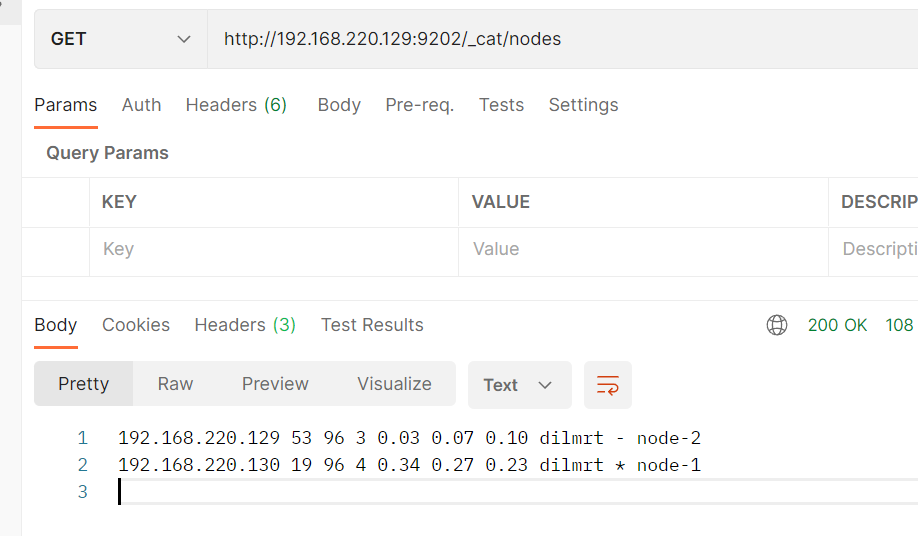
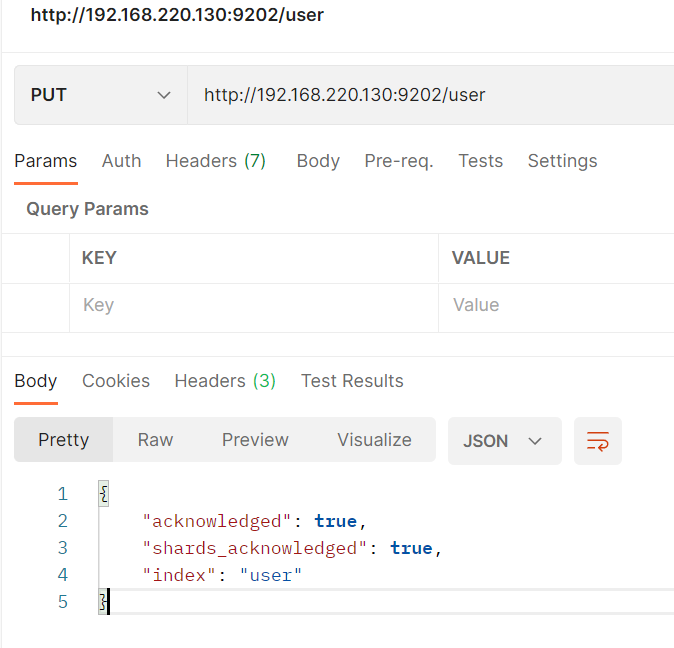
创建索引
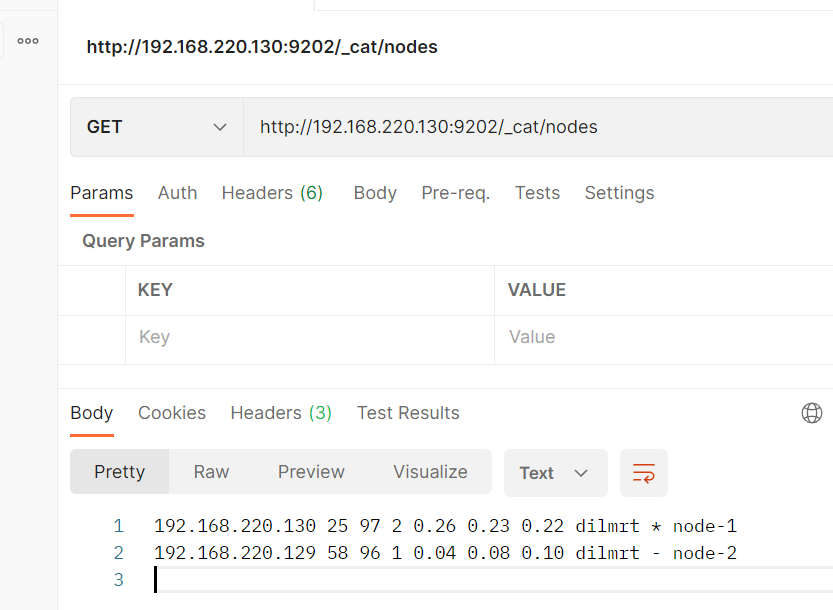
在另一个节点获取节点
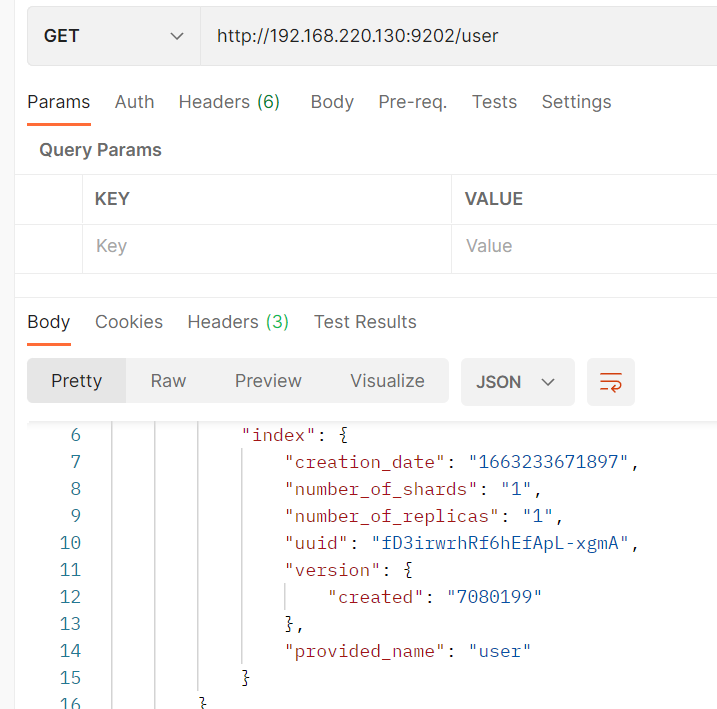
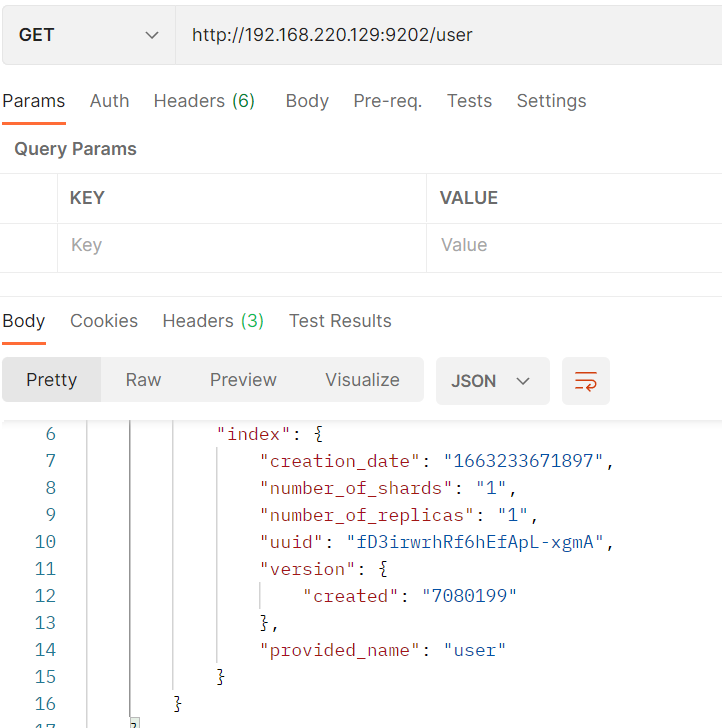
可以看出,两个节点的数据是同步的。
五、安全认证
-
进入安装目录,添加认证信息。编辑
config/elasticsearch.yml
http.cors.enabled: true http.cors.allow-origin: "*" xpack.security.enabled: true xpack.license.self_generated.type: trial -
重启es
-
根据提示依次设置elastic、apm_system、kibana、logstash_system、beats_system和remote_monitoring_user的认证密码。进入安装目录下,执行
./bin/elasticsearch-setup-passwords interactive
,按提示操作。bash-4.2$ ./elasticsearch-setup-passwords interactive Initiating the setup of passwords for reserved users elastic,apm_system,kibana,logstash_system,beats_system,remote_monitoring_user. You will be prompted to enter passwords as the process progresses. Please confirm that you would like to continue [y/N]y Enter password for [elastic]: Reenter password for [elastic]: Enter password for [apm_system]: Reenter password for [apm_system]: Passwords do not match. Try again. Enter password for [apm_system]: Reenter password for [apm_system]: Enter password for [kibana]: Reenter password for [kibana]: Enter password for [logstash_system]: Reenter password for [logstash_system]: Enter password for [beats_system]: Reenter password for [beats_system]: Enter password for [remote_monitoring_user]: Reenter password for [remote_monitoring_user]: Passwords do not match. Try again. Enter password for [remote_monitoring_user]: Reenter password for [remote_monitoring_user]: Changed password for user [apm_system] Changed password for user [kibana] Changed password for user [logstash_system] Changed password for user [beats_system] Changed password for user [remote_monitoring_user] Changed password for user [elastic] -
测试
账号密码设置后,你直接就访问不到es了,需要输入账号密码。
 curl -u elastic 192.168.220.137:9200/_cluster/health?pretty
Enter host password for user 'elastic':
或者直接在访问路径上加上密码,即可
curl elastic:elastic123@192.168.220.137:9200/_cluster/health?pretty
六、结束语
ES能够执行及合并多种类型的搜索,方式随心所变,RESTful风格的搜索和数据分析引擎,能够解决不断涌现出的各种用例。
推荐感兴趣的伙伴都来学习一下!